在基於ABP框架的前端項目Vue&Element項目中採用電子簽名的處理
- 2022 年 3 月 22 日
- 筆記
- ABP框架使用, 循序漸進VUE+Element
在前面隨筆介紹了《在基於ABP框架的前端項目Vue&Element項目中採用電子簽章處理文件和打印處理》的處理,有的時候,我們在流程中或者一些文件簽署的時候,需要簽上自己的大名,一般通過簽名表的方式(銀行很常見)實現電子簽名的處理。本篇隨筆介紹如何基於Vue &Element前端的技術實現電子簽名的處理。
1、實現電子簽名的組件
我們知道,很多常見的功能,我們都會引入對應的組件來做頁面功能,會非常簡潔方便,畢竟不用重複製造輪子。
我們在Github上可以找到很多基於Vue前端技術的界面組件,其中實現電子簽名的也有好幾個,大多數處理界面和功能差不多。
如vue-sign-canvas,它也是基於寫字或者簽名模式來實現電子簽名的處理,案例可以參考地址://langyuxiansheng.github.io/vue-sign-canvas/。
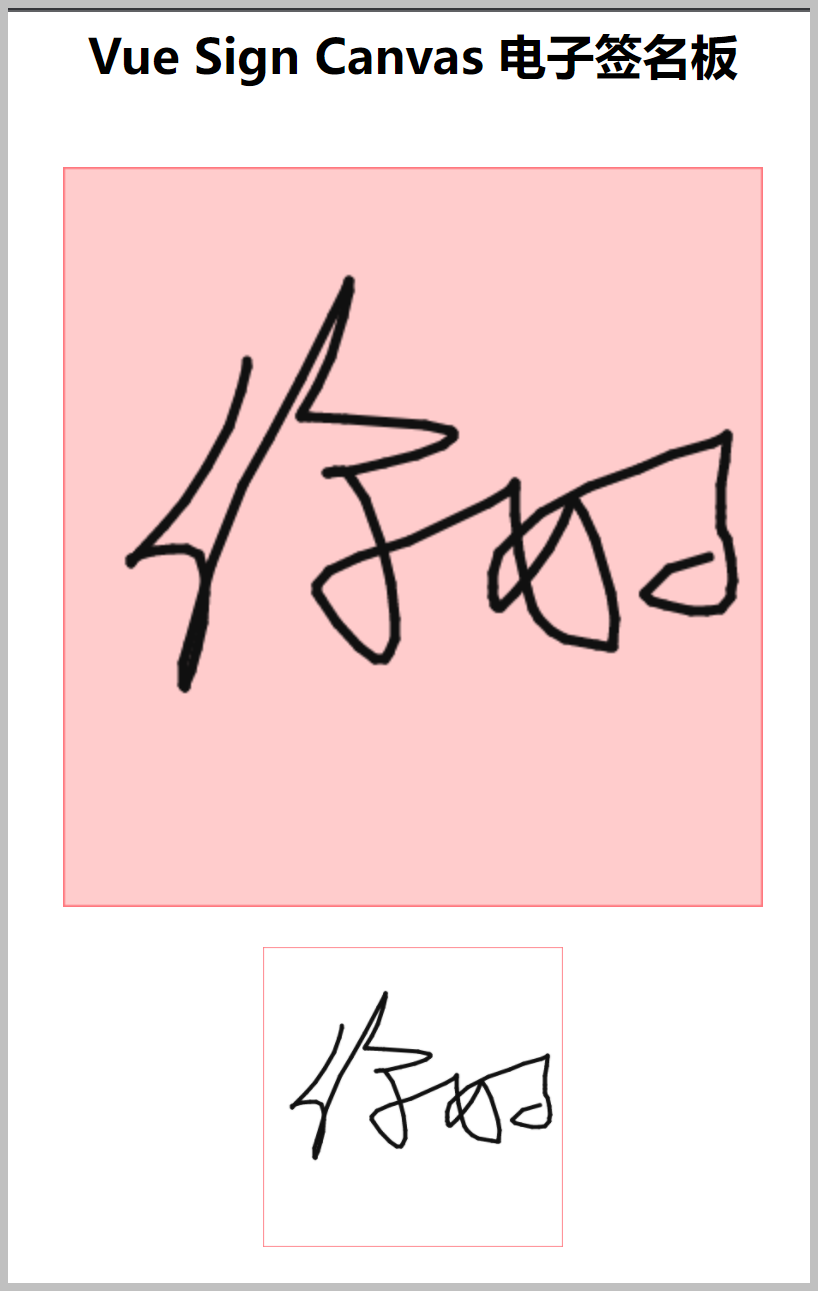
案例本身就是一個很好的例子,提供了很多配置屬性來實現不同的效果。

而vue-esign也是另一款實現個人電子簽名處理的組件,也提供了類似的功能。
npm install vue-esign --save
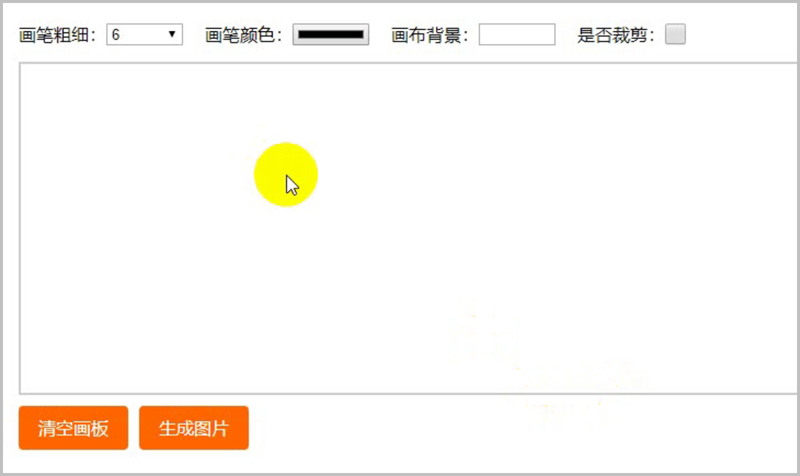
<!-- vue2 -->
<vue-esign ref="esign" :width="800" :height="300" :isCrop="isCrop" :lineWidth="lineWidth" :lineColor="lineColor" :bgColor.sync="bgColor" />
<!-- vue3 -->
<vue-esign ref="esign" :width="800" :height="300" :isCrop="isCrop" :lineWidth="lineWidth" :lineColor="lineColor" v-model:bgColor="bgColor" />

<!-- isClearBgColor為false時,不必再給bgColor加sync修飾符或v-model -->

<button @click="handleReset">清空畫板</button>
<button @click="handleGenerate">生成圖片</button>
data () {
  return {
    lineWidth: 6,
    lineColor: '#000000',
    bgColor: '',
    resultImg: '',
    isCrop: false
  }
},
methods: {
  handleReset () {
    this.$refs.esign.reset()
  },
  handleGenerate () {
    this.$refs.esign.generate().then(res => {
      this.resultImg = res
    }).catch(err => {
      alert(err) // 畫布沒有簽字時會執行這裡 'Not Signned'
    })
  }
}
界面效果如下所示。
本篇隨筆基於vue-esign來實現電子簽名處理。
2、在頁面中實現電子簽名
在頁面中引入對應的電子簽名組件
import Vue from 'vue'
import vueEsign from 'vue-esign' // 電子簽名

export default {
  name: 'Signature',
  components: {
    vueEsign
  },
在頁面HTML代碼中,放置一塊區域來實現電子簽名,引入Vue-esign組件,如下代碼所示。
  <div class="sigbut">
    <div class="tip">請在這裡簽名</div>
    <div class="left-bu">
      <el-button class="clear-bu" size="mini" @click="handleReset">清空簽名</el-button>
      <el-button class="sure" size="mini" :disabled="!showSig" @click="handleGenerate">確定簽名
      </el-button>
    </div>
  </div>
  <div class="sig">
    <vue-esign v-if="showSig" ref="esign" :width="800" :height="150" :is-crop="isCrop" :line-width="lineWidth"
      :line-color="lineColor" :bg-color.sync="bgColor" />
    <img v-if="!showSig" :src="resultImg" alt="" class="sig-img">
  </div>
  methods: {
    // 清空畫布
    handleReset () {
      this.resultImg = ''
      this.showSig = true;
      this.$nextTick(() => {
        this.$refs.esign.reset()
      })
    },
    //生成簽名圖片
    handleGenerate () {
      this.$refs.esign.generate().then(res => {
        if (res) {
          this.showSig = false;
          this.resultImg = res;
        }
      }).catch(err => {
        this.$message({
          message: '請簽名',
          type: 'warning'
        });
      })
    },
最後得到界面效果如下所示。
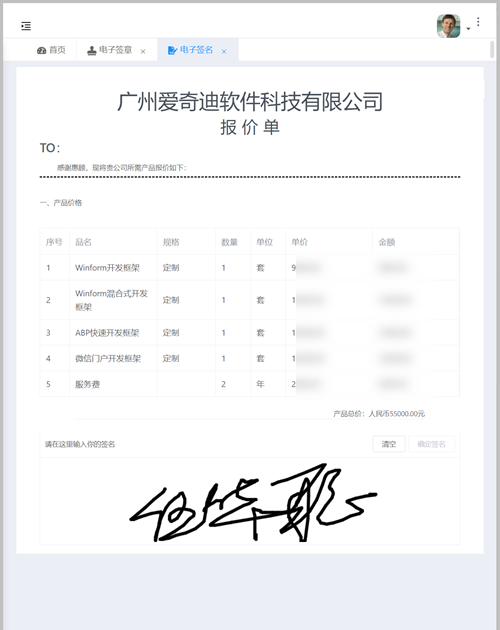
由於電腦沒有簽名筆,因此使用鼠標胡亂畫的名字,效果一般,呵呵。
如果使用簽名筆來實現模擬真實的簽名,其實和書寫效果就很接近了,因此也可以作為一般的個人簽章處理。

