Spring系列13:bean的生命周期
本文內容
- bean的完整的生命周期
- 生命周期回調接口
Aware接口詳解
Spring Bean的生命周期
面試熱題:請描述下Spring的生命周期?
4大生命周期
從源碼角度來說,簡單分為4大階段: 實例化 -> 屬性賦值 -> 初始化 -> 銷毀
- 實例化 Instantiation
- 屬性賦值 Populate
- 初始化 Initialization
- 銷毀 Destruction
實例化和屬性賦值對應構造方法和 setter 方法的注入,初始化和銷毀是用戶能自定義擴展的兩個階段。在這四步之間穿插了各種Spring提供的容器擴展點。
看下源碼實現 AbstractAutowireCapableBeanFactory#doCreateBean ,無關源碼已經省略,會保留一定的源碼的英文注釋。
protected Object doCreateBean(String beanName, RootBeanDefinition mbd, @Nullable Object[] args)
			throws BeanCreationException {

		// Instantiate the bean.
		BeanWrapper instanceWrapper = null;
		if (instanceWrapper == null) {
            // 1 實例化階段
			instanceWrapper = createBeanInstance(beanName, mbd, args);
		}

		// Initialize the bean instance.
		Object exposedObject = bean;
		try {
            // 2 屬性賦值階段
			populateBean(beanName, mbd, instanceWrapper);
            // 3 初始化階段
			exposedObject = initializeBean(beanName, exposedObject, mbd);
		}

		return exposedObject;
	}
bean銷毀階段源碼可以看下 ConfigurableApplicationContext#close(),最終每個bean會調到 DisposableBeanAdapter#destroy() 方法,比較簡單。
class DisposableBeanAdapter implements DisposableBean, Runnable, Serializable {
@Override
	public void destroy() {
		if (this.invokeDisposableBean) {
			try {
                //  1 實現DisposableBean 銷毀
				else {
					((DisposableBean) this.bean).destroy();
				}
			}
		}

		if (this.destroyMethod != null) {
            // 2 自定義銷毀方法
			invokeCustomDestroyMethod(this.destroyMethod);
		}
		else if (this.destroyMethodName != null) {
			Method methodToInvoke = determineDestroyMethod(this.destroyMethodName);
			if (methodToInvoke != null) {
				invokeCustomDestroyMethod(ClassUtils.getInterfaceMethodIfPossible(methodToInvoke));
			}
		}
	}
}
生命周期擴展點
Spring 之所以強大的原因是易擴展,生命周期相關的常用擴展點非常多。擴展點分2類:
-
作用於多個bean的增強擴展
- InstantiationAwareBeanPostProcessor 作用於實例化階段前後
- BeanPostProcessor 作用於初始化階段前後
- InstantiationAwareBeanPostProcessor 作用於銷毀階段前
-
作用於單個bean的增強擴展
-
初始化階段
3個 Aware 接口: BeanNameAware BeanClassLoaderAware BeanFactoryAware
InitializingBean 接口
自定義的初始化方法
-
銷毀階段
DisposableBean 接口
自定義的銷毀方法
-
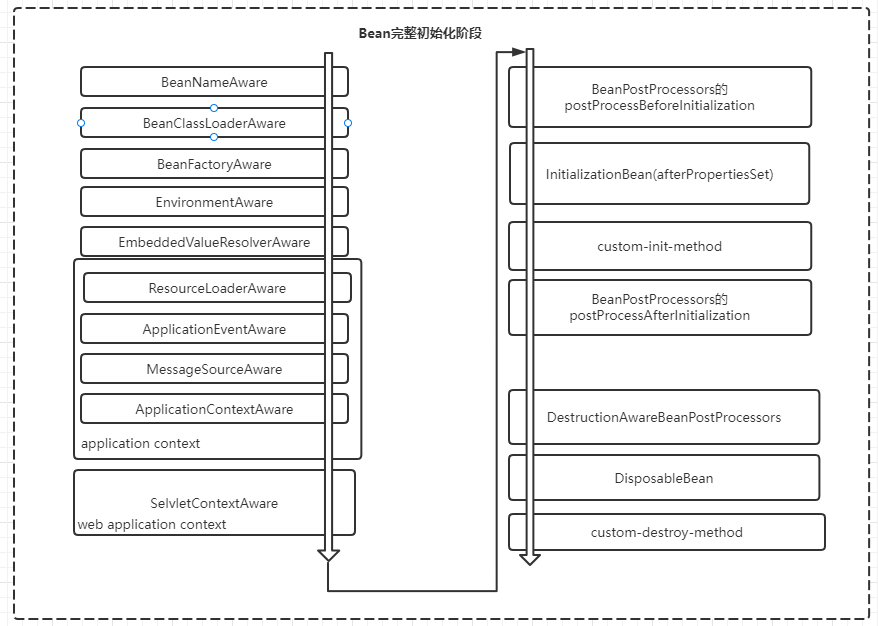
來一張匯總圖,直觀明了。

提示:
BeanNameAware BeanClassLoaderAware BeanFactoryAware是在初始化階段調用對應的接口方法設置的;而其它Aware接口如 EnvironmentAware、EmbeddedValueResolverAware、ApplicationContextAware(ResourceLoaderAware\ApplicationEventPublisherAware\MessageSourceAware)是在初始化前通過 BeanPostProcessor#postProcessBeforeInitialization() 來調用對應接口設置的。
後面有機會寫Spring源碼的時候再深入。
bean生命周期回調
挖個墳糾個錯,在Spring系列2:Spring容器基本概念和使用 中我們提到:
非常建議閱讀
BeanFactory的源碼上的注釋說明,非常的詳盡,常見的面試題:請描述下Spring的生命周期?注釋上就有非常官方的完整說明
其實此處表述有誤,準確來說如下的源碼注釋寫的是完整的生命周期回調,局限於bean的初始化階段和銷毀階段。完整bean的生命周期看上一小節的分析。
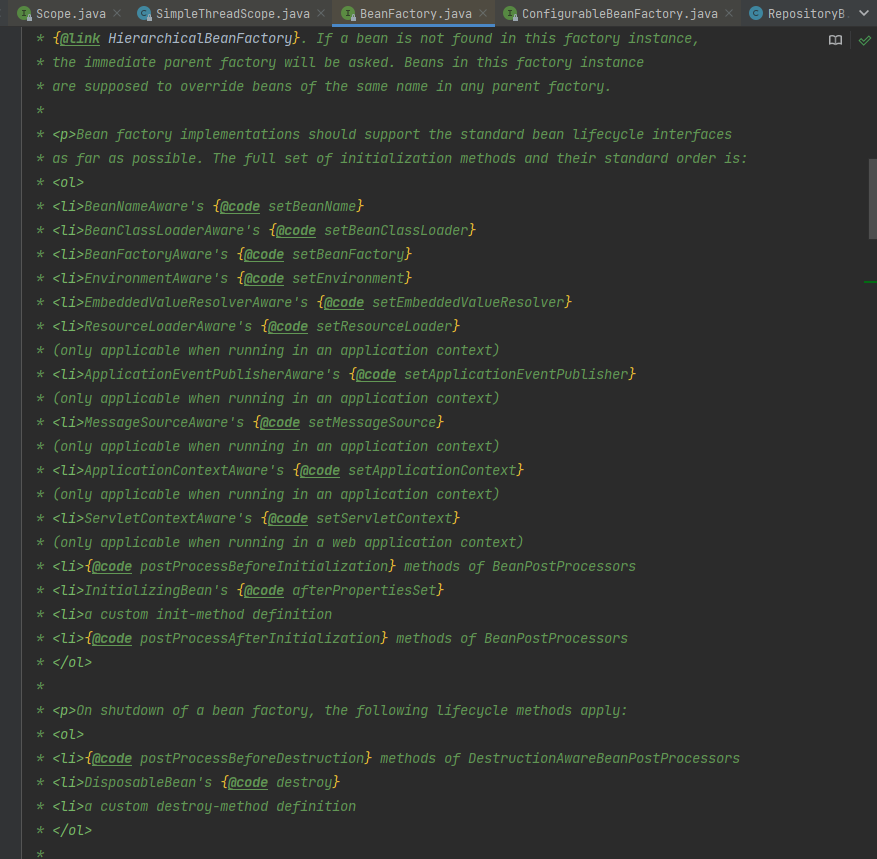
初始化化階段完整的調用過程整理如下:
容器對 bean 生命周期的管理提供了生命周期接口,允許開發者對bean的初始化和銷毀等生命周期中進行自定義的操作。
bean 初始化回調3種
Spring提供了3種方式進行bean的初始化回調:
-
InitializingBean 接口
org.springframework.beans.factory.InitializingBean 接口讓 bean 在容器設置了 bean 的所有必要屬性後執行初始化工作。這種方式有個弊端是類中耦合了Spirng容器。
-
xml中
<bean/>指定init-method方法<bean class="com.crab.spring.ioc.demo11.BeanOne" id="beanOne" init-method="myInit"/> -
使用@PostConstruct註解
既然提供了3種,那麼不禁會有疑問:
- 同時使用3種方式,指定3個不同的方法,執行順序是如何的?
- 同時使用3種方式,指定的是同一個方法,執行次數是多少次,3次?
直接通過案例來驗證。
案例1:3種方式3個不同方法
類的定義
public class BeanOne implements InitializingBean {
    // 1 實現接口的方式
    @Override
    public void afterPropertiesSet() throws Exception {
        System.out.println("BeanOne InitializingBean afterPropertiesSet");
    }

    // 通過xml init-method 配置的方式
    public void myInit() {
        System.out.println("BeanOne init-method myInit");
    }

    @PostConstruct
    public void postConstruct() {
        System.out.println("BeanOne PostConstruct postConstruct");
    }
}
通過xml配置文件的方式定義bean信息
<?xml version="1.0" encoding="UTF-8"?>
<beans xmlns="//www.springframework.org/schema/beans"
       xmlns:xsi="//www.w3.org/2001/XMLSchema-instance"
       xmlns:context="//www.springframework.org/schema/context"
       xsi:schemaLocation="//www.springframework.org/schema/beans //www.springframework.org/schema/beans/spring-beans.xsd //www.springframework.org/schema/context //www.springframework.org/schema/context/spring-context.xsd">

    <!--掃描指定包下的bean並自動DI-->
    <context:annotation-config/>

    <bean class="com.crab.spring.ioc.demo11.BeanOne" id="beanOne" init-method="myInit"/>
</beans>
運行測試
    @org.junit.Test
    public void test1() {
        System.out.println("開始初始化容器");
        ClassPathXmlApplicationContext context = new ClassPathXmlApplicationContext("demo11/spring.xml");
        System.out.println("容器使用中----");
        BeanOne beanOne = context.getBean(BeanOne.class);
        System.out.println(beanOne);
        System.out.println("開始銷毀容器");
        context.close();
        System.out.println("結束銷毀容器");
    }
測試結果
開始初始化容器
BeanOne PostConstruct postConstruct
BeanOne InitializingBean afterPropertiesSet
BeanOne init-method myInit
容器使用中----
com.crab.spring.ioc.demo11.BeanOne@f0f2775
開始銷毀容器
結束銷毀容器
結論:@PostConstruct > InitializingBean > xml init-method
案例2:3種方式指定同一個方法
類定義如下
public class BeanTwo implements InitializingBean {
    // 1 實現接口的方式
    // 2 通過xml init-method 配置的方式
    // 3 註解方式
    @PostConstruct
    @Override
    public void afterPropertiesSet() throws Exception {
        System.out.println("BeanTwo InitializingBean afterPropertiesSet");
    }
}
xml配置文件和測試程序和上面的類似,不重複。
運行結果如下
開始初始化容器
BeanTwo InitializingBean afterPropertiesSet
容器使用中----
com.crab.spring.ioc.demo11.BeanTwo@3f200884
開始銷毀容器
結束銷毀容器
結論:3種方式指定同一方法,只會回調一次,不會重複調用
思考下: 一個類中配置2個@PostConstruct註解的初始化方法 init1()和 init2() ,回調初始化哪一個?
bean的銷毀回調
類似初始化回調,Spring提供了3種方式進行bean的銷毀回調:
- 實現 DisposableBean接口
- xml中配置destroy-method
- 使用@PreDestroy
類似執行順序和次數結論:
- 3種方式指定3個不同方法,回調順序:@PreDestroy > DisposableBean > xml中配置destroy-method
- 3種方式指定同一個方法,只回調1次
綜合案例
定義類
public class BeanThree implements DisposableBean {

    // 方式1 實現DisposableBean
    @Override
    public void destroy() throws Exception {
        System.out.println("BeanThree DisposableBean destroy");
    }
    // 方式2 xml中配置destroy-method
    public void destroy2(){
        System.out.println("BeanThree destroy-method destroy3");
    }
    // 方式3 使用 @PreDestroy 註解
    @PreDestroy
    public void destroy3(){
        System.out.println("BeanThree @PreDestroy destroy3");
    }
}
xml中配置銷毀回調
<!--掃描指定包下的bean並自動DI-->
<context:annotation-config/>

<bean class="com.crab.spring.ioc.demo11.BeanThree" destroy-method="destroy2"/>
測試程序和結果
    @org.junit.Test
    public void test3() {
        System.out.println("開始初始化容器");
        ClassPathXmlApplicationContext context = new ClassPathXmlApplicationContext("demo11/spring3.xml");
        System.out.println("容器使用中----");
        BeanThree beanOne = context.getBean(BeanThree.class);
        System.out.println(beanOne);
        System.out.println("開始銷毀容器");
        context.close();
        System.out.println("結束銷毀容器");
    }

// 結果對照結論看
開始初始化容器
容器使用中----
com.crab.spring.ioc.demo11.BeanThree@f0f2775
開始銷毀容器
BeanThree @PreDestroy destroy3
BeanThree DisposableBean destroy
BeanThree destroy-method destroy3
結束銷毀容器
思考下:xml配置中如何配置全局默認的初始化和銷毀回調方法,而不用每個bean都配置?default-init-method default-destroy-method
Aware接口詳解
原理解析
Aware 是一個標記超接口,Spring 提供了廣泛的 Aware 回調接口實現,讓 bean 向容器獲取它們需要特定的基礎設施依賴項。
public interface Aware {}
來看一下“ApplicationContextAware 接口
public interface ApplicationContextAware {
    void setApplicationContext(ApplicationContext applicationContext) throws BeansException;
}
當 ApplicationContext 創建一個實現 org.springframework.context.ApplicationContextAware 接口的對象實例時,會為該實例提供對該 ApplicationContext 的引用。直接上案例。
定義一個類實現 ApplicationContextAware
public class BeanFour implements ApplicationContextAware {
    // 用於獲取初始該類對象的容器對象ApplicationContext
    private ApplicationContext context;

    @Override
    public void setApplicationContext(ApplicationContext applicationContext) throws BeansException {
        this.context = applicationContext;
    }
    public ApplicationContext getContext() {
        return context;
    }
}

@Configuration
@ComponentScan
public class AppConfig {
}
測試程序和結果
@org.junit.Test
public void test_aware() {
    AnnotationConfigApplicationContext context =
            new AnnotationConfigApplicationContext(AppConfig.class);
    BeanFour bean = context.getBean(BeanFour.class);
    System.out.println(bean.getContext() == context);
    context.close();
}
// 結果
true
從結果看,BeanFour實例已獲取到創建它的容器對象。
使用 Aware 接口主要目的是獲取容器中相關的基礎對象,也就是依賴注入,但這樣做的弊端是將應用程序類和Spring強耦合在一起了。換個角度,依賴注入通過 @Autowired 也可以實現,耦合更低。
@Component
public class BeanFour2  {
    // 用於獲取初始該類對象的容器對象ApplicationContext
    @Autowired
    private ApplicationContext context;

    public ApplicationContext getContext() {
        return context;
    }
}
Aware 接口匯總
Spring 提供了廣泛的 Aware 回調接口,讓 bean 向容器指示它們需要特定的基礎設施依賴項,如下表。作為一般規則,名稱表示依賴類型。
| 接口名 |
|---|
ApplicationContextAware |
ApplicationEventPublisherAware |
BeanClassLoaderAware |
BeanFactoryAware |
BeanNameAware |
LoadTimeWeaverAware |
MessageSourceAware |
NotificationPublisherAware |
ResourceLoaderAware |
總結
本文介紹各種bean的完整的生命周期、生命周期回調接口和Aware接口。
知識分享,轉載請註明出處。學無先後,達者為先!


