五萬字長文帶你學會Spring
Sping

Spring概念介紹
spring是啥呢,你在鬥地主的時候把別人打爆了那叫spring,

你成功的追到了你愛慕已久的女神,人生中的春天來了,那也叫sping


好了別看我老婆了,咱來講講啥是Spring
Sping:Spring是分層的javaEE/SE應用full-stack輕量級開源框架,他以AOP( 面向切面編程 aspect oriented programming)和IOC(控制反轉 invers of control)為內核,這個框架之所以叫spring是因為他給軟件行業的發展帶來的春天,看吧和你的春天一樣,不過這個是程序員的春天,這個框架的到來極大的方便的程序的開發
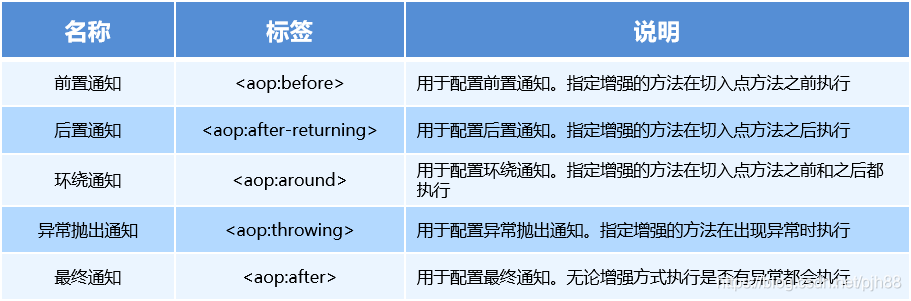
Spring 體系結構介紹
Spring體系結構圖
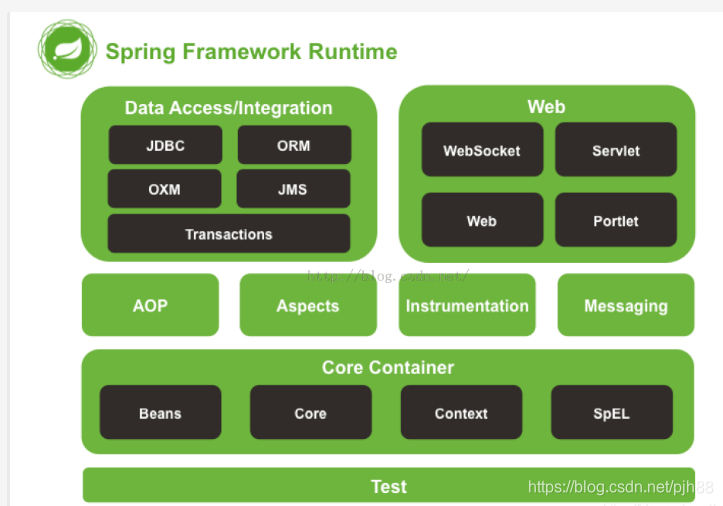
Spring四大模塊簡介
Core核心模塊。負責管理組件的Bean對象
spring-beans-4.0.0.RELEASE.jar
spring-context-4.0.0.RELEASE.jar
spring-core-4.0.0.RELEASE.jar
spring-expression-4.0.0.RELEASE.jar
面向切面編程
spring-aop-4.0.0.RELEASE.jar
spring-aspects-4.0.0.RELEASE.jar
數據庫操作
spring-jdbc-4.0.0.RELEASE.jar
spring-orm-4.0.0.RELEASE.jar
spring-oxm-4.0.0.RELEASE.jar
spring-tx-4.0.0.RELEASE.jar
spring-jms-4.0.0.RELEASE.jar
Web模塊
spring-web-4.0.0.RELEASE.jar
spring-webmvc-4.0.0.RELEASE.jar
spring-websocket-4.0.0.RELEASE.jar
spring-webmvc-portlet-4.0.0.RELEASE.jar
Spring的優勢
以下優勢我都將在下文一一介紹
- 方便解耦,簡化開發
- AOP 編程的支持
- 聲明式事務的支持
- 方便程序的測試
- 方便集成各種優秀框架
- 降低 JavaEE API 的使用難度
- Java 源碼是經典學習範例
下面我們來介紹介紹Spring的兩個核心IOC與AOP
IOC(控制反轉 invers of control)
基本概念
IOC -Inversion of Control ,即控制反轉,這不一種具體的技術,而是一種設計思想,以前我們的java開發都是自己的new一個對象,這樣十分麻煩,而且每new一個對象,就會佔用一個內存空間,消耗資源。而IOC技術就是為了解決這個問題,把,這個思想的本質就是將你設計好的對象交給容器控制,而不是傳統的在你的對象內部直接控制。
你現在是不是還是一臉懵逼,下面我們再來理解理解兩個思想,即
1.誰控制誰控制了什麼
2.為何是反轉,那方面反轉了
1.誰控制誰控制了什麼
傳統JAVA SE 程序設計,是我們直接在對象內部通過new 來創建對象,也即程序主動的去創建依賴對象,而IOC有一個專門的控制容器來創建對象,即對象的管理權全交給了IOC容器,即由IOC控制對象,這裡不僅僅是對象,還有一些外部資源的獲取,比如文件等等
2.為何是反轉,那方面反轉了
在講反轉之前我們先來講講什麼是正轉,傳統對象中是我們自己在對象中主動控制去獲取依賴對象,這就是正轉,而反轉則是由IOC容器去控制依賴注入,因為由容器幫我們查找及注入依賴對象,對象只是被動的接受依賴對象,所以是反轉;哪些方面反轉了?依賴對象的獲取被反轉了。
IOC的優點以及他可以做什麼
IOC不是一種技術,只是一種思想,一個重要的面向對象編程設計的發則,它能指導我們如何設計出松耦合,更優良的程序,傳統應用程序都是我們在類的內部主動的去創建依賴對象,導致 了類與類之間的高度融合,很難測試,有了IOC容器之後,把創建和查找依賴對象的控制器交給了容器,由容器進行注入組合對象,對象和對象之間的鬆散耦合的,這樣方便測試也利於重複利用,使整個程序的體系結構變的十分靈活,其實IoC對編程帶來的最大改變不是從代碼上,而是從思想上,發生了「主從換位」的變化。應用程序原本是老大,要獲取什麼資源都是主動出擊,但是在IoC/DI思想中,應用程序就變成被動的了,被動的等待IoC容器來創建並注入它所需要的資源了。
IOC很好的體現了面向對象設計法則之一—— 好萊塢法則:「別找我們,我們找你」;即由IOC容器幫對象找相應的依賴對象並注入,而不是由對象主動去找。
IOC和DI(控制反轉和依賴注入)
DI—Dependency Injection,即「依賴注入」:是組件之間依賴關係由容器在運行期決定,形象的說,即由容器動態的將某個依賴關係注入到組件之中。依賴注入的目的並非為軟件系統帶來更多功能,而是為了提升組件重用的頻率,並為系統搭建一個靈活、可擴展的平台。通過依賴注入機制,我們只需要通過簡單的配置,而無需任何代碼就可指定目標需要的資源,完成自身的業務邏輯,而不需要關心具體的資源來自何處,由誰實現。
理解DI的關鍵是:「誰依賴誰,為什麼需要依賴,誰注入誰,注入了什麼」,那我們來深入分析一下:
●誰依賴於誰:當然是應用程序依賴於IOC容器;
●為什麼需要依賴:應用程序需要IoC容器來提供對象需要的外部資源;
●誰注入誰:很明顯是IoC容器注入應用程序某個對象,應用程序依賴的對象;
●注入了什麼:就是注入某個對象所需要的外部資源(包括對象、資源、常量數據)。
IoC和DI由什麼關係呢?其實它們是同一個概念的不同角度描述,由於控制反轉概念比較含糊(可能只是理解為容器控制對象這一個層面,很難讓人想到誰來維護對象關係),所以2004年大師級人物Martin Fowler又給出了一個新的名字:「依賴注入」,相對IoC 而言,「依賴注入」明確描述了「被注入對象依賴IoC容器配置依賴對象」。
**
怎麼在spring中實現依賴注入我後面再來講解,這裡大家先理解理解這個概念
**
註:如果想要更加深入的了解IOC和DI,請參考大師級人物Martin Fowler的一篇經典文章《Inversion of Control Containers and the Dependency Injection pattern》,原文地址://www.martinfowler.com/articles/injection.html。
AOP思想介紹(面向切面編程aspect oriented programming)
AOP概念
AOP為Aspect Oriented Programming 的縮寫,意為面向切面編程,通過預處理和運行期動態代理的方式實現程序功能的統一和維護的一種技術
AOP是OOP(Object Oriented Programmin 面向對象編程)的延續,是軟件開發的一個熱點,又是框架中的一個重要內容,是函數式編程的一種衍生范型,利用AOP可以對業務邏輯中的各個部分進行隔離,使業務邏輯之間的耦合度降低,提高程序的可重用性,同時提高了程序的開發效率
一個案例帶你理解切面

切面:
把一塊蛋糕切成兩塊,這個切口就是切面,;炒飯的時候,鍋和鍋鏟就是切面;web層級設計中,web層->網關層->服務層->數據層,每一層之間也是一個切面。編程中,對與對象之間,方法與方法之間,模塊與模塊之間都是一個個切面。
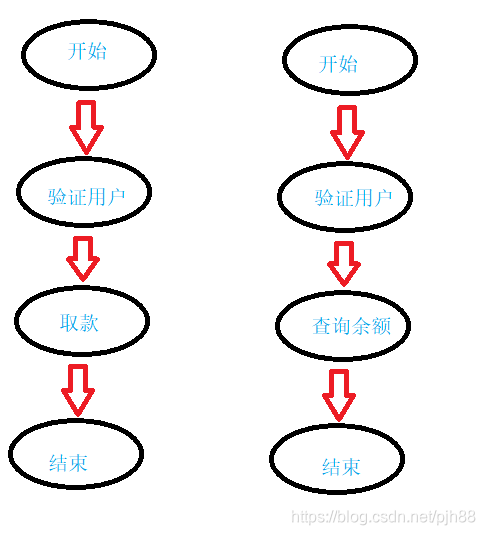
以一個銀行案例為例:
**
如圖銀行的取款業務和查詢餘額業務有交叉的業務邏輯(所謂交叉業務邏輯是與主業務無關的代碼,比如安全檢查,事務,日誌等等),這裡指的是驗證用戶的業務。這會導致代碼糾纏,交叉業務邏輯與主業務邏輯混合在一起,這會導致業務邏輯的混合不清,這時候就要用到AOP
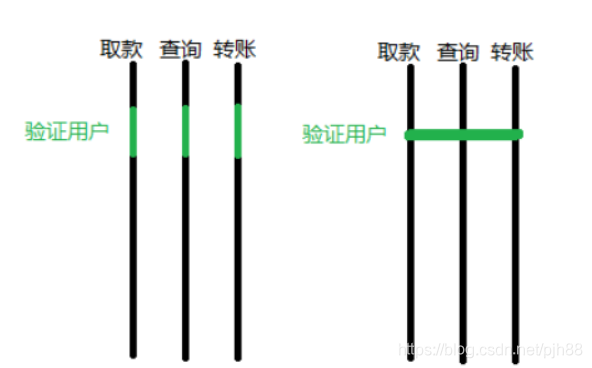
使用AOP可以幫助我們簡化代碼,我們在寫代碼的時候可不寫這個驗證用戶的業務,可以在另一個地方寫好驗證用戶的代碼,然後告訴Spring那幾個地方需要這些代碼,讓Spring加過去即可,如果有多個控制流的話,會大大的減少時間,而AOP不會把代碼加入到源文件中但是他會正確的影響最後的機器代碼
上面那個 驗證用戶 的方框,我們可以把它當成一塊板子,在這塊板子上插入一些控制流程,這塊板子就可以當成是 AOP 中的一個切面。所以 AOP 的本質是在一系列的縱向的控制流程中,把那些相同的子流程提取成一個橫向的面,把縱向流程畫成一條直線,而 AOP 相當於把相同的地方連起來了(這幅圖是真的形象,好好體會一下應該不難),這個驗證用戶的子流程 就成了一條直線,也可以理解成一個切面,這裡只插了三個流程,如果其他流程也需要這個子流程,也可以插到其他地方去。
AOP的優勢與作用
**
作用:在不修改源碼的情況下對方法進行增強
優勢:提高代碼的可復用性,提高開發效率,便於維護
Spring中AOP思想的實現我在後面就有講解,不在這裡講是因為講Spring在AOP中的實現要有一定的基礎,會的的同學可以點擊鏈接跳轉:鏈接
構建一個簡單的案例
創建Spring工程的方法我放在附錄2了:點擊這裡跳轉
在寫Spring的案例之前我們再來理理使用Spring與不使用Spring的區別
沒有spring之前:
在沒有spring之前,一個對象調用另一個對象的方法,需要通過之間new一個對象的方式來實現,比如對象A調用對象BImp,需要在對象A內部new一個對象B,再來調用B的方法Methdo,其中BImp實現自接口B
在使用了Spring之後:
在有了Spring之後直接向Spring要就好了,不需要再自己來創建
**
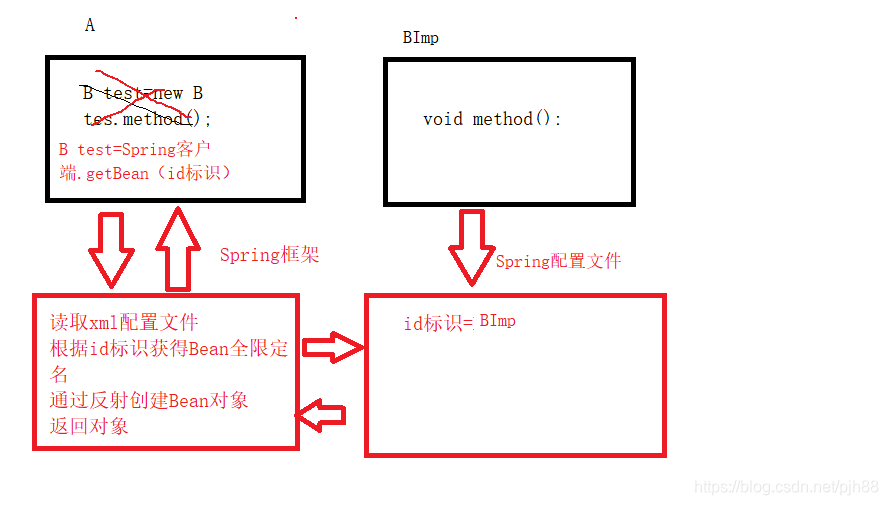
從這兩個圖就可以看出Spring 的一個優點,即實現了解耦操作,
比如將來你想用另一個對象來代替Bimp,直接更改配置文件即可而不用修改文件源碼,配置文件是不會被編譯的,而且因為BImp實現了接口B,其他實現自接口B的類就可以替換BImp,繼承也是一樣的道理
進入案例
步驟
1.導入相關的jar包
2.編寫Dao接口與實現類
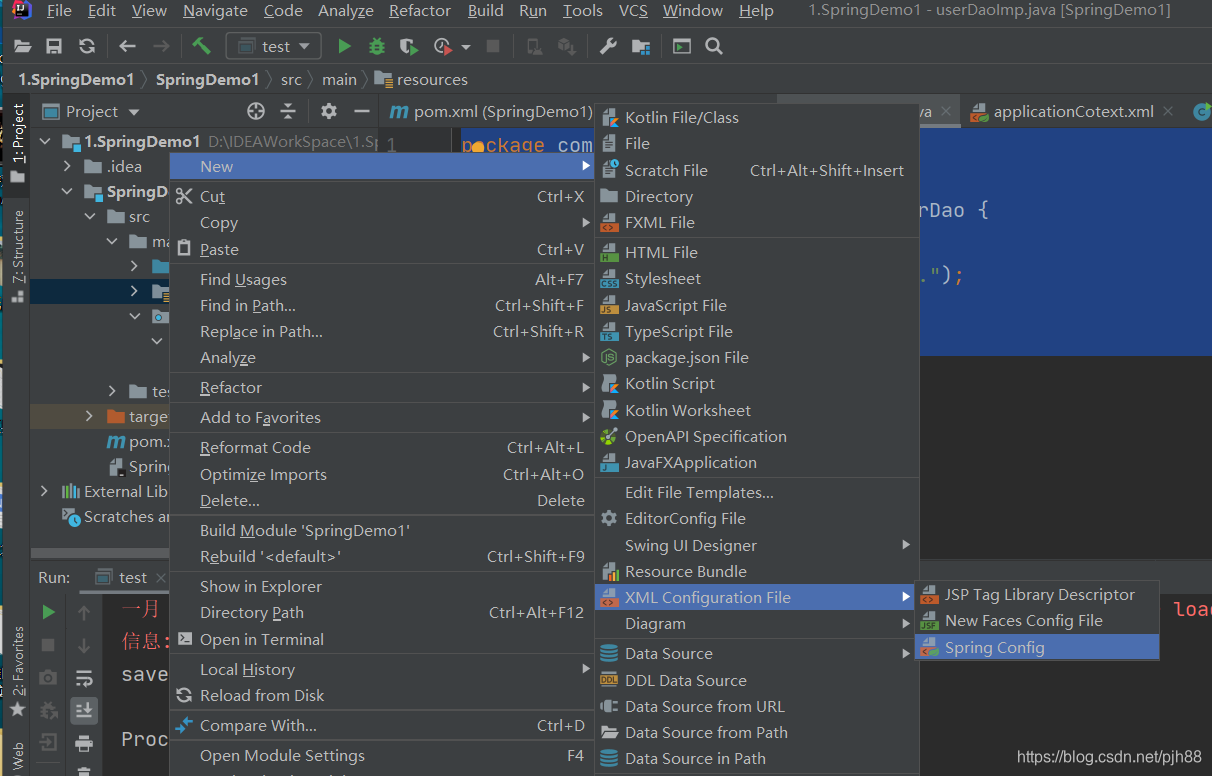
3.創建Spring核心配置文件
4.在Spring配置文件中配置UserDaoImp
5.使用Spring的API獲取Bean實例
**
**
1.導入相關的jar包
<dependencies>
        <dependency>
            <groupId>org.springframework</groupId>
            <artifactId>spring-context</artifactId>
            <version>5.0.5.RELEASE</version>
        </dependency>
    </dependencies>
2.編寫Dao接口與實現類
接口
package com.pjh.Dao;

public  interface  userDao {
    void save();
}
實現類
package com.pjh.Dao.Imp;
import com.pjh.Dao.userDao;
public class userDaoImp implements userDao {
    public void save() {
        System.out.println("save.......");
    }
}
3.創建Spring核心配置文件
**
4.在Spring配置文件中配置UserDaoImp
<?xml version="1.0" encoding="UTF-8"?>
<beans xmlns="//www.springframework.org/schema/beans"
       xmlns:xsi="//www.w3.org/2001/XMLSchema-instance"
       xsi:schemaLocation="//www.springframework.org/schema/beans //www.springframework.org/schema/beans/spring-beans.xsd">
<bean id="userDao" class="com.pjh.Dao.Imp.userDaoImp"/>
</beans>
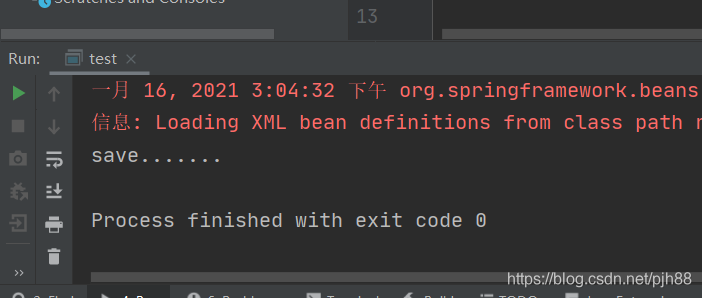
5.使用Spring的API獲取Bean實例
package com.pjh.Test;
import com.pjh.Dao.userDao;
import org.springframework.context.support.ClassPathXmlApplicationContext;
public class test {
    public static void main(String[] args) {
        ClassPathXmlApplicationContext classPathXmlApplicationContext = new ClassPathXmlApplicationContext("applicationCotext.xml");
        userDao userDao =(com.pjh.Dao.userDao) classPathXmlApplicationContext.getBean("userDao");
        userDao.save();
    }
}
運行結果
Spring配置文件基本屬性介紹(ID Class Scope)
基本概述
id:
Bean實例在Spring容器中的唯一標識,不允許重複
class:
Bean的全限定名稱,即這個類存在的路徑
scope:
這個Bean對象的作用範圍
1.singleton:默認值,單例
2.prototpye:多例的
3.request: WEB 項目中,Spring 創建一個 Bean 的對象,將對象存入到 request 域中 4.session:WEB 項目中,Spring 創建一個 Bean 的對象,將對象存入到 session 域中 5.global session: WEB 項目中,應用在 Portlet 環境,如果沒有Portlet境那 globalSession相當於 session
singleton和prototype的區別
**1)當scope的取值為singleton時 **
Bean的實例化個數:1個
Bean的實例化時機:當Spring核心文件被加載時,實例化配置的Bean實例
Bean的生命周期:
對象創建:當應用加載,創建容器時,對象就被創建了
對象運行:只要容器在,對象一直活着
對象銷毀:當應用卸載,銷毀容器時,對象就被銷毀了
2)當scope的取值為prototype時
Bean的實例化個數:多個
Bean的實例化時機:當調用getBean()方法時實例化 Bean
對象創建:當使用對象時,創建新的對象實例
對象運行:只要對象在使用中,就一直活着
對象銷毀:當對象長時間不用時,被 Java 的垃圾回收器回收了
證明步驟我放在附錄2里了:點擊這裡跳轉
bean的初始化構造方法與消耗方法配置
init-method:指定類中的初始化方法名稱 ,即在構造方法執行完畢後自動執行的方法
destroy-method:指定類中銷毀方法名稱 ,在對象銷毀之前執行的方法
applicationContesxt.xml中配置文件的配置
**格式: **init-method=”所指定的類中的初始化方法名”
destroy-method=”所指定的類中的銷毀化方法名”
<?xml version="1.0" encoding="UTF-8"?>
<beans xmlns="//www.springframework.org/schema/beans"
       xmlns:xsi="//www.w3.org/2001/XMLSchema-instance"
       xsi:schemaLocation="//www.springframework.org/schema/beans //www.springframework.org/schema/beans/spring-beans.xsd">
<bean id="userDao" class="com.pjh.Dao.Imp.userDaoImp" scope="prototype"
    init-method="initmethod" destroy-method="destroymethod"/>
</beans>
Bean實例化的三種方式
1.無參構造方法實例化(重點掌握,使用最多)
2.工廠靜態方法實例化
3.工廠動態方法實例化
1.無參構造方法實例化(重點掌握,使用最多)
即直接通過類的無參構造方法來創建對象
applicationContext配置文件中所需的配置 ,默認使用無參構造的方式
<?xml version="1.0" encoding="UTF-8"?>
<beans xmlns="//www.springframework.org/schema/beans"
       xmlns:xsi="//www.w3.org/2001/XMLSchema-instance"
       xsi:schemaLocation="//www.springframework.org/schema/beans //www.springframework.org/schema/beans/spring-beans.xsd">
<bean id="userDao" class="com.pjh.Dao.Imp.userDaoImp" "/>
</beans>
2.工廠靜態方法實例化
靜態工廠類中的代碼
package com.pjh.Factory;
import com.pjh.Dao.Imp.userDaoImp;
import com.pjh.Dao.userDao;
public class staticFactory {
    public static userDao getUserDao(){
        return  new userDaoImp();
    }
}
applicationContext中的代碼
<?xml version="1.0" encoding="UTF-8"?>
<beans xmlns="//www.springframework.org/schema/beans"
       xmlns:xsi="//www.w3.org/2001/XMLSchema-instance"
       xsi:schemaLocation="//www.springframework.org/schema/beans //www.springframework.org/schema/beans/spring-beans.xsd">
    <bean id="userDao" class="com.pjh.Factory.staticFactory" factory-method="getUserDao"/>

</beans>
3.工廠動態方法實例化
動態工廠類中的代碼
package com.pjh.Factory;
import com.pjh.Dao.Imp.userDaoImp;
import com.pjh.Dao.userDao;
public class dynamicFactory {
    public userDao getUserDao(){
        return new userDaoImp();
    }
}
applicationContext中的配置文件代碼
<?xml version="1.0" encoding="UTF-8"?>
<beans xmlns="//www.springframework.org/schema/beans"
       xmlns:xsi="//www.w3.org/2001/XMLSchema-instance"
       xsi:schemaLocation="//www.springframework.org/schema/beans //www.springframework.org/schema/beans/spring-beans.xsd">

<bean id="dynamicFactory" class="com.pjh.Factory.dynamicFactory"></bean>
<bean id="userDao" factory-bean="dynamicFactory" factory-method="getUserDao"/>
</beans>
以上三種只有着重掌握前面兩種即可
Spring中依賴注入的實現
因為前面已經講過什麼是IOC(控制反轉)和ID(依賴注入)了,這裡就不在敘述了,如果不懂,可以點擊鏈接到前面看看:鏈接
注入對象
Spring中依賴注入的實現:
比如有兩個類,類A和類B,類A中需要引用類B中的某個方法,故需要將類B注入到類A中,類A才可以調用類B中的方法。故因該將類A和類B都交給spring容器來創建Bean對象,再讓spring容器將類B的bean對象注入到類A的bean對象內部。實現注入需要在類B中設置一個setB()的方法來實現注入。
光說不練假把式
下面來實現以下,這裡以一個userDaoImp類的Bean注入userServiceImp類的Bea為例
userDaoImp類繼承自userDao類,userServiceImp類繼承自userService類。這裡對應接口的代碼就不寫了,直接寫對應實現類的代碼。
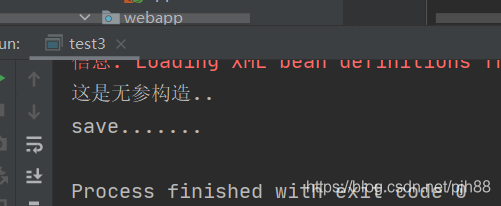
userDaoImp類代碼
package com.pjh.Dao.Imp;
import com.pjh.Dao.userDao;
public class userDaoImp implements userDao {
    public userDaoImp(){
        System.out.println("這是無參構造..");
    }
    public void save() {
        System.out.println("save.......");
    }

}
**
userService類代碼
**
package com.pjh.Service.Imp;
import com.pjh.Service.userService;
public class userServiceImp implements userService {
    private com.pjh.Dao.userDao userDao;
    public void setUserDao(com.pjh.Dao.userDao userDao) {
        this.userDao = userDao;
    }
    public void save(){
        userDao.save();
    }
}
applicationContext配置文件代碼
方法1普通注入方式
<?xml version="1.0" encoding="UTF-8"?>
<beans xmlns="//www.springframework.org/schema/beans"
       xmlns:xsi="//www.w3.org/2001/XMLSchema-instance"
       xsi:schemaLocation="//www.springframework.org/schema/beans //www.springframework.org/schema/beans/spring-beans.xsd">
<bean id="userDao" class="com.pjh.Dao.Imp.userDaoImp"/>
    <bean id="userService" class="com.pjh.Service.Imp.userServiceImp">
        <property name="userDao" ref="userDao"/>
    </bean>
</beans>
方法2使用P命名空間簡化注入
1.引入p命名空間 :
**
xmlns:p="//www.springframework.org/schema/p"
2.修改注入方式
**
<bean id="userService" class="com.itheima.service.impl.UserServiceImpl" p:userDao-ref="userDao"/>
<?xml version="1.0" encoding="UTF-8"?>
<beans xmlns="//www.springframework.org/schema/beans"
       xmlns:xsi="//www.w3.org/2001/XMLSchema-instance"
       xmlns:p="//www.springframework.org/schema/p"
       xsi:schemaLocation="//www.springframework.org/schema/beans //www.springframework.org/schema/beans/spring-beans.xsd">
<bean id="userDao" class="com.pjh.Dao.Imp.userDaoImp"/>
    <bean id="userService" class="com.pjh.Service.Imp.userServiceImp" p:userDao-ref="userDao"/>
</beans>
**
使用有參構造的方式注入UserDaoImp對象
1.userServiceImp中需要增加有參構造方法
package com.pjh.Service.Imp;
import com.pjh.Dao.userDao;
import com.pjh.Service.userService;
public class userServiceImp implements userService {
    private com.pjh.Dao.userDao userDao;
    public userServiceImp(com.pjh.Dao.userDao userDao) {
        this.userDao = userDao;
    }
    public void save(){
        userDao.save();
    }
}
2.spring配置文件中的配置
<?xml version="1.0" encoding="UTF-8"?>
<beans xmlns="//www.springframework.org/schema/beans"
       xmlns:xsi="//www.w3.org/2001/XMLSchema-instance"
       xmlns:p="//www.springframework.org/schema/p"
       xsi:schemaLocation="//www.springframework.org/schema/beans //www.springframework.org/schema/beans/spring-beans.xsd">
<bean id="userDao" class="com.pjh.Dao.Imp.userDaoImp"/>
   <bean id="userService" class="com.pjh.Service.Imp.userServiceImp">
       <constructor-arg name="userDao" ref="userDao"/>
   </bean>

</beans>
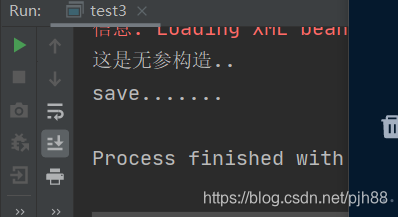
測試類
**
package com.pjh.Test;

import com.pjh.Service.userService;
import org.springframework.context.support.ClassPathXmlApplicationContext;

public class test3 {
    public static void main(String[] args) {
        ClassPathXmlApplicationContext app = new ClassPathXmlApplicationContext("applicationCotext.xml");
        userService userService = (com.pjh.Service.userService)app.getBean("userService");
        userService.save();
    }
}
控制台輸出
注入普通數據類型
比如一個user類要注入一個age和一個name
user類代碼
package com.pjh.Dao;

public class user {
    private int age;
    private  String name;

    public void setAge(int age) {
        this.age = age;
    }

    public void setName(String name) {
        this.name = name;
    }


}
applicationContext.xml中的配置代碼
<?xml version="1.0" encoding="UTF-8"?>
<beans xmlns="//www.springframework.org/schema/beans"
       xmlns:xsi="//www.w3.org/2001/XMLSchema-instance"
       xmlns:p="//www.springframework.org/schema/p"
       xsi:schemaLocation="//www.springframework.org/schema/beans //www.springframework.org/schema/beans/spring-beans.xsd">
<bean id="user" class="com.pjh.Dao.user">
    <property name="age" value="18"/>
    <property name="name" value="zhangsan"/>
 </bean>
</beans>
**
這下面的我就不演示了操作和上面一樣
集合數據類型(List
**集合數據類型( Map<String,User> )的注入 **
集合數據類型(Properties)的注入
配置多個Spring配置文件解決項目龐大的問題
在實際的開發中Spring的配置內容非常多,這導致Spring配置很繁雜且體積很大,所以,可以將一個項目拆分為若干個模塊,將不同模塊的配置文件寫到不同的配置文件中,在一個主Spring配置文件中通過import標籤進行加載
如圖有兩個配置文件,applicationContext為主配置文件,application-product是拆分出的配置文件,被applicationContext配置文件使用import引入
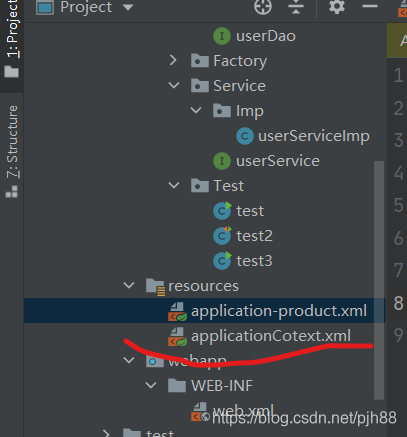
applicationContext中的配置文件代碼
<?xml version="1.0" encoding="UTF-8"?>
<beans xmlns="//www.springframework.org/schema/beans"
       xmlns:xsi="//www.w3.org/2001/XMLSchema-instance"
       xmlns:p="//www.springframework.org/schema/p"
       xsi:schemaLocation="//www.springframework.org/schema/beans //www.springframework.org/schema/beans/spring-beans.xsd">
    <import resource="application-product.xml"/>
</beans>
**
application-product.xml中的配置文件代碼
<?xml version="1.0" encoding="UTF-8"?>
<beans xmlns="//www.springframework.org/schema/beans"
       xmlns:xsi="//www.w3.org/2001/XMLSchema-instance"
       xsi:schemaLocation="//www.springframework.org/schema/beans //www.springframework.org/schema/beans/spring-beans.xsd">
    <bean id="userDao" class="com.pjh.Dao.Imp.userDaoImp"/>
    <bean id="userService" class="com.pjh.Service.Imp.userServiceImp">
        <constructor-arg name="userDao" ref="userDao"/>
    </bean>
</beans>
測試類測試
**
package com.pjh.Test;

import com.pjh.Service.userService;
import org.springframework.context.support.ClassPathXmlApplicationContext;

public class test3 {
    public static void main(String[] args) {
        ClassPathXmlApplicationContext app = new ClassPathXmlApplicationContext("applicationCotext.xml");
        userService userService = (com.pjh.Service.userService)app.getBean("userService");
        userService.save();
    }
}
控制台輸出
說明配置文件配置成功,成功注入並在bean容器中獲取對象
Spring相應的API
applicationContext:
接口類型,代表應用上下文,可以通過其實例獲得 Spring 容器中的 Bean 對象 ApplicationContext的實現類:
1)ClassPathXmlApplicationContext
它是從類的根路徑下加載配置文件 推薦使用這種
2)FileSystemXmlApplicationContext **
它是從磁盤路徑上加載配置文件,配置文件可以在磁盤的任意位置。
** 3)AnnotationConfigApplicationContext
當使用註解配置容器對象時,需要使用此類來創建 spring 容器。它用來讀取註解
getBean()方法使用
1.使用對應的id屬性值來從spring容器中獲取對象
這個我就不敘述了,因為上面用的就是這種
2.使用對應的class位元組碼文件來獲取對應對象
從spring容器中獲取對應對象的代碼
package com.pjh.Test;
import com.pjh.Service.userService;
import org.springframework.context.support.ClassPathXmlApplicationContext;
public class test3 {
    public static void main(String[] args) {
        ClassPathXmlApplicationContext app = new ClassPathXmlApplicationContext("applicationCotext.xml");
        userService userService = app.getBean(com.pjh.Service.userService.class);
        userService.save();
    }
}
**
使用這種方式獲取代碼,要注意當spring容器中配置了兩個相同類的bean對象的時候,使用這種方式會報錯,因為spring容器不知道你要獲取的是哪個對象
Spring配置數據源
數據源介紹以及數據源,連接池,數據庫三者的區別
連接池:這個應該都學習過,比如c3p0,druid等等,連接池的作用是為了提高程序的效率,因為頻繁的去創建,關閉數據庫連接,會對性能有很大的消耗,所以就有了連接池,連接池顧名思義是存儲多個連接的池子,池子中的連接都是創建好的,我們只要拿來使用即可,不用的時候就歸還給連接池,這就大大減少了關閉創建連接的時間,提高了效率
數據庫:存儲數據的地方
數據源:數據源顧名思義是數據的來源,存儲了連接數據庫所需要的信息,也可以說是用於管理數據庫連接池,並不存儲真正的數據,僅僅記錄了連接哪個數據庫,怎麼連接。如果把數據庫比作一個文件的話,那麼數據源存儲的就是文件的名稱,可以通過文件名稱來找到對應的文件,算是一個抽象的映射,一個數據庫對應一個數據源,數據源可能是一個連接,也可能是一個連接池。在J2EE里,數據源是代表物理數據存儲系統的實際Java對象。通過這些對象,J2EE應用可以獲取到數據庫的JDBC連接。
如果你是玫瑰,他就是牛糞

呸呸呸,說錯了
如果數據是水,數據庫就是水庫,數據源就是管道,終端用戶看到的數據集是管道里流出來的水。

當然啦,Spring功能這麼強大,怎麼可能少的了數據源呢
Spring配置數據源的步驟
**
1.所需的jar包
junit
<dependency>
        <groupId>junit</groupId>
        <artifactId>junit</artifactId>
        <version>4.13</version>
        <scope>test</scope>
    </dependency>
druid
<dependency>
    <groupId>com.alibaba</groupId>
    <artifactId>druid</artifactId>
    <version>1.0.9</version>
</dependency>
c3p0
<dependency>
    <groupId>c3p0</groupId>
    <artifactId>c3p0</artifactId>
    <version>0.9.1.2</version>
</dependency>
spring—context
<dependency>
    <groupId>org.springframework</groupId>
    <artifactId>spring-context</artifactId>
    <version>5.0.3.RELEASE</version>
</dependency>
mysql
<dependency>
        <groupId>mysql</groupId>
        <artifactId>mysql-connector-java</artifactId>
        <version>5.1.32</version>
    </dependency>
**
2.我先手動配置一下數據園,等一下再用Spring容器經行配置,大家就能看到二者的巨大差別了
手動配置數據源
配置druid
 public void druid() throws SQLException {
        //創建數據源
        DruidDataSource druidDataSource = new DruidDataSource();
        //設置連接參數
        druidDataSource.setDriverClassName("com.mysql.jdbc.Driver");
        druidDataSource.setPassword("1234");
        druidDataSource.setUsername("root");
        druidDataSource.setUrl("jdbc:mysql://localhost:3309/one");
        //獲取連接
        DruidPooledConnection connection = druidDataSource.getConnection();
        System.out.println(connection);
    }
配置c3p0數據源
 public void getc3p0() throws PropertyVetoException, SQLException {
        //創建連接池
        ComboPooledDataSource comboPooledDataSource = new ComboPooledDataSource();
        //設置參數
        comboPooledDataSource.setDriverClass("com.mysql.jdbc.Driver");
        comboPooledDataSource.setPassword("1234");
        comboPooledDataSource.setUser("root");
        comboPooledDataSource.setJdbcUrl("jdbc:mysql://localhost:3309/one");
        //獲取連接
        Connection connection = comboPooledDataSource.getConnection();
        System.out.println(connection);
    }
為了降低代碼的耦合度,我們可以使用讀取配置文件的方式來獲取需要設置的參數
這裡我也演示一下
在resource下新建文件jdbc.properties
jdbc.properties中的配置如下
jdbc.driver=com.mysql.jdbc.Driver
jdbc.url=jdbc:mysql://localhost:3309/one
jdbc.username=root
jdbc.password=1234
測試方法如下
public void getProperties() throws PropertyVetoException, SQLException {
        ResourceBundle jdbc = ResourceBundle.getBundle("jdbc");
        ComboPooledDataSource comboPooledDataSource = new ComboPooledDataSource();
        comboPooledDataSource.setJdbcUrl(jdbc.getString("jdbc.url"));
        comboPooledDataSource.setUser(jdbc.getString("jdbc.username"));
        comboPooledDataSource.setPassword(jdbc.getString("jdbc.password"));
        comboPooledDataSource.setDriverClass(jdbc.getString("jdbc.driver"));
        Connection connection = comboPooledDataSource.getConnection();
        System.out.println(connection);
    }
使用Spring容器來創建數據源
1.步驟1
在前面導入相關數據庫jar包的基礎上再導入springcontext包
<dependency>
            <groupId>org.springframework</groupId>
            <artifactId>spring-context</artifactId>
            <version>5.0.5.RELEASE</version>
        </dependency>
2.創建spring配置文件,並在其中配置如下配置
 <?xml version="1.0" encoding="UTF-8"?>
<beans xmlns="//www.springframework.org/schema/beans"
       xmlns:xsi="//www.w3.org/2001/XMLSchema-instance"
       xsi:schemaLocation="//www.springframework.org/schema/beans //www.springframework.org/schema/beans/spring-beans.xsd">
    <bean id="dataSource" class="com.mchange.v2.c3p0.ComboPooledDataSource">
        <property name="driverClass" value="com.mysql.jdbc.Driver"/>
        <property name="jdbcUrl" value="jdbc:mysql://localhost:3309/one"/>
        <property name="user" value="root"/>
        <property name="password" value="1234"/>
    </bean>
</beans>
配置測試函數
 @Test
    public void getProperties() throws PropertyVetoException, SQLException {
        ResourceBundle jdbc = ResourceBundle.getBundle("jdbc");
        ComboPooledDataSource comboPooledDataSource = new ComboPooledDataSource();
        comboPooledDataSource.setJdbcUrl(jdbc.getString("jdbc.url"));
        comboPooledDataSource.setUser(jdbc.getString("jdbc.username"));
        comboPooledDataSource.setPassword(jdbc.getString("jdbc.password"));
        comboPooledDataSource.setDriverClass(jdbc.getString("jdbc.driver"));
        Connection connection = comboPooledDataSource.getConnection();
        System.out.println(connection);
    }
    public void two() throws SQLException {
        ClassPathXmlApplicationContext classPathXmlApplicationContext = new       ClassPathXmlApplicationContext("applicationcontext.xml");
        DataSource datasource = (DataSource)classPathXmlApplicationContext.getBean("datasource");
        Connection connection = datasource.getConnection();
        System.out.println(connection);

    }
使用上述的代碼雖然已經完成了解耦合的操作,但是在日常開發中通常還是將數據源的相關配置參數抽取為一個jdbc.properties配置,步驟如下
**
1.在application.contex配置文件中引入相關的命名空間和相關的約束路徑
命名空間:
xmlns:context="//www.springframework.org/schema/context"
約束路徑:
//www.springframework.org/schema/context //www.springframework.org/schema/context/spring-context.xsd
修改後的applicationContext配置文件如下
<?xml version="1.0" encoding="UTF-8"?>
<beans xmlns="//www.springframework.org/schema/beans"
       xmlns:xsi="//www.w3.org/2001/XMLSchema-instance"
       xmlns:context="//www.springframework.org/schema/context"
       xsi:schemaLocation="//www.springframework.org/schema/beans //www.springframework.org/schema/beans/spring-beans.xsd
//www.springframework.org/schema/context //www.springframework.org/schema/context/spring-context.xsd
">
    <context:property-placeholder location="jdbc.properties"/>
    <bean id="dataSource" class="com.mchange.v2.c3p0.ComboPooledDataSource">
        <property name="driverClass" value="${jdbc.driver}"/>
        <property name="jdbcUrl" value="${jdbc.url}"/>
        <property name="user" value="${jdbc.username}"/>
        <property name="password" value="${jdbc.password}"/>
    </bean>
</beans>
測試函數如下
public void two() throws SQLException {
        ClassPathXmlApplicationContext classPathXmlApplicationContext = new       ClassPathXmlApplicationContext("applicationcontext.xml");
        DataSource datasource = (DataSource)classPathXmlApplicationContext.getBean("datasource");
        Connection connection = datasource.getConnection();
        System.out.println(connection);
    }
Spring註解開發
為什麼使用註解開發
Spring是重代碼輕配置的框架,配置比較繁重,影響開發效率,所以註解開發是一種趨勢,註解代替xml配置文件可以簡化配置,提高開發效率。

Spring原始註解
原始註解主要是為了簡化Bean的配置
| 註解 | 說明 |
|---|---|
| @Component | 使用在類上用於實例化Bean |
| @Controller | 使用在web層類上用於實例化Bean |
| @Service | 使用在service層類上用於實例化Bean |
| @Repository | 使用在dao層類上用於實例化Bean |
| @Autowired | 使用在字段上用於根據類型依賴注入 |
| @Qualifier | 結合@Autowired一起使用用於根據名稱進行依賴注入 |
| @Resource | 相當於@Autowired+@Qualifier,按照名稱進行注入 |
| @Value | 注入普通屬性 |
| @Scope | 標註Bean的作用範圍 |
| @PostConstruct | 使用在方法上標註該方法是Bean的初始化方法 |
| @PreDestroy | 使用在方法上標註該方法是Bean的銷毀方法 |
@Component
@Controller
@Service
@Repository
這四個主要是為了在語義上區分在各個層中配置的類,這樣我們在配置的時候也更為方便。
**
註解 1
@Component
@Controller
@Service
@Repository
配置一個userDao到Spring容器中
在xml中配置的原始語句
<?xml version="1.0" encoding="UTF-8"?>
<beans xmlns="//www.springframework.org/schema/beans"
       xmlns:xsi="//www.w3.org/2001/XMLSchema-instance"
       xsi:schemaLocation="//www.springframework.org/schema/beans //www.springframework.org/schema/beans/spring-beans.xsd">
    <bean id="userDao" class="com.pjh.Dao.Imp.userDaoImp"/>
</beans>
使用註解配置的語句
package com.pjh.Dao.Imp;
import com.pjh.Dao.userDao;
import org.springframework.stereotype.Repository;
@Repository("userDao")
public class userDaoImp implements userDao {
    public userDaoImp(){
        System.out.println("這是無參構造..");
    }
    public void save() {
        System.out.println("save.......");
    }
}
我們使用了註解自然要告訴Spring我們使用 了註解不然Spring怎麼知道呢,所以我們要引入context命名空間和約束路徑,進行包掃描,在applictionContext中的配置如下
加入命名空間與約束路徑
命名空間:
xmlns:context="//www.springframework.org/schema/context"
約束路徑
//www.springframework.org/schema/context //www.springframework.org/schema/context/spring-context.xsd
最終的配置
**
<?xml version="1.0" encoding="UTF-8"?>
<beans xmlns="//www.springframework.org/schema/beans"
       xmlns:context="//www.springframework.org/schema/context"
       xmlns:xsi="//www.w3.org/2001/XMLSchema-instance"
       xsi:schemaLocation="//www.springframework.org/schema/beans //www.springframework.org/schema/beans/spring-beans.xsd
//www.springframework.org/schema/context //www.springframework.org/schema/context/spring-context.xsd
">
    <context:component-scan base-package="com.pjh"/>
    <bean id="userDao" class="com.pjh.Dao.Imp.userDaoImp"/>
</beans>
這樣子Spring容器才會掃描到對應的註解並在容器中創建對應的Bean對象
註解2
@Scope
配置bena對象的作用範圍,以及他是多例的還是單例的,具體我前面已經將過了
有不懂的回去看看或者點擊鏈接跳轉:鏈接
在xml中我們配置scope的時候是在配置bean的時候同時在bean標籤內配置一個scope屬性,如下我們對一個userDao類的bean對象配置一個scope屬性
**
<?xml version="1.0" encoding="UTF-8"?>
<beans xmlns="//www.springframework.org/schema/beans"
       xmlns:context="//www.springframework.org/schema/context"
       xmlns:xsi="//www.w3.org/2001/XMLSchema-instance"
       xsi:schemaLocation="//www.springframework.org/schema/beans //www.springframework.org/schema/beans/spring-beans.xsd
//www.springframework.org/schema/context //www.springframework.org/schema/context/spring-context.xsd
">
    <context:component-scan base-package="com.pjh"/>
    <bean id="userDao" class="com.pjh.Dao.Imp.userDaoImp" scope="prototype"/>
</beans>
使用註解配置Scope
**
package com.pjh.Dao.Imp;
import com.pjh.Dao.userDao;
import org.springframework.context.annotation.Scope;
import org.springframework.stereotype.Repository;
@Repository("userDao")
@Scope
public class userDaoImp implements userDao {
    public userDaoImp(){
        System.out.println("這是無參構造..");
    }
    public void save() {
        System.out.println("save.......");
    }

}
註解3
@Autowired
使用在字段上用於根據類型依賴注入
@Qualifier
必須結合@Autowired一起使用用於根據名稱進行依賴注入,
@Resource=@Qualifier+@Autowired
相對與上面二者的合體
在配置文件中我們將一個Bean注入到另一個Bean的時候具體配置如下,以向userService中注入一個userDao為例
<?xml version="1.0" encoding="UTF-8"?>
<beans xmlns="//www.springframework.org/schema/beans"
       xmlns:context="//www.springframework.org/schema/context"
       xmlns:xsi="//www.w3.org/2001/XMLSchema-instance"
       xsi:schemaLocation="//www.springframework.org/schema/beans //www.springframework.org/schema/beans/spring-beans.xsd
//www.springframework.org/schema/context //www.springframework.org/schema/context/spring-context.xsd
">
    <context:component-scan base-package="com.pjh"/>
    <bean id="userDao" class="com.pjh.Dao.Imp.userDaoImp" scope="prototype"/>
    <bean id="userService" class="com.pjh.Service.Imp.userServiceImp">
        <constructor-arg name="userDao" ref="userDao"/>
    </bean>
</beans>
使用註解配置
userDao中的配置
**
package com.pjh.Dao.Imp;
import com.pjh.Dao.userDao;
import org.springframework.context.annotation.Scope;
import org.springframework.stereotype.Repository;
@Repository("userDao")
public class userDaoImp implements userDao {
    public userDaoImp(){
        System.out.println("這是無參構造..");
    }
    public void save() {
        System.out.println("save.......");
    }

}
userService中的配置
**
使用@Qualifier+@Autowired,如果spring容器中只有一個對應類的Bean可以省略@Qualifier
package com.pjh.Service.Imp;
import com.pjh.Dao.userDao;
import com.pjh.Service.userService;
import org.springframework.beans.factory.annotation.Autowired;
import org.springframework.beans.factory.annotation.Qualifier;
import org.springframework.stereotype.Service;
@Service("userService")//指定對應的ID
public class userServiceImp implements userService {
    @Autowired
    @Qualifier("userDao")//指定注入的具體bean的名稱
    private userDao userDao;
    public void save(){
        userDao.save();
    }
}
使用@Resource
**
package com.pjh.Service.Imp;
import com.pjh.Dao.userDao;
import com.pjh.Service.userService;
import org.springframework.stereotype.Service;
import javax.annotation.Resource;
@Service("userService")//指定對應的ID
public class userServiceImp implements userService {
    @Resource(name = "userDao")//指定注入的具體bean的名稱
    private userDao userDao;
    public void save(){
        userDao.save();
    }
}
註解4
注入普通屬性
package com.pjh.Domain;
import org.springframework.beans.factory.annotation.Value;
import org.springframework.stereotype.Component;
@Component("user")
public class User {
    @Value("18")
    private int age;
    @Value("Jack")
    private String name;
    public  void  output(){
        System.out.println("姓名:"+name);
        System.out.println("年齡:"+age);
    }
}
是不是覺得這樣沒有什麼意思,還不如直接賦值,但是如果我們使用讀取配置文件的方式,這幾實現了解耦合,下面來演示一下,以一個user類注入一個age和name屬性為例
**
Spring配置文件配置
<?xml version="1.0" encoding="UTF-8"?>
<beans xmlns="//www.springframework.org/schema/beans"
       xmlns:context="//www.springframework.org/schema/context"
       xmlns:xsi="//www.w3.org/2001/XMLSchema-instance"
       xsi:schemaLocation="//www.springframework.org/schema/beans //www.springframework.org/schema/beans/spring-beans.xsd
//www.springframework.org/schema/context //www.springframework.org/schema/context/spring-context.xsd
">
    <context:component-scan base-package="com.pjh"/>
    <context:property-placeholder location="information.properties"/>
</beans>
配置文件數據
people.name=Jack
people.age=18
uers類配置
package com.pjh.Domain;
import org.springframework.beans.factory.annotation.Value;
import org.springframework.stereotype.Component;
@Component("user")
public class User {
    @Value("${people.age}")
    private int age;
    @Value("${people.name}")
    private String name;
    public  void  output(){
        System.out.println("姓名:"+name);
        System.out.println("年齡:"+age);
    }
}
Spring新註解
| 註解 | 說明 |
|---|---|
| @Configuration | 用於指定當前類是一個 Spring 配置類,當創建容器時會從該類上加載註解 |
| @ComponentScan | 用於指定 Spring 在初始化容器時要掃描的包。
作用和在 Spring 的 xml 配置文件中的
<context:component-scan base-package=”com.itheima”/>一樣 |
| @Bean | 使用在方法上,標註將該方法的返回值存儲到 Spring 容器中 |
| @PropertySource | 用於加載.properties 文件中的配置 |
| @Import | 用於導入其他配置類 |
註解1
@Configuration
@ComponentScan
@Import
package com.pjh.Config;
import org.springframework.context.annotation.ComponentScan;
import org.springframework.context.annotation.Configuration;
import org.springframework.context.annotation.Import;
@Configuration//指定這是一個配置類
@ComponentScan("com.pjh")//指定掃描的包的範圍
@Import(DataSourceConfigueration.class)//引入其他配置類
public class SpringConfiguration {
}
註解2
@Propertysource
package com.pjh.Domain;
import org.springframework.beans.factory.annotation.Value;
import org.springframework.context.annotation.PropertySource;
import org.springframework.stereotype.Component;
@Component("user")
@PropertySource("classpath:information.properties")//加載對應的配置文件
public class User {
    @Value("${people.age}")
    private int age;
    @Value("${people.name}")
    private String name;
    public  void  output(){
        System.out.println("姓名:"+name);
        System.out.println("年齡:"+age);
    }
}
註解3
用於配置非自定義的Bean,比如配置一個數據源
@Bean
 @Bean(name="dataSource")//spring會將該函數返回的對象加入容器中
    public DataSource getDataSource() throws PropertyVetoException {
        ComboPooledDataSource dataSource = new ComboPooledDataSource();          dataSource.setDriverClass(driver);
        dataSource.setJdbcUrl(url);
        dataSource.setUser(username);
        dataSource.setPassword(password);
        return dataSource;
    }
Spring集成Junit
為什麼要集成junit
自然是為了方便我們測試,在測試類中,每個測試方法都有以下兩行代碼:
 ApplicationContext ac = new ClassPathXmlApplicationContext("bean.xml");
    IAccountService as = ac.getBean("accountService",IAccountService.class);
這兩行代碼的作用是獲取容器,如果不寫的話,直接會提示空指針異常。所以又不能輕易刪掉。
解決方案
讓SpringJunit負責創建Spring容器,但是需要將配置文件的名稱告訴它 將需要進行測試Bean直接在測試類中進行注入
Spring集成Juint步驟
1.導入spring集成Junit的坐標
2.使用@Runwith註解替換原來的運行期
3.使用@ContextConfiguration指定配置文件或配置類
4.使用@Autowired注入需要測試的對象 創建測試方法進行測試
1.導入spring集成Junit的坐標
<!--此處需要注意的是,spring5 及以上版本要求 junit 的版本必須是 4.12 及以上-->
<dependency>
            <groupId>junit</groupId>
            <artifactId>junit</artifactId>
            <version>4.13</version>
        </dependency>
        <dependency>
            <groupId>org.springframework</groupId>
            <artifactId>spring-test</artifactId>
            <version>5.0.5.RELEASE</version>
        </dependency>
2.使用@Runwith註解替換原來的運行期
package com.pjh.Test;
import org.junit.runner.RunWith;
import org.springframework.test.context.junit4.SpringJUnit4ClassRunner;
@RunWith(SpringJUnit4ClassRunner.class)
public class test4 {
}
3.使用@ContextConfiguration指定配置文件或配置類
package com.pjh.Test;
import org.junit.runner.RunWith;
import org.springframework.test.context.ContextConfiguration;
import org.springframework.test.context.junit4.SpringJUnit4ClassRunner;
@RunWith(SpringJUnit4ClassRunner.class)
//加載spring核心配置文件
 @ContextConfiguration(value = {"classpath:applicationCotext.xml"})
// 加載spring核心配置類
//@ContextConfiguration(classes = {SpringConfiguration.class})
public class test4 {
}
4.使用@Autowired注入需要測試的對象 創建測試方法進行測試
package com.pjh.Test;
import com.pjh.Dao.userDao;
import org.junit.Test;
import org.junit.runner.RunWith;
import org.springframework.beans.factory.annotation.Autowired;
import org.springframework.test.context.ContextConfiguration;
import org.springframework.test.context.junit4.SpringJUnit4ClassRunner;
@RunWith(SpringJUnit4ClassRunner.class)
//加載spring核心配置文件
 @ContextConfiguration(value = {"classpath:applicationCotext.xml"})
// 加載spring核心配置類
//@ContextConfiguration(classes = {SpringConfiguration.class})
public class test4 {
    @Autowired
    private userDao userDao;
    @Test
    public void testUserDao(){
        userDao.save();
    }
}
Spring中AOP的實現
寫在前面
什麼是AOP我已經在前面敘述過了,不懂的點擊鏈接跳轉到前面看看這裡主要講Spring中AOP的實現:鏈接
這裡複習一下AOP的優點
作用:在程序運行期間,在不修改源碼的情況下對方法進行功能增強
優勢:減少重複代碼,提高開發效率,並且便於維護
我們後續也將圍繞這兩點展開對AOP的敘述
動態代理
AOP的底層是通過Spring動態代理技術實現的,在運行期間通過動態代理,獲取代理對象,代理方法執行時增強功能介入,在去調用目標對象的方法,從而完成功能增強。
動態代理的優點:
靜態代理:了解設計模式中的代理模式的童鞋應該都知道,如果想要生成代理類,需要讓代理類和被代理類實現同一個接口,並且在代理類中添加被代理類的引用,代理類方法實現中添加代理邏輯,並決定是否調用被代理類方法,這種通過硬編碼的方式指定代理類與被代理類的方式,叫靜態代理。可以明顯看出,靜態代理類與被代理類是耦合的,如果要代理100個類,你就得寫100個代理類
動態代理:其實動態代理與靜態代理的本質一樣,最終程序運行時都需要生成一個代理對象實例,通過它來完成相關增強以及業務邏輯,只不過靜態代理需要硬編碼的方式指定,而動態代理則是以動態方式生成代理(有編譯時操作位元組碼生成的方式、以及運行時通過反射、位元組碼生成的方式)。動態生成的好處很明顯,代理邏輯與業務邏輯是互相獨立的,沒有耦合,代理1個類100個類沒有任何區別
說到耦合,必須把AOP拿來說道說道:傳統面向對象思想中,如果想要實現功能復用,要麼繼承、要麼引用,無論哪種方式,對代碼都有一定的侵入性,耦合無可避免,侵入性啥意思?簡單來說:如果你想要用它增強你程序的功能,你必須改動你的程序代碼,那它就具有侵入性。如果只有一點兩點需要增強還好說,如果大量的功能點需要被增強,工作量就會很大,代碼也不太優雅。想像一下,如果你對外公開了一系列的接口,現在領導說了,接口要加權限控制。在哪加?最笨的當然就是寫個程序驗證的邏輯,然後每個接口都拿來調用一遍。這也正是面向對象思想的短板,在要為程序新增一些通用功能時,只能通過耦合的方式才能進行。AOP正是為此而生,AOP旨在通過一種無耦合的方式來為程序帶來增強。而動態代理,就是AOP實現方式中的一種****
我舉兩個例子,說明下用動態代理實現功能增強,要怎麼做,怎麼就解耦了,哪裡就方便了:
springAOP大家一定耳熟能詳,它借鑒了AOP的思想,通過動態代理實現功能的無耦合增強,企業級應用開發時,當需要為程序添加通用功能時,springAOP應該是你的首選之一,比如現在要給系統對外的一系列接口添加一個權限驗證功能,只需要兩步即可
編寫切面類,如下:
1. @Aspect
2. @Component
3. public class AuthAspect{
4.      @Around(value="pointCut()")
5.           public Object doAround(ProceedingJoinPoint pjp) throws Throwable{
6.                if(!havePermission()) return "沒有權限...";
7.                return pjp.proceed(pjp.getArgs());
8.           }
9. }
可以看到,代理邏輯是獨立的,沒有也不需要任何與被代理相關的內容,是為解耦,有了代理邏輯後,我們只要按照spring的規則配置好要代理的範圍就好了(也就是代理哪些類的哪些方法),spring會為這些目標類生成動態代理對象,功能增強就是如此簡單
RPC框架大家應該也都接觸過,客戶端可以像調用本地對象的方法一樣調用遠程方法,這裡的本地對象其實就是個動態代理對象,在rpc中,這類代理對象有個專業的名字,叫做stub(樁),stub對象的創建方式大概是這樣的:
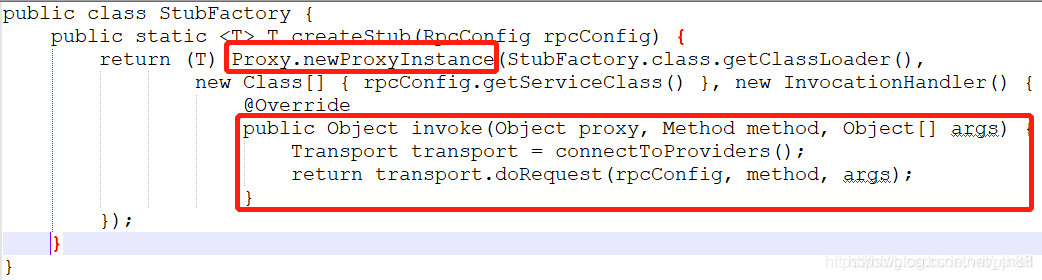
為了方便理解,我將其簡化了下,這裡使用了jdk自帶的代理對象生成方法,Proxy.newProxyInstance,需要在InvocationHandler的invoke方法中實現代理邏輯,在rpc框架中,代理邏輯可以簡單理解為連接服務提供端,發送請求,獲取返回。有了這個createStub方法,就可以很方便的生成任意我們想要調用的服務的代理對象了,還是非常方便的;這就是解耦的好處..
總結一下:代理分為靜態代理和動態代理,靜態代理將代理類和被代理類耦合在一起,實現增強時非常不便,需要大量編碼;
AOP的宗旨是實現無耦合的增強,動態代理就是AOP思想的實現方式之一,無耦合的方式對代碼沒有侵入性,可以很方便的實現功能增強,如果你需要給你的代碼添加一些通用的增強功能,你應該第一時間想到動態代理
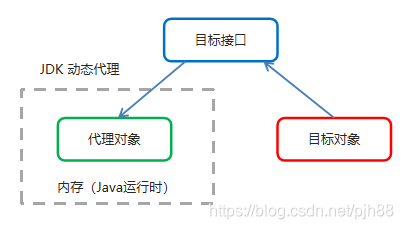
jdk代理
jdk代理:基於接口的動態代理技術
代理對象與目標對象是兄弟關係,不是繼承
cglib代理
cglib代理:基於父類的動態代理技術,代理對象與目標對象是父子關係

我們來逐一講解這兩個代理方式的差別
jdk代理
demo內容:user類實現一個userImp接口,對user類進行動態代理
user類代碼
package com.pjh.user;
public interface user {
    public void save();
}
userImp代碼
package com.pjh.user.Imp;
import com.pjh.user.user;
public class userImp implements user {
    public void save() {
        System.out.println("save run....");
    }
}
對save方法進行增強
這裡使用兩種方式
方式一匿名內部類:即InvocationHandler直接使用匿名內部類的方式來創建
package com.pjh.test;
import com.pjh.user.Imp.userImp;
import com.pjh.user.user;
import java.lang.reflect.InvocationHandler;
import java.lang.reflect.Method;
import java.lang.reflect.Proxy;
public class main {
    public static void main(String[] args) {
      //創建目標對象
        final userImp userImp=new userImp();
      //調用proxy類的靜態方法來創建代理對象
      //Proxy.newProxyInstance(類加載器,獲取目標對象的接口,實現動態代理接口)
       user userproxy = (user)Proxy.newProxyInstance(userImp.class.getClassLoader(),userImp.getClass().getInterfaces(), new InvocationHandler() {
       //invoke(代理類,被代理的方法,參數)
            public Object invoke(Object proxy, Method method, Object[] args) throws Throwable {
                System.out.println("前置增強代碼");
                      //當代理對象調用真實對象的方法時,其會自動的跳轉到代理對象關聯的handler對象的invoke方法來進行調用
                Object invoke = method.invoke(userImp);
                System.out.println("後置增強代碼");
                return invoke;
            }
        });
       userproxy.save();
    }
}
運行結果
成功對方法進行了增強
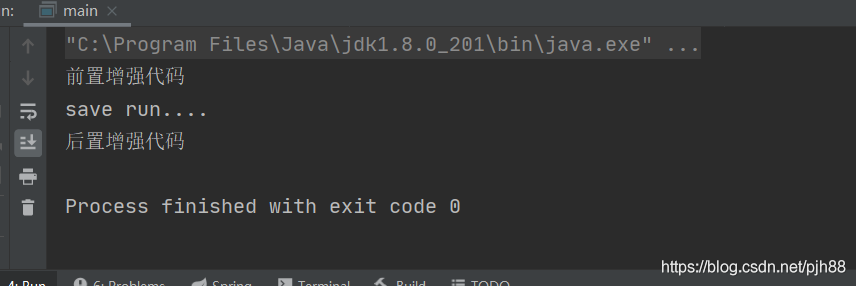
方法二使用一個類繼承自InvocationHandler來實現
編寫InvocationHandler實現類
package com.pjh.proxy;
import java.lang.reflect.InvocationHandler;
import java.lang.reflect.Method;
public class InvocationHandlerImp implements InvocationHandler {
    //所有類均繼承自object類
    private Object object;
    //寫一個帶參構造的方法,來引入目標對象
    public InvocationHandlerImp(Object object) {
        this.object = object;
    }
    public Object invoke(Object proxy, Method method, Object[] args) throws Throwable {
        System.out.println("增強前");
        Object invoke = method.invoke(object, args);
        System.out.println("執行後的方法");
        return invoke;
    }
}
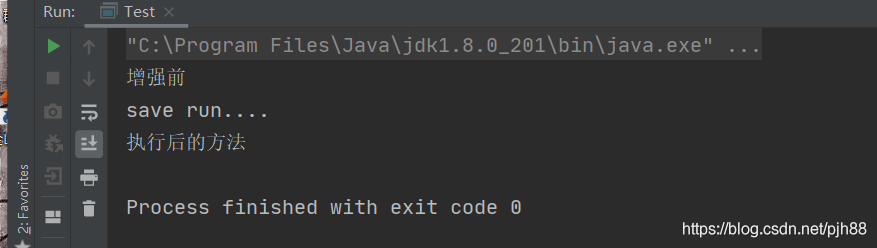
編寫測試類
package com.pjh.test;
import com.pjh.proxy.InvocationHandlerImp;
import com.pjh.user.Imp.userImp;
import com.pjh.user.user;
import java.lang.reflect.InvocationHandler;
import java.lang.reflect.Proxy;
public class Test {
    public static void main(String[] args) {
        //創建目標對象,即代理的真實對象
        userImp person = new userImp();
        //獲取處理器實現類InvocationHandlerImp
        InvocationHandlerImp invocationHandlerImp = new InvocationHandlerImp(person);
        //獲取代理對象
       user o = (user)Proxy.newProxyInstance(userImp.class.getClassLoader(),
               person.getClass().getInterfaces(),
                invocationHandlerImp);
       //調用方法
       o.save();
    }
}
運行結果
Cglib的動態代理
這裡就簡單的講一下流程
目標類
這裡僅僅是一個類沒有實現任何接口
package com.pjh.user;
public class person {
    public void save(){
        System.out.println("save");
    }
}
主函數
package com.pjh.test;
import com.pjh.user.person;
import org.springframework.cglib.proxy.Enhancer;
import org.springframework.cglib.proxy.MethodInterceptor;
import org.springframework.cglib.proxy.MethodProxy;
import java.lang.reflect.Method;
public class test2 {
    public static void main(String[] args) {
        //設置目標對象
        final person one = new person();
        //創建增強器
        Enhancer enhancer = new Enhancer();
        //設置父類
        enhancer.setSuperclass(person.class);
        //設置回調
        enhancer.setCallback(new MethodInterceptor() {
            public Object intercept(Object o, Method method, Object[] objects, MethodProxy methodProxy) throws Throwable {
                System.out.println("前置增強代碼");
                Object invoke = method.invoke(one, objects);
                System.out.println("後置增強");
                return invoke;
            }
        });
        //獲取代理對象
        person oneproxy = (person)enhancer.create();
        //調用增強後的方法
        oneproxy.save();
    }
}
Spring中AOP相關概念
String 的AOP實現底層就是對上面的動態代理進行了封裝,封裝後我們只需要對關注的部分進行代碼進行編寫,並通過配置的方式完成對指定目標的方法增強
AOP的部分術語
Target(目標對象):代理的目標對象
Proxy(代理):一個類被AOP織入增強後,就產生一個結果代理類
Joinpoint(連接點):所謂連接點指那些被攔截到的點,在spring中這些點指的是方法,因為spring是只支持方法類型的連接點
Pointcut(切入點):所謂切入點是指我們要對哪些Joinpoint進行攔截的定義,即被增強的方法
Jointpoint不一定是Pointcut但是Pointcut一定是Joinpoint
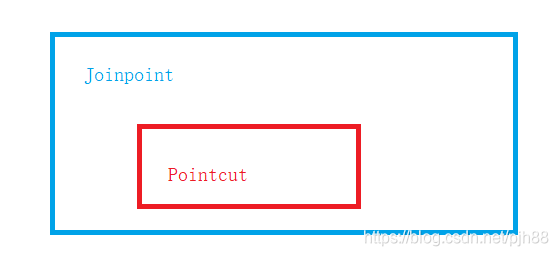
Advice(通知/增強):攔截到jointpoint之後要做的事情就是通知,封裝增強業務邏輯的方法
Aspect(切面):是切入點和通知的結合
Weaving(織入):是指把增強應用到目標對象來創建新的代理對象的過程,spring採用動態織入代理,而Aspect採用編譯織入和類裝載期織入,切點與通知結合的過程
**
AOP的實現內容
Spring框架監控切入點方法的執行,只要檢測到切入點被執行,就會使用代理機制,創建代理對象,根據通知類別,在代理對象的對應位置,將通知對應的功能織入,完成完整的代碼邏輯運行
AOP底層使用什麼代理機制
在spring中,框架會根據是否實現了接口來選擇使用那種動態代理方式
基於XML的AOP開發
快速入門
1.導入AOP的相關配置坐標
2.創建目標接口和目標類(內有切入點)
3.創建切面類(內部有增強方法)
4.將目標類和切面類的對象創建權交給spring
5.在applicationContext.xml中配置織入關係
6.測試代碼
1.導入AOP的相關坐標
<dependencies>
    <dependency>
        <groupId>org.springframework</groupId>
        <artifactId>spring-test</artifactId>
        <version>5.0.2.RELEASE</version>
    </dependency>
    <dependency>
        <groupId>org.springframework</groupId>
        <artifactId>spring-context</artifactId>
        <version>5.0.3.RELEASE</version>
    </dependency>
    <dependency>
        <groupId>org.aspectj</groupId>
        <artifactId>aspectjweaver</artifactId>
        <version>1.8.13</version>
    </dependency>
</dependencies>
創建接口與實現類
接口
package com.pjh.user;
public interface userInterface {
    public void save();
}
實現類
package com.pjh.user;
public class user implements userInterface{
    public void save() {
        System.out.println("save run...");
    }
}
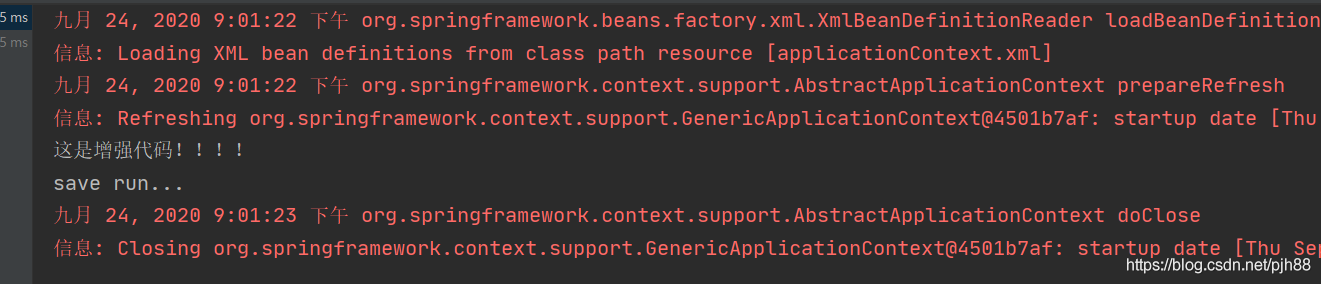
創建切面類
package com.pjh.enhance;
public class enhance {
    public  void enhance(){
        System.out.println("這是增強代碼!!!!");
    }
}
將目標類和切面類的對象創建權交給spring
<bean id="daoImp" class="com.pjh.dao.Imp.daoImp"/>
    <bean id="aspect" class="com.pjh.aspect.aspect"/>
引入命名空間與約束路徑
<?xml version="1.0" encoding="UTF-8"?>
<beans xmlns="//www.springframework.org/schema/beans"
       xmlns:xsi="//www.w3.org/2001/XMLSchema-instance"
       xmlns:aop="//www.springframework.org/schema/aop"
       xsi:schemaLocation="//www.springframework.org/schema/beans //www.springframework.org/schema/beans/spring-beans.xsd
//www.springframework.org/schema/aop //www.springframework.org/schema/aop/spring-aop.xsd">
</beans
配置切點表達式和前置增強之間的關係
切點表達式的配置語法
excution(【修飾符】返回值類型 包名.類名.方法名(參數))
通知的配置語法
<aop:通知類型 method=「切面類中方法名」 pointcut=「切點表達式”></aop:通知類型>
這裡先寫個簡單的格式後面再給大家深入講
<aop:config >
       <!--說明這是一個切面類-->
       <aop:aspect ref="enhance">
           <!--切入後的增強方法-->
           <!--這是一個前置增強-->
           <!--method切入後的增強方法-->
           <!--pointcut對什麼類方法執行的時候進行增強-->
           <aop:before
                   method="enhance" pointcut="execution(public void com.pjh.user.user.save())"></aop:before>
       </aop:aspect>
   </aop:config>
測試代碼類
import com.pjh.user.userInterface;
import org.junit.Test;
import org.junit.runner.RunWith;
import org.springframework.beans.factory.annotation.Autowired;
import org.springframework.test.context.ContextConfiguration;
import org.springframework.test.context.junit4.SpringJUnit4ClassRunner;
@RunWith(SpringJUnit4ClassRunner.class)
@ContextConfiguration("classpath:applicationContext.xml")
public class test {
    /*如果是繼承自接口的一定要使用接口進行定義否則會報錯*/
@Autowired
private userInterface user;
    @Test
    public  void test1(){
         user.save();
    }
}
結果
切點表達式的花樣寫法

表達式語法
excution(【修飾符】 返回值類型 包名.類名.方法名(參數))
返回值的修飾符可省略
返回值的類名,包名,方法名可以使用「 * 」星號代表任意
包名與類名之間的一個點” . “代表當前包下的所有類,兩個點「 …」代表當前包及其子包下的所有類
參數列表可以使用兩個點 ” . . “ 表示任意個數,任意類型的參數列表
//user類下的save方法增強
execution(public void com.pjh.one.user.save())
//對user類下的所有放回值為void的方法進行增強
execution(public void com.pjh.one.user.*(..))
//one包下所有類的所有方法進行增強
execution(* com.pjh.*.*.*(..))
//one包包括其子包下所有類的所有方法進行增強
execution(*  com.pjh..*.*.*(..))
//任何包任何類任何方法
execution(*  *.*..*.*. * (..))
切點表達式的抽取
當多個增強切點表達式相同時,可以將切點表達式進行抽取。在增強中使用pointcut-ref屬性替代pointcut屬性來引用切點表達式
<aop:config >
       <aop:aspect ref="enhance">
           <aop:pointcut id="myPointcut" expression="execution(public void com.pjh.user.user.save())"/>
           <aop:before
                   method="enhance" pointcut-ref="myPointcut"></aop:before>
       </aop:aspect>
   </aop:config>
通知的類型
通知的配置語法
<aop:通知的類型 method=「切面中的方法名」 pointcut=「切點表達式」/>
簡單的小總結
<aop:config >
       <aop:aspect ref="切入類的名稱>
           <aop:before
                   method="切入方法的名稱e" pointcut="切點表達式"></aop:before>
       </aop:aspect>
   </aop:config>
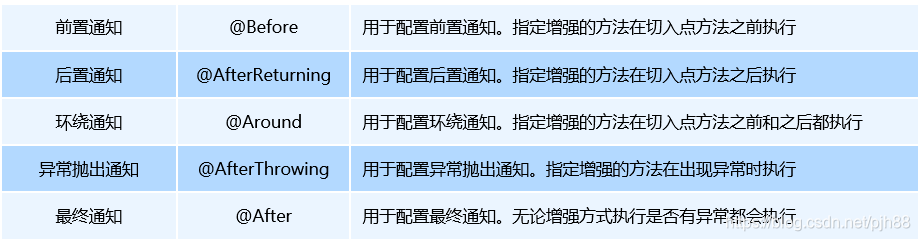
通知的類型:前置通知、後置通知、環繞通知、異常拋出通知、最終通知
切點表達式的寫法:
excution(【修飾符】返回值類型 包名.類名.方法名(參數))
下面我們再來講講更加簡單的方法,即使用註解的方式
基於註解的AOP開發
註解aop的開發步驟
1.使用@Aspect標註切面類
2.使用@通知註解標註通知方法
3.在配置文件中配置aop自動代理<aop:aspectj-autoproxy>
標註為一個切面類@Aspect
@Aspect
public class enhance {

}
使用註解來抽取切點表達式
@Pointcut(」註解表達式「)
切點表達式方法的抽取,抽取方法是在切點內定義方法,
在方法內使用 @Pointcut註解切點表達式,然後在增強註解中進行引用
@Pointcut("execution(public void com.pjh.user.user.save())")
    public void mypoint(){
    }
Spring之JDBCTemplate
啥是jdncTemplate?
t他是spring框架中提供的一個對象,是對原始的jdbcAPI對象的簡單封裝,spring框架為我們提供了很多操作,模板類,比如操作關係型數據庫的jdbcTemplate,操作nosql數據庫的Redis Template,操作消息隊列的jmsTemplate等等
JdbcTemplate開發步驟
1.導入sprign-jdbc和spring-tx坐標
2.創建數據庫表和實體
3.創建JdbcTemplate對象
4.執行數據庫操作
1.導入sprign-jdbc和spring-tx坐標
<dependencies>
    <dependency>
        <groupId>org.springframework</groupId>
        <artifactId>spring-test</artifactId>
        <version>5.0.2.RELEASE</version>
    </dependency>
    <dependency>
        <groupId>org.springframework</groupId>
        <artifactId>spring-jdbc</artifactId>
        <version>5.0.3.RELEASE</version>
    </dependency>
    <dependency>
        <groupId>org.springframework</groupId>
        <artifactId>spring-tx</artifactId>
        <version>5.0.3.RELEASE</version>
    </dependency>
    <dependency>
        <groupId>mysql</groupId>
        <artifactId>mysql-connector-java</artifactId>
        <version>5.1.32</version>
    </dependency>
    <dependency>
        <groupId>junit</groupId>
        <artifactId>junit</artifactId>
        <version>4.12</version>
    </dependency>
    <dependency>
        <groupId>c3p0</groupId>
        <artifactId>c3p0</artifactId>
        <version>0.9.1.2</version>
    </dependency>
    <dependency>
        <groupId>com.alibaba</groupId>
        <artifactId>druid</artifactId>
        <version>1.0.9</version>
    </dependency>
</dependencies>
2.創建數據庫表和實體
使用sqlyog創建一個表
語句
CREATE TABLE test1(
id INT,
NAME VARCHAR(10)
 );
創建實體
package com.pjh;
public class user {
    private Integer id;
    private String name;
    public Integer getId() {
        return id;
    }
    public void setId(Integer id) {
        this.id = id;
    }
    public String getName() {
        return name;
    }
    public void setName(String name) {
        this.name = name;
    }
    @Override
    public String toString() {
        return "user{" +
                "id=" + id +
                ", name='" + name + '\'' +
                '}';
    }
}
**
JbdcTemplate快速入門,不使用spring框架的時候
_
@Test
    public void test1() throws PropertyVetoException {
    ComboPooledDataSource comboPooledDataSource = new ComboPooledDataSource();
    comboPooledDataSource.setDriverClass("com.mysql.jdbc.Driver");
    comboPooledDataSource.setJdbcUrl("jdbc:mysql://localhost:3309/one");
    comboPooledDataSource.setUser("root");
    comboPooledDataSource.setPassword("1234");
    //創建jdbcTemplate對象
    JdbcTemplate jdbcTemplate = new JdbcTemplate();
    jdbcTemplate.setDataSource(comboPooledDataSource);
    //執行語句
    jdbcTemplate.update("insert into test1 values(?,?)",10,"one");
}
結果
抽取配置文件
配置文件代碼:
jdbc.driver=com.mysql.jdbc.Driver
jdbc.url=jdbc:mysql://localhost:3309/one
jdbc.name=root
jdbc.password=1234
測試函數操作
@Test
public void test3() throws PropertyVetoException {
    //讀取配置文件
    ResourceBundle jdbc = ResourceBundle.getBundle("jdbc");
    //獲取連接池
    ComboPooledDataSource comboPooledDataSource = new ComboPooledDataSource();
    //設置參數
    comboPooledDataSource.setDriverClass(jdbc.getString("jdbc.driver"));
    comboPooledDataSource.setJdbcUrl(jdbc.getString("jdbc.url"));
    comboPooledDataSource.setUser(jdbc.getString("jdbc.name"));
    comboPooledDataSource.setPassword(jdbc.getString("jdbc.password"));
    //創建jdbcTemplate對象
    JdbcTemplate jdbcTemplate = new JdbcTemplate();
    jdbcTemplate.setDataSource(comboPooledDataSource);
    jdbcTemplate.update("insert into test1 values(?,?)",13,"three");
}
使用spring創建JdbcTemplate對象
將數據源DataSource與JdbcTemplate的創建權交給Spring並在Spring容器內進行依賴注入
配置代碼:
<bean id="datasource" class="com.mchange.v2.c3p0.ComboPooledDataSource">
    <property name="driverClass" value="com.mysql.jdbc.Driver"/>
    <property name="jdbcUrl" value="jdbc:mysql://localhost:3309/one"/>
    <property name="user" value="root"/>
    <property name="password" value="1234"/>
</bean>
    <bean id="jdbcTemplate" class="org.springframework.jdbc.core.JdbcTemplate">
        <property name="dataSource" ref="datasource"/>
    </bean>
測試函數
@Test
    public void test2(){
    ClassPathXmlApplicationContext classPathXmlApplicationContext =
            new ClassPathXmlApplicationContext("applicationContext.xml");
    JdbcTemplate jdbcTemplate =(JdbcTemplate) classPathXmlApplicationContext.getBean("jdbcTemplate");
    jdbcTemplate.update("insert into test1 values(?,?)",11,"two");
}
結果
成功插入

這個也可以使用讀取配置文件的方式
我們首先要導入context的約束路徑與命名空間
命名空間: xmlns:context=「//www.springframework.org/schema/context」
約束路徑://www.springframework.org/schema/context //www.springframework.org/schema/context/spring-context.xsd
配置文件修改
<?xml version="1.0" encoding="UTF-8"?>
<beans xmlns="//www.springframework.org/schema/beans"
xmlns:context="//www.springframework.org/schema/context"
xmlns:xsi="//www.w3.org/2001/XMLSchema-instance"
xsi:schemaLocation="//www.springframework.org/schema/beans //www.springframework.org/schema/beans/spring-beans.xsd
//www.springframework.org/schema/context //www.springframework.org/schema/context/spring-context.xsd">
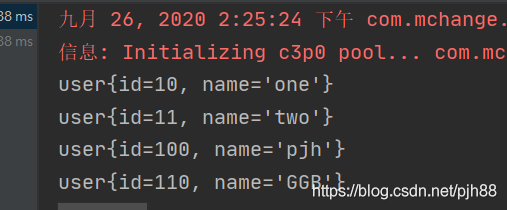
<bean id="datasource" class="com.mchange.v2.c3p0.ComboPooledDataSource">
<property name="driverClass" value="${jdbc.driver}"/>
<property name="jdbcUrl" value="${jdbc.url}"/>
<property name="user" value="${jdbc.name}"/>
<property name="password" value="${jdbc.password}"/>
</bean>
<bean id="jdbcTemplate" class="org.springframework.jdbc.core.JdbcTemplate">
<property name="dataSource" ref="datasource"/>
</bean>
<context:property-placeholder location="classpath:jdbc.properties"/>
</beans>
測試代碼
@Test
    public void test4(){
        ClassPathXmlApplicationContext classPathXmlApplicationContext =
                new ClassPathXmlApplicationContext("applicationContext.xml");
        JdbcTemplate jdbcTemplate =(JdbcTemplate) classPathXmlApplicationContext.getBean("jdbcTemplate");
        jdbcTemplate.update("insert into test1 values(?,?)",100,"pjh");
    }
結果
成功插入

通過註解的方式來得到JdbcTemplate
使用框架
@RunWith(SpringJUnit4ClassRunner.class)
@ContextConfiguration("classpath:applicationContext.xml")
public class test {
@Autowired
private  JdbcTemplate jdbcTemplate;
    @Test
    public void test7(){
        jdbcTemplate.update("insert into test1 values(?,?)",110,"GGB");
    }
不使用框架
public void test1() throws PropertyVetoException {
    ComboPooledDataSource comboPooledDataSource = new ComboPooledDataSource();
    comboPooledDataSource.setDriverClass("com.mysql.jdbc.Driver");
    comboPooledDataSource.setJdbcUrl("jdbc:mysql://localhost:3309/one");
    comboPooledDataSource.setUser("root");
    comboPooledDataSource.setPassword("1234");
    //創建jdbcTemplate對象
    JdbcTemplate jdbcTemplate = new JdbcTemplate();
    jdbcTemplate.setDataSource(comboPooledDataSource);
    //執行語句
    jdbcTemplate.update("insert into test1 values(?,?)",10,"one");
}
由二者對比即可看出框架的巨大好處,上面那麼長的代碼現在只要幾行即可解決

JDBCTemplate的常用操作
查詢語句
查詢數據庫中的所有內容
@RunWith(SpringJUnit4ClassRunner.class)
@ContextConfiguration("classpath:applicationContext.xml")
public class test {
@Autowired
private JdbcTemplate jdbcTemplate;
@Test
public void test8(){
String sql="select * from test1 where name=?";
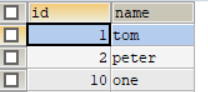
List<user> query = jdbcTemplate.query(sql, new BeanPropertyRowMapper<user>(user.class));
for (user user : query) {
System.out.println(user);
}
}
結果
查詢數據庫中的某條內容
@RunWith(SpringJUnit4ClassRunner.class)
@ContextConfiguration("classpath:applicationContext.xml")
public class test {
@Autowired
private  JdbcTemplate jdbcTemplate;
   @Test
 @Test
    public void test9(){
        String sql="select * from test1 where id=?";
        List<user> query = jdbcTemplate.query(sql, new BeanPropertyRowMapper<user>(user.class), 10);
        for (user user : query) {
            System.out.println(user);
        }
    }
}
查詢數據庫記錄的數量
@RunWith(SpringJUnit4ClassRunner.class)
@ContextConfiguration("classpath:applicationContext.xml")
public class test {
@Autowired
private  JdbcTemplate jdbcTemplate;
@Test
public void test90(){
    String sql="select count(*) from test1";
    Long aLong = jdbcTemplate.queryForObject(sql, Long.class);
    System.out.println("記錄條數:"+aLong);
}
}
刪除指定記錄
@RunWith(SpringJUnit4ClassRunner.class)
@ContextConfiguration("classpath:applicationContext.xml")
public class test {
@Autowired
private  JdbcTemplate jdbcTemplate;
@Test
public void test11(){
    String sql="delete from test1 where id=11";
    jdbcTemplate.update(sql);
}
}
Spring系列之事務的控制 註解實現+xml實現
**
對事務不了解的點擊鏈接跳轉到附錄附錄我有介紹:事務
**
編程式事務控制對象
事務管理器:PlatformTransactionManager
PlatformTransactionManager是事務的管理器,他提供了我們常用的事務操作方法
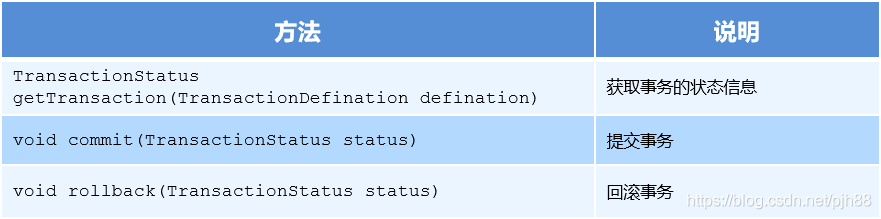
為什麼PlatformTransactionManager是接口類型?
因為不同的dao層技術有不同的實現類
Dao層是jdbc時:org.springframework.jdbc.datasource.DataSourceTransactionManager
Dao層是mybatis時:org.springframework.orm.hibernate5.HibernateTransactionManager
事務的定義信息對象:TransactionDefinition
TransactionDefinition
裏面的方法
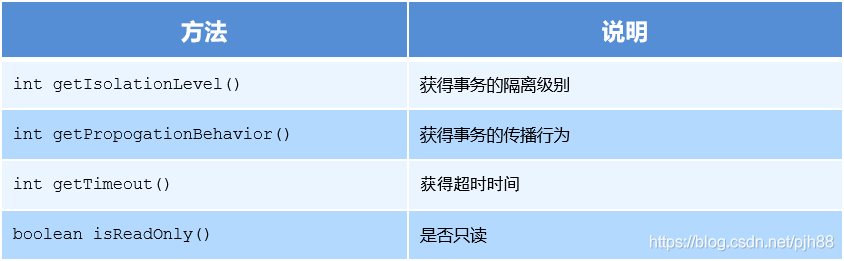
事務的隔離級別
ISOLATION_READ_UNCOMMITTED(讀未提交)
實質:一個事務讀取另一個事務未提交的數據
例子:老闆要給程序員發工資,程序員的工資是3.6萬/月。但是發工資時老闆不小心按錯了數字,按成3.9萬/月,該錢已經打到程序員的戶口,但是事務還沒有提交,就在這時,程序員去查看自己這個月的工資,發現比往常多了3千元,以為漲工資了非常高興。但是老闆及時發現了不對,馬上回滾差點就提交了的事務,將數字改成3.6萬再提交。
分析:實際程序員這個月的工資還是3.6萬,但是程序員看到的是3.9萬。他看到的是老闆還沒提交事務時的數據。這就是臟讀。
ISOLATION_READ_COMMITTED(讀已提交)
實質:一個用戶讀取另一個用戶已提交的數據
事例:程序員拿着信用卡去享受生活(卡里當然是只有3.6萬),當他埋單時(程序員事務開啟),收費系統事先檢測到他的卡里有3.6萬,就在這個時候!!程序員的妻子要把錢全部轉出充當家用,並提交。當收費系統準備扣款時,再檢測卡里的金額,發現已經沒錢了(第二次檢測金額當然要等待妻子轉出金額事務提交完)。程序員就會很鬱悶,明明卡里是有錢的…
分析:這就是讀提交,若有事務對數據進行更新(UPDATE)操作時,讀操作事務要等待這個更新操作事務提交後才能讀取數據,可以解決臟讀問題。但在這個事例中,出現了一個事務範圍內兩個相同的查詢卻返回了不同數據,這就是不可重複讀。
ISOLATION_REPEATABLE_READ(重複讀)
實質:一個事務在讀取數據時,其他事務不允許進行修改操作
事例:程序員拿着信用卡去享受生活(卡里當然是只有3.6萬),當他埋單時(事務開啟,不允許其他事務的UPDATE修改操作),收費系統事先檢測到他的卡里有3.6萬。這個時候他的妻子不能轉出金額了。接下來收費系統就可以扣款了。
分析:重複讀可以解決不可重複讀問題。寫到這裡,應該明白的一點就是,不可重複讀對應的是修改,即UPDATE操作。但是可能還會有幻讀問題。因為幻讀問題對應的是插入INSERT操作,而不是UPDATE操作。
ISOLATION_SERIALIZABLE(幻讀)
事例:程序員某一天去消費,花了2千元,然後他的妻子去查看他今天的消費記錄(全表掃描FTS,妻子事務開啟),看到確實是花了2千元,就在這個時候,程序員花了1萬買了一部電腦,即新增INSERT了一條消費記錄,並提交。當妻子打印程序員的消費記錄清單時(妻子事務提交),發現花了1.2萬元,似乎出現了幻覺,這就是幻讀。
事務的傳播行為
什麼是事務的傳播行為:
解決業務方法調用業務方法的時候,事務統一性的問題,比如A業務方法調用B業務方法,而A業務方法B業務方法事先都開啟了事務,這就會出現事務統一的問題
REQUIRED:如果當前沒有事務,就新建一個事務,如果已經存在一個事務中,加入到這個事務中。一般的選擇(默認值)
案例解析:A業務方法調用B業務方法,B業務方法看A業務方法有沒有事務,如果A業務方法有事務就加入A的事務,如果A業務方法沒有事務,則B業務方法創建一個事務
SUPPORTS:支持當前事務,如果當前沒有事務,就以非事務方式執行(沒有事務)
案例解析:A業務方法調用B業務方法,B業務方法看A業務方法有沒有事務,如果A業務方法有事務就加入A的事務,如果A業務方法沒有事務,則B業務方法就以非事務方式運行
MANDATORY:使用當前的事務,如果當前沒有事務,就拋出異常
案例解析:A業務方法調用B業務方法,B業務方法看A業務方法有沒有事務,如果A業務方法有事務就加入A的事務,如果A業務方法沒有事務,則B業務方法就拋出異常,表示老子不幹了

REQUERS_NEW:新建事務,如果當前在事務中,把當前事務掛起。
NOT_SUPPORTED:以非事務方式執行操作,如果當前存在事務,就把當前事務掛起
NEVER:以非事務方式運行,如果當前存在事務,拋出異常
NESTED:如果當前存在事務,則在嵌套事務內執行。如果當前沒有事務,則執行 REQUIRED 類似的操作
超時時間:默認值是-1,沒有超時限制。如果有,以秒為單位進行設置
是否只讀:建議查詢時設置為只讀
TransactionStatus:事務的具體運行狀態
不需配置
TransactionStatus接口提供的是事務具體的運行狀態,方法如下
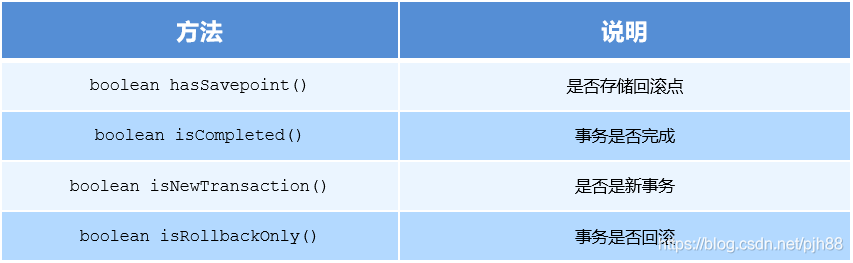
**
編程式事務控制的三大對象
**
PlatformTransactionManager
TransactionDefinition
TransactionStatus
基於XML的聲明式事務控制
Spring的聲明式事務控制顧名思義就是使用聲明的方式來處理事務,這裡的聲明指的是在配置文件中聲明,Spring配置文件中的聲明式處理來代替代碼式的事務處理
聲明式事務處理的作用
事務處理是不侵入開發的組件,具體來說,業務邏輯對象不會意識帶正在處於事務處理之中,事實上也應該如此,因為事務管理是出於系統層面的職務,而不是業務邏輯處理的一部分,如果要改變事務管理策劃的話,也只需要在定義文件中重新配置即可
在不需要事務管理的時候,只要在設定的文件上修改一下,即可移除事務管理服務,不需要改變代碼重新編譯,這樣維護起來更加方便
Spring事務控制的底層就是AOP
聲明式事務控制的實現
切點:需要被事務管理的方法,即業務方法
通知/增強:事務增強
切面:二者結合
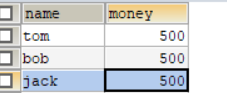
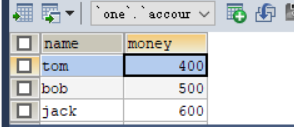
下面通過一個銀行業務轉賬的案例來方便大家理解
1.創建數據庫和實體
表名:account
字段名:moey–錢,Name–客戶名
CREATE TABLE account(
NAME VARCHAR(10),
money DOUBLE
);
插入三個字段值
INSERT INTO account VALUE('tom',1),('bob',2),('jack',3);
2.需要導入的坐標
<?xml version="1.0" encoding="UTF-8"?>
<project xmlns="//maven.apache.org/POM/4.0.0"
         xmlns:xsi="//www.w3.org/2001/XMLSchema-instance"
         xsi:schemaLocation="//maven.apache.org/POM/4.0.0 //maven.apache.org/xsd/maven-4.0.0.xsd">
    <modelVersion>4.0.0</modelVersion>
    <groupId>org.example</groupId>
    <artifactId>spring-mysql</artifactId>
    <version>1.0-SNAPSHOT</version>
<dependencies>
    <dependency>
        <groupId>mysql</groupId>
        <artifactId>mysql-connector-java</artifactId>
        <version>5.1.32</version>
    </dependency>
    <dependency>
        <groupId>com.alibaba</groupId>
        <artifactId>druid</artifactId>
        <version>1.1.10</version>
    </dependency>
    <dependency>
        <groupId>c3p0</groupId>
        <artifactId>c3p0</artifactId>
        <version>0.9.1.2</version>
    </dependency>
    <dependency>
        <groupId>org.springframework</groupId>
        <artifactId>spring-context</artifactId>
        <version>5.0.5.RELEASE</version>
    </dependency>
    <dependency>
        <groupId>org.springframework</groupId>
        <artifactId>spring-tx</artifactId>
        <version>5.0.3.RELEASE</version>
    </dependency>
    <dependency>
        <groupId>org.springframework</groupId>
        <artifactId>spring-jdbc</artifactId>
        <version>5.0.3.RELEASE</version>
    </dependency>
    <dependency>
        <groupId>org.springframework</groupId>
        <artifactId>spring-test</artifactId>
        <version>5.0.5.RELEASE</version>
    </dependency>
    <dependency>
        <groupId>junit</groupId>
        <artifactId>junit</artifactId>
        <version>4.13</version>
    </dependency>
    <dependency>
        <groupId>org.aspectj</groupId>
        <artifactId>aspectjweaver</artifactId>
        <version>1.8.13</version>
    </dependency>
    <dependency>
        <groupId>org.junit.jupiter</groupId>
        <artifactId>junit-jupiter</artifactId>
        <version>RELEASE</version>
        <scope>compile</scope>
    </dependency>
</dependencies>
</project>
3.創建實體類
package com.pjh.account;
public class account {
    private  double money;
    private  String name;
    @Override
    public String toString() {
        return "account{" +
                "money=" + money +
                ", name='" + name + '\'' +
                '}';
    }
    public double getMoney() {
        return money;
    }
    public void setMoney(double money) {
        this.money = money;
    }
    public String getName() {
        return name;
    }
    public void setName(String name) {
        this.name = name;
    }
}
4.dao層(執行語句,與數據庫交互)
接口
package com.pjh.dao;
public interface ServiceDao {
    public void inman(String inName,double money);
    public void outman(String outName,double money);
}
實現類
package com.pjh.dao.imp;
import com.pjh.dao.ServiceDao;
import org.springframework.jdbc.core.JdbcTemplate;
public class ServiceDaoImp implements ServiceDao {
    private JdbcTemplate jdbcTemplate;
    public void setJdbcTemplate(JdbcTemplate jdbcTemplate) {
        this.jdbcTemplate = jdbcTemplate;
    }
    public void inman(String inName, double money) {
        jdbcTemplate.update("update account set money=money-? where name =?",money,inName);
    }
    public void outman(String outName, double money) {
          jdbcTemplate.update("update account set money=money+? where name =?",money,outName);
    }
}
5.service層
接口
package com.pjh.service;
public interface service {
    public void trasfer(String inName,String outName,double money);
}
實現類
package com.pjh.service.Imp;
import com.pjh.dao.imp.ServiceDaoImp;
import com.pjh.service.service;
import org.springframework.beans.factory.annotation.Autowired;
public class serviceImp implements service {
    private ServiceDaoImp serviceDaoImp;
    public void setServiceDaoImp(ServiceDaoImp serviceDaoImp) {
        this.serviceDaoImp = serviceDaoImp;
    }
    public void trasfer(String inName, String outName, double money) {
        serviceDaoImp.inman(inName,money);

        serviceDaoImp.outman(outName,money);
    }
}
6.applicationContext配置文件
<?xml version="1.0" encoding="UTF-8"?>
<beans xmlns="//www.springframework.org/schema/beans"
       xmlns:context="//www.springframework.org/schema/context"
       xmlns:aop="//www.springframework.org/schema/aop"
       xmlns:tx="//www.springframework.org/schema/tx"
       xmlns:xsi="//www.w3.org/2001/XMLSchema-instance"
       xsi:schemaLocation="//www.springframework.org/schema/beans //www.springframework.org/schema/beans/spring-beans.xsd
       //www.springframework.org/schema/context //www.springframework.org/schema/context/spring-context.xsd
       //www.springframework.org/schema/aop //www.springframework.org/schema/aop/spring-aop.xsd
       //www.springframework.org/schema/tx //www.springframework.org/schema/tx/spring-tx.xsd">
<bean id="dataSource" class="com.mchange.v2.c3p0.ComboPooledDataSource">
    <property name="password" value="${jdbc.password}"/>
    <property name="user" value="${jdbc.name}"/>
    <property name="driverClass" value="${jdbc.driver}"/>
    <property name="jdbcUrl" value="${jdbc.url}"/>
</bean>
    <bean id="jdbcTemplate" class="org.springframework.jdbc.core.JdbcTemplate">
        <property name="dataSource" ref="dataSource"></property>
    </bean>
   <bean id="serviceDaoImp" class="com.pjh.dao.imp.ServiceDaoImp">
       <property name="jdbcTemplate" ref="jdbcTemplate"/>
    </bean>
    <!--目標對象 內部方法就是切點-->
    <bean id="serviceImp" class="com.pjh.service.Imp.serviceImp">
        <property name="serviceDaoImp" ref="serviceDaoImp"></property>
    </bean>
    <!--配置平台事務管理器-->
    <bean id="transactionManager" class="org.springframework.jdbc.datasource.DataSourceTransactionManager">
        <property name="dataSource" ref="dataSource"/>
    </bean>
    <!--通知 事務的增強-->
   <tx:advice id="txAdvice" transaction-manager="transactionManager">
       <tx:attributes>
           <tx:method name="*"/>
       </tx:attributes>
   </tx:advice>
    <!--配置事務的織入-->
  <aop:config proxy-target-class="true">
      <aop:pointcut id="txPointcut" expression="execution(* com.pjh.service.Imp.serviceImp.*(..))"/>
      <aop:advisor advice-ref="txAdvice" pointcut-ref="txPointcut"/>
  </aop:config>
    <context:property-placeholder location="classpath:jdbc.properties"/>
    <context:component-scan base-package="com.pjh"/>
</beans>
7.主函數
package com.pjh.control;
import com.pjh.service.Imp.serviceImp;
import com.pjh.service.service;
import org.springframework.context.support.ClassPathXmlApplicationContext;
public class control2 {
    public static void main(String[] args) {
        ClassPathXmlApplicationContext classPathXmlApplicationContext = new ClassPathXmlApplicationContext("applicationContext.xml");
       service bean1 =(service) classPathXmlApplicationContext.getBean(service.class);
        bean1.trasfer("tom","jack",100);
    }
}
結果
成功轉賬
下面我們重點來講講切點方法的事務配置
<tx:advice id="txAdvice" transaction-manager="transactionManager">
       <tx:attributes>
           <tx:method name="*"/>
       </tx:attributes>
   </tx:advice>
<tx:method >:代表事務參數方法的配置
這個部分一定要重點掌握這是核心
<tx:method name="transfer" isolation="REPEATABLE_READ" propagation="REQUIRED" timeout="-1" read-only="false"/>
name:切點方法名稱
isolation:事務的隔離級別
propogation:事務的傳播行為
timeout:超時時間
read-only:是否只讀
使用註解的方式進行事務的配置
1.dao層
package com.pjh.dao.imp;
import com.pjh.dao.ServiceDao;
import org.springframework.beans.factory.annotation.Autowired;
import org.springframework.jdbc.core.JdbcTemplate;
import org.springframework.stereotype.Repository;
@Repository("ServiceDaoImp")
public class ServiceDaoImp implements ServiceDao {
    @Autowired
    private JdbcTemplate jdbcTemplate;
    public void inman(String inName, double money) {
        jdbcTemplate.update("update account set money=money-? where name =?",money,inName);
    }
    public void outman(String outName, double money) {
          jdbcTemplate.update("update account set money=money+? where name =?",money,outName);
    }
}
2.service層
package com.pjh.service.Imp;
import com.pjh.dao.imp.ServiceDaoImp;
import com.pjh.service.service;
import org.springframework.beans.factory.annotation.Autowired;
import org.springframework.stereotype.Service;
import org.springframework.transaction.annotation.Transactional;
@Service("serviceImp")
@Transactional
public class serviceImp implements service {
    @Autowired
    private ServiceDaoImp serviceDaoImp;
 public void trasfer(String inName, String outName, double money) {
        serviceDaoImp.inman(inName,money);
        //int a=1/0;
        serviceDaoImp.outman(outName,money);
    }
}
3.編寫applicationContext的內容
<!--組件掃描-->
<context:component-scan base-package="com.pjh"/>
<!--事務的註解驅動-->
<tx:annotation-driven transaction-manager="transactionManager"/>
小總結
1.使用 @Transactional 在需要進行事務控制的類或是方法上修飾,註解可用的屬性同 xml 配置方式,例如隔離級別、傳播行為等。
註解使用在類上,那麼該類下的所有方法都使用同一套註解參數配置。
使用在方法上,不同的方法可以採用不同的事務參數配置。
2.Xml配置文件中要開啟事務的註解驅動<tx:annotation-driven />


