從SpringBoot構建十萬博文聊聊限流特技
- 2019 年 10 月 3 日
- 筆記

前言
在開發十萬博客系統的的過程中,前面主要分享了爬蟲、緩存穿透以及文章閱讀量計數等等。爬蟲的目的就是解決十萬+問題;緩存穿透是為了保護後端數據庫查詢服務;計數服務解決了接近真實閱讀數以及數據庫服務的壓力。
架構圖
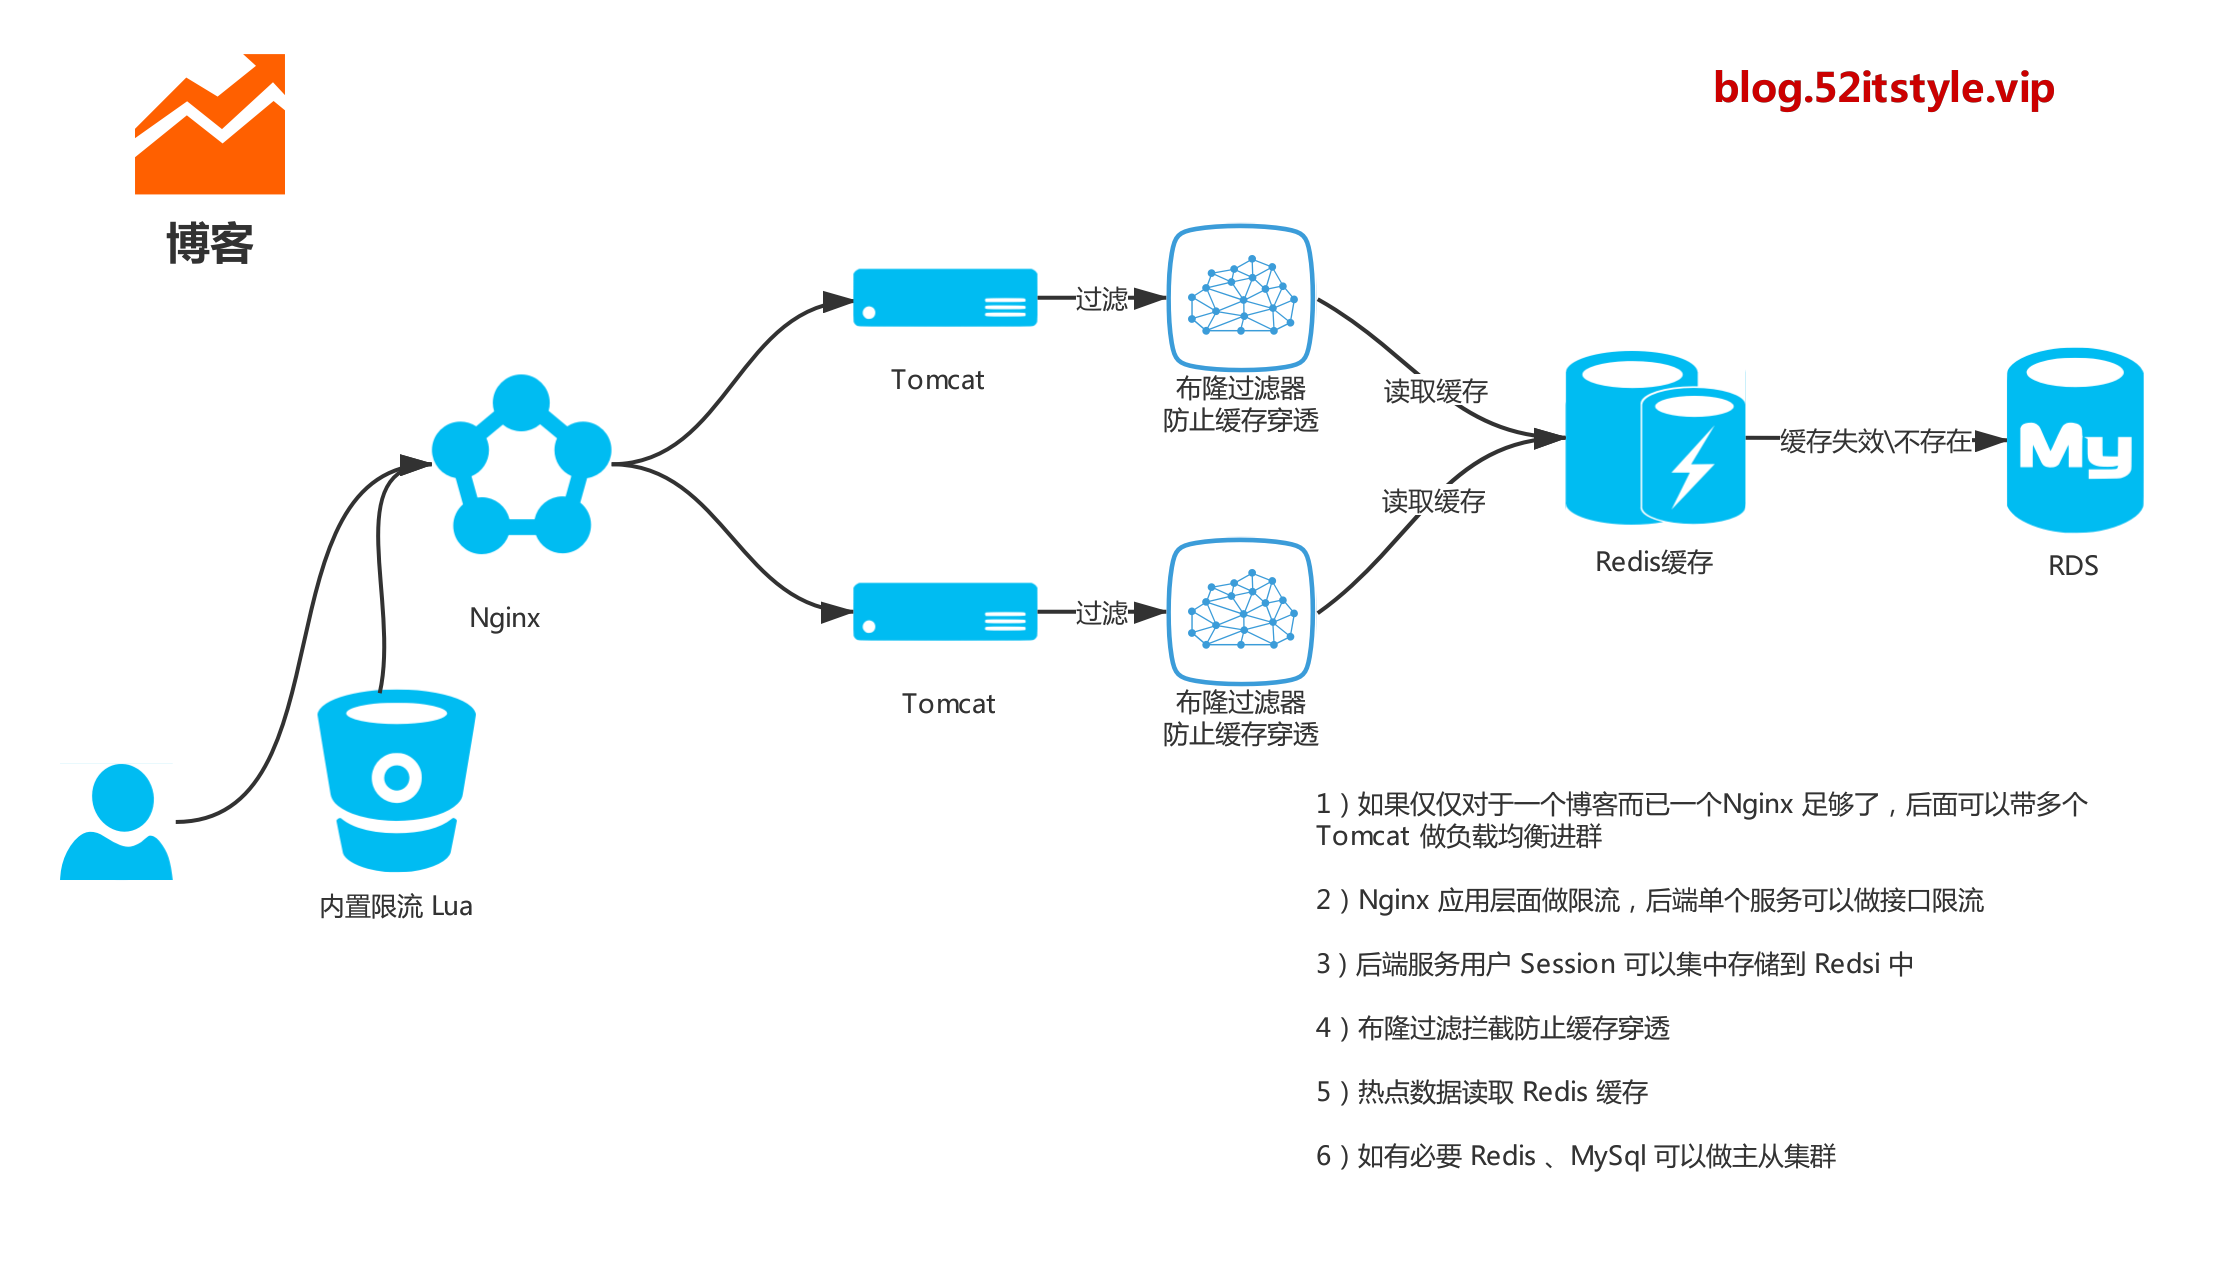
限流
就拿十萬博客來說,如果存在熱點文章,可能會有數十萬級別的並發用戶參與閱讀。如果想讓這些用戶正常訪問,無非就是加機器橫向擴展各種服務,但凡事都有一個利益平衡點,有時候只需要少量的機器保證大部分用戶在大部分時間可以正常訪問即可。
亦或是,如果存在大量爬蟲或者惡意攻擊,我們必須採取一定的措施來保證服務的正常運行。這時候我們就要考慮限流來保證服務的可用性,以防止非預期的請求對系統壓力過大而引起的系統癱瘓。通常的策略就是拒絕多餘的訪問,或者讓多餘的訪問排隊等待服務。
限流算法
任何限流都不是漫無目的的,也不是一個開關就可以解決的問題,常用的限流算法有:令牌桶,漏桶。
令牌桶
令牌桶算法是網絡流量整形(Traffic Shaping)和速率限制(Rate Limiting)中最常使用的一種算法。典型情況下,令牌桶算法用來控制發送到網絡上的數據的數目,並允許突發數據的發送(百科)。

用戶的請求速率是不固定的,這裡我們假定為10r/s,令牌按照5個每秒的速率放入令牌桶,桶中最多存放20個令牌。仔細想想,是不是總有那麼一部分請求被丟棄。
漏桶
漏桶算法的主要目的是控制數據注入到網絡的速率,平滑網絡上的突發流量。漏桶算法提供了一種機制,通過它,突發流量可以被整形以便為網絡提供一個穩定的流量(百科)。
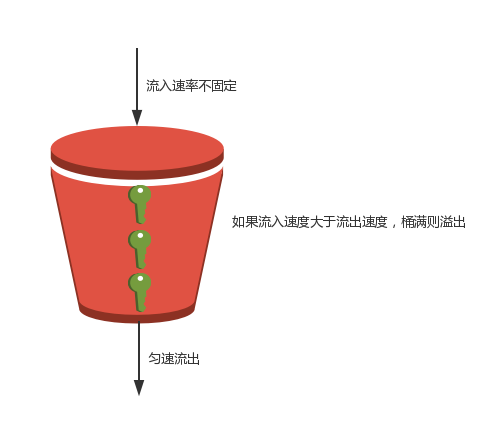
令牌桶是無論你流入速率多大,我都按照既定的速率去處理,如果桶滿則拒絕服務。
應用限流
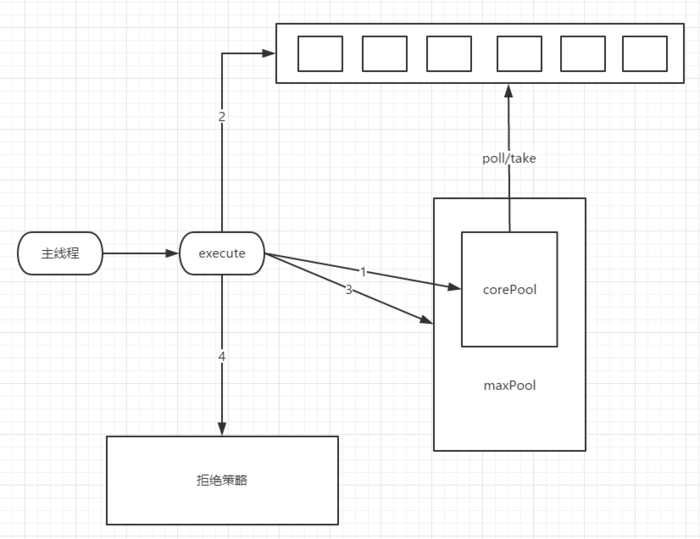
Tomcat
在Tomcat容器中,我們可以通過自定義線程池,配置最大連接數,請求處理隊列等參數來達到限流的目的。
Tomcat默認使用自帶的連接池,這裡我們也可以自定義實現,打開/conf/server.xml文件,在Connector之前配置一個線程池:
<Executor name="tomcatThreadPool" namePrefix="tomcatThreadPool-" maxThreads="1000" maxIdleTime="300000" minSpareThreads="200"/>- name:共享線程池的名字。這是Connector為了共享線程池要引用的名字,該名字必須唯一。默認值:None;
- namePrefix:在JVM上,每個運行線程都可以有一個name 字符串。這一屬性為線程池中每個線程的name字符串設置了一個前綴,Tomcat將把線程號追加到這一前綴的後面。默認值:tomcat-exec-;
- maxThreads:該線程池可以容納的最大線程數。默認值:200;
- maxIdleTime:在Tomcat關閉一個空閑線程之前,允許空閑線程持續的時間(以毫秒為單位)。只有當前活躍的線程數大於minSpareThread的值,才會關閉空閑線程。默認值:60000(一分鐘)。
- minSpareThreads:Tomcat應該始終打開的最小不活躍線程數。默認值:25。
配置Connector
<Connector executor="tomcatThreadPool" port="8080" protocol="HTTP/1.1" connectionTimeout="20000" redirectPort="8443" minProcessors="5" maxProcessors="75" acceptCount="1000"/>- executor:表示使用該參數值對應的線程池;
- minProcessors:服務器啟動時創建的處理請求的線程數;
- maxProcessors:最大可以創建的處理請求的線程數;
- acceptCount:指定當所有可以使用的處理請求的線程數都被使用時,可以放到處理隊列中的請求數,超過這個數的請求將不予處理。
API限流
這裡我們採用開源工具包guava提供的限流工具類RateLimiter進行API限流,該類基於"令牌桶算法",開箱即用。
自定義定義註解
/** * 自定義註解 限流 * 創建者 爪窪筆記 * 博客 https://blog.52itstyle.vip * 創建時間 2019年8月15日 */ @Target({ElementType.PARAMETER, ElementType.METHOD}) @Retention(RetentionPolicy.RUNTIME) @Documented public @interface ServiceLimit { /** * 描述 */ String description() default ""; /** * key */ String key() default ""; /** * 類型 */ LimitType limitType() default LimitType.CUSTOMER; enum LimitType { /** * 自定義key */ CUSTOMER, /** * 根據請求者IP */ IP } }自定義切面
/** * 限流 AOP * 創建者 爪窪筆記 * 博客 https://blog.52itstyle.vip * 創建時間 2019年8月15日 */ @Aspect @Configuration @Order(1) public class LimitAspect{ //根據IP分不同的令牌桶, 每天自動清理緩存 private static LoadingCache<String, RateLimiter> caches = CacheBuilder.newBuilder() .maximumSize(1000) .expireAfterWrite(1, TimeUnit.DAYS) .build(new CacheLoader<String, RateLimiter>() { @Override public RateLimiter load(String key){ // 新的IP初始化 每秒只發出5個令牌 return RateLimiter.create(5); } }); //Service層切點 限流 @Pointcut("@annotation(com.itstyle.blog.common.limit.ServiceLimit)") public void ServiceAspect() { } @Around("ServiceAspect()") public Object around(ProceedingJoinPoint joinPoint) { MethodSignature signature = (MethodSignature) joinPoint.getSignature(); Method method = signature.getMethod(); ServiceLimit limitAnnotation = method.getAnnotation(ServiceLimit.class); ServiceLimit.LimitType limitType = limitAnnotation.limitType(); String key = limitAnnotation.key(); Object obj; try { if(limitType.equals(ServiceLimit.LimitType.IP)){ key = IPUtils.getIpAddr(); } RateLimiter rateLimiter = caches.get(key); Boolean flag = rateLimiter.tryAcquire(); if(flag){ obj = joinPoint.proceed(); }else{ throw new RrException("小同志,你訪問的太頻繁了"); } } catch (Throwable e) { throw new RrException("小同志,你訪問的太頻繁了"); } return obj; } }業務實現:
/** * 執行順序 * 1)限流 * 2)布隆 * 3)計數 * 4) 緩存 * @param id * @return */ @Override @ServiceLimit(limitType= ServiceLimit.LimitType.IP) @BloomLimit @HyperLogLimit @Cacheable(cacheNames ="blog") public Blog getById(Long id) { String nativeSql = "SELECT * FROM blog WHERE id=?"; return dynamicQuery.nativeQuerySingleResult(Blog.class,nativeSql,new Object[]{id}); } 分佈式限流
Nginx
如何使用Nginx實現基本的限流,比如單個IP限制每秒訪問50次。通過Nginx限流模塊,我們可以設置一旦並發連接數超過我們的設置,將返回503錯誤給客戶端。
配置nginx.conf
#統一在http域中進行配置 #限制請求 limit_req_zone $binary_remote_addr $uri zone=api_read:20m rate=50r/s; #按ip配置一個連接 zone limit_conn_zone $binary_remote_addr zone=perip_conn:10m; #按server配置一個連接 zone limit_conn_zone $server_name zone=perserver_conn:100m; server { listen 80; server_name blog.52itstyle.top; index index.jsp; location / { #請求限流排隊通過 burst默認是0 limit_req zone=api_read burst=5; #連接數限制,每個IP並發請求為2 limit_conn perip_conn 2; #服務所限制的連接數(即限制了該server並發連接數量) limit_conn perserver_conn 1000; #連接限速 limit_rate 100k; proxy_pass http://seckill; } } upstream seckill { fair; server 172.16.1.120:8080 weight=1 max_fails=2 fail_timeout=30s; server 172.16.1.130:8080 weight=1 max_fails=2 fail_timeout=30s; }配置說明
imit_conn_zone
是針對每個IP定義一個存儲session狀態的容器。這個示例中定義了一個100m的容器,按照32bytes/session,可以處理3200000個session。
limit_rate 300k;
對每個連接限速300k. 注意,這裡是對連接限速,而不是對IP限速。如果一個IP允許兩個並發連接,那麼這個IP就是限速limit_rate×2。
burst=5;
這相當於桶的大小,如果某個請求超過了系統處理速度,會被放入桶中,等待被處理。如果桶滿了,那麼抱歉,請求直接返回503,客戶端得到一個服務器忙的響應。如果系統處理請求的速度比較慢,桶里的請求也不能一直待在裏面,如果超過一定時間,也是會被直接退回,返回服務器忙的響應。
OpenResty
這裡我們使用 OpenResty 開源的限流方案,測試案例使用OpenResty1.15.8.1最新版本,自帶lua-resty-limit-traffic模塊以及案例 ,實現起來更為方便。
限制接口總並發數/請求數
熱點博文,由於突發流量暴增,有可能會影響整個系統的穩定性從而造成崩潰,這時候我們就要限制熱點博文的總並發數/請求數。
這裡我們採用 lua-resty-limit-traffic中的resty.limit.count模塊實現:
-- 限制接口總並發數/請求數 local limit_count = require "resty.limit.count" -- 這裡我們使用AB測試,-n訪問10000次, -c並發1200個 -- ab -n 10000 -c 1200 http://121.42.155.213/ ,第一次測試數據:1000個請求會有差不多8801請求失敗,符合以下配置說明 -- 限制 一分鐘內只能調用 1200 次 接口(允許在時間段開始的時候一次性放過1200個請求) local lim, err = limit_count.new("my_limit_count_store", 1200, 60) if not lim then ngx.log(ngx.ERR, "failed to instantiate a resty.limit.count object: ", err) return ngx.exit(500) end -- use the Authorization header as the limiting key local key = ngx.req.get_headers()["Authorization"] or "public" local delay, err = lim:incoming(key, true) if not delay then if err == "rejected" then ngx.header["X-RateLimit-Limit"] = "5000" ngx.header["X-RateLimit-Remaining"] = 0 return ngx.exit(503) end ngx.log(ngx.ERR, "failed to limit count: ", err) return ngx.exit(500) end -- the 2nd return value holds the current remaining number -- of requests for the specified key. local remaining = err ngx.header["X-RateLimit-Limit"] = "5000" ngx.header["X-RateLimit-Remaining"] = remaining限制接口時間窗請求數
現在網絡爬蟲泛濫,有時候並不是人為的去點擊,亦或是存在惡意攻擊的情況。此時我們就要對客戶端單位時間內的請求數進行限制,以至於黑客不是那麼猖獗。當然了道高一尺魔高一丈,攻擊者總是會有辦法繞開你的防線,從另一方面講也促進了技術的進步。
這裡我們採用 lua-resty-limit-traffic中的resty.limit.conn模塊實現:
-- well, we could put the require() and new() calls in our own Lua -- modules to save overhead. here we put them below just for -- convenience. local limit_conn = require "resty.limit.conn" -- 這裡我們使用AB測試,-n訪問1000次, -c並發100個 -- ab -n 1000 -c 100 http://121.42.155.213/ ,這裡1000個請求將會有700個失敗 -- 相同IP段的人將不能被訪問,不影響其它IP -- 限制 IP 總請求數 -- 限制單個 ip 客戶端最大 200 req/sec 並且允許100 req/sec的突發請求 -- 就是說我們會把200以上300一下的請求請求給延遲, 超過300的請求將會被拒絕 -- 最後一個參數其實是你要預估這些並發(或者說單個請求)要處理多久,可以通過的log_by_lua中的leaving()調用進行動態調整 local lim, err = limit_conn.new("my_limit_conn_store", 200, 100, 0.5) if not lim then ngx.log(ngx.ERR, "failed to instantiate a resty.limit.conn object: ", err) return ngx.exit(500) end -- the following call must be per-request. -- here we use the remote (IP) address as the limiting key -- commit 為true 代表要更新shared dict中key的值, -- false 代表只是查看當前請求要處理的延時情況和前面還未被處理的請求數 local key = ngx.var.binary_remote_addr local delay, err = lim:incoming(key, true) if not delay then if err == "rejected" then return ngx.exit(503) end ngx.log(ngx.ERR, "failed to limit req: ", err) return ngx.exit(500) end if lim:is_committed() then local ctx = ngx.ctx ctx.limit_conn = lim ctx.limit_conn_key = key ctx.limit_conn_delay = delay end -- the 2nd return value holds the current concurrency level -- for the specified key. local conn = err if delay >= 0.001 then -- 其實這裡的 delay 肯定是上面說的並發處理時間的整數倍, -- 舉個例子,每秒處理100並發,桶容量200個,當時同時來500個並發,則200個拒掉 -- 100個在被處理,然後200個進入桶中暫存,被暫存的這200個連接中,0-100個連接其實應該延後0.5秒處理, -- 101-200個則應該延後0.5*2=1秒處理(0.5是上面預估的並發處理時間) -- the request exceeding the 200 connections ratio but below -- 300 connections, so -- we intentionally delay it here a bit to conform to the -- 200 connection limit. -- ngx.log(ngx.WARN, "delaying") ngx.sleep(delay) end 平滑限制接口請求數
之前的限流方式允許突發流量,也就是說瞬時流量都會被允許。突然流量如果不加以限制會影響整個系統的穩定性,因此在秒殺場景中需要對請求整形為平均速率處理,即20r/s。
這裡我們採用 lua-resty-limit-traffic 中的resty.limit.req 模塊實現漏桶限流和令牌桶限流。
其實漏桶和令牌桶根本的區別就是,如何處理超過請求速率的請求。漏桶會把請求放入隊列中去等待均速處理,隊列滿則拒絕服務;令牌桶在桶容量允許的情況下直接處理這些突發請求。
漏桶
桶容量大於零,並且是延遲模式。如果桶沒滿,則進入請求隊列以固定速率等待處理,否則請求被拒絕。
令牌桶
桶容量大於零,並且是非延遲模式。如果桶中存在令牌,則允許突發流量,否則請求被拒絕。
壓測
為了測試以上配置效果,我們採用AB壓測,Linux下執行以下命令即可:
# 安裝 yum -y install httpd-tools # 查看ab版本 ab -v # 查看幫助 ab --help測試命令:
ab -n 1000 -c 100 http://127.0.0.1/測試結果:
Server Software: openresty/1.15.8.1 #服務器軟件 Server Hostname: 127.0.0.1 #IP Server Port: 80 #請求端口號 Document Path: / #文件路徑 Document Length: 12 bytes #頁面位元組數 Concurrency Level: 100 #請求的並發數 Time taken for tests: 4.999 seconds #總訪問時間 Complete requests: 1000 #總請求樹 Failed requests: 0 #請求失敗數量 Write errors: 0 Total transferred: 140000 bytes #請求總數據大小 HTML transferred: 12000 bytes #html頁面實際總位元組數 Requests per second: 200.06 [#/sec] (mean) #每秒多少請求,這個是非常重要的參數數值,服務器的吞吐量 Time per request: 499.857 [ms] (mean) #用戶平均請求等待時間 Time per request: 4.999 [ms] (mean, across all concurrent requests) # 服務器平均處理時間,也就是服務器吞吐量的倒數 Transfer rate: 27.35 [Kbytes/sec] received #每秒獲取的數據長度 Connection Times (ms) min mean[+/-sd] median max Connect: 0 0 0.8 0 4 Processing: 5 474 89.1 500 501 Waiting: 2 474 89.2 500 501 Total: 9 475 88.4 500 501 Percentage of the requests served within a certain time (ms) 50% 500 66% 500 75% 500 80% 500 90% 501 95% 501 98% 501 99% 501 100% 501 (longest request)源碼
總結
以上限流方案,只是針對此次十萬博文做一個簡單的小結,大家也不要刻意區分那種方案的好壞,只要適合業務場景就是最好的。
