JavaScript 數據結構與算法之美 – 線性表(數組、棧、隊列、鏈表)
- 2019 年 10 月 3 日
- 筆記


前言
- 基礎知識就像是一座大樓的地基,它決定了我們的技術高度。
- 我們應該多掌握一些可移值的技術或者再過十幾年應該都不會過時的技術,數據結構與算法就是其中之一。
棧、隊列、鏈表、堆 是數據結構與算法中的基礎知識,是程序員的地基。
筆者寫的 JavaScript 數據結構與算法之美 系列用的語言是 JavaScript ,旨在入門數據結構與算法和方便以後複習。
1. 線性表與非線性表
線性表(Linear List):就是數據排成像一條線一樣的結構。每個線性表上的數據最多只有前和後兩個方向。數組、鏈表、隊列、棧 等就是線性表結構。
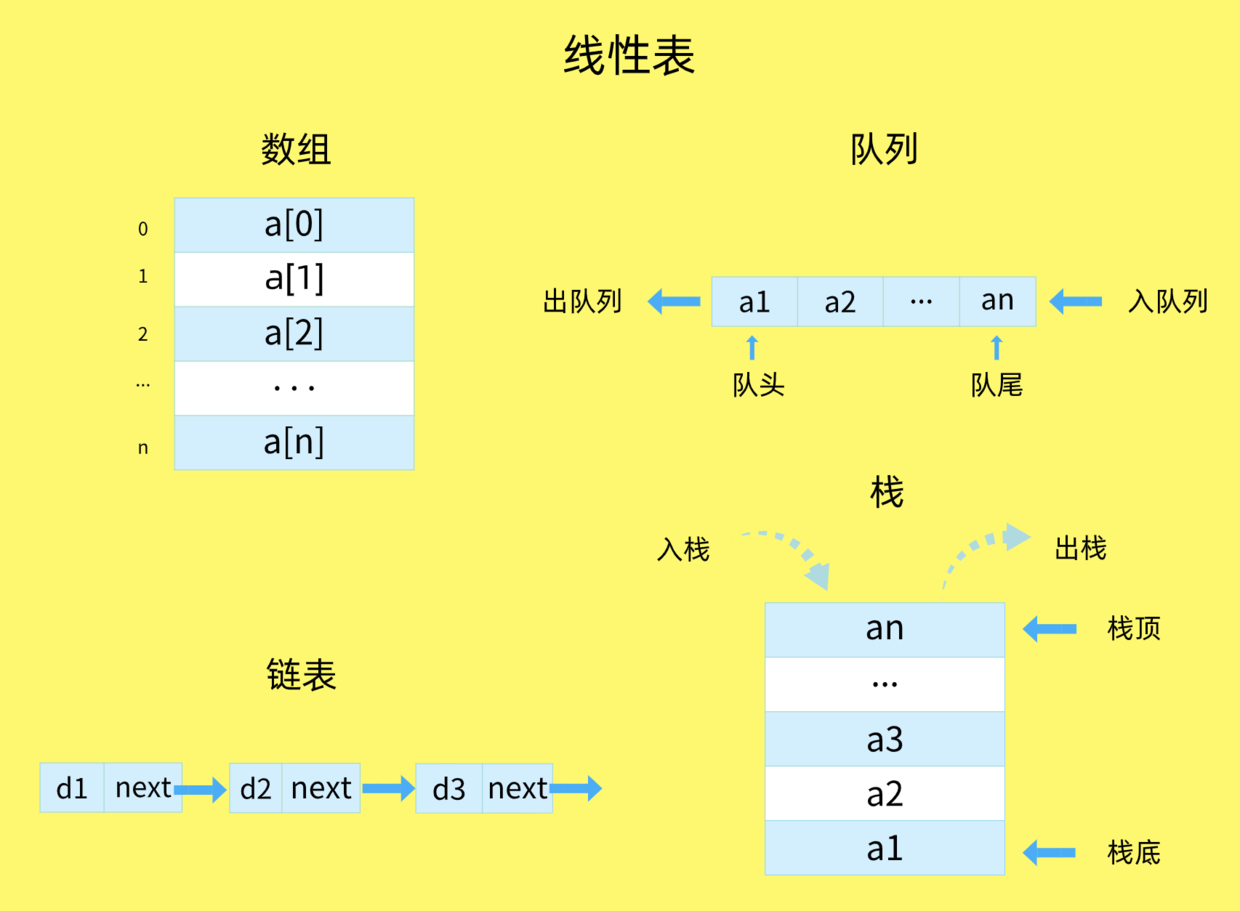

非線性表:數據之間並不是簡單的前後關係。二叉樹、堆、圖 就是非線性表。
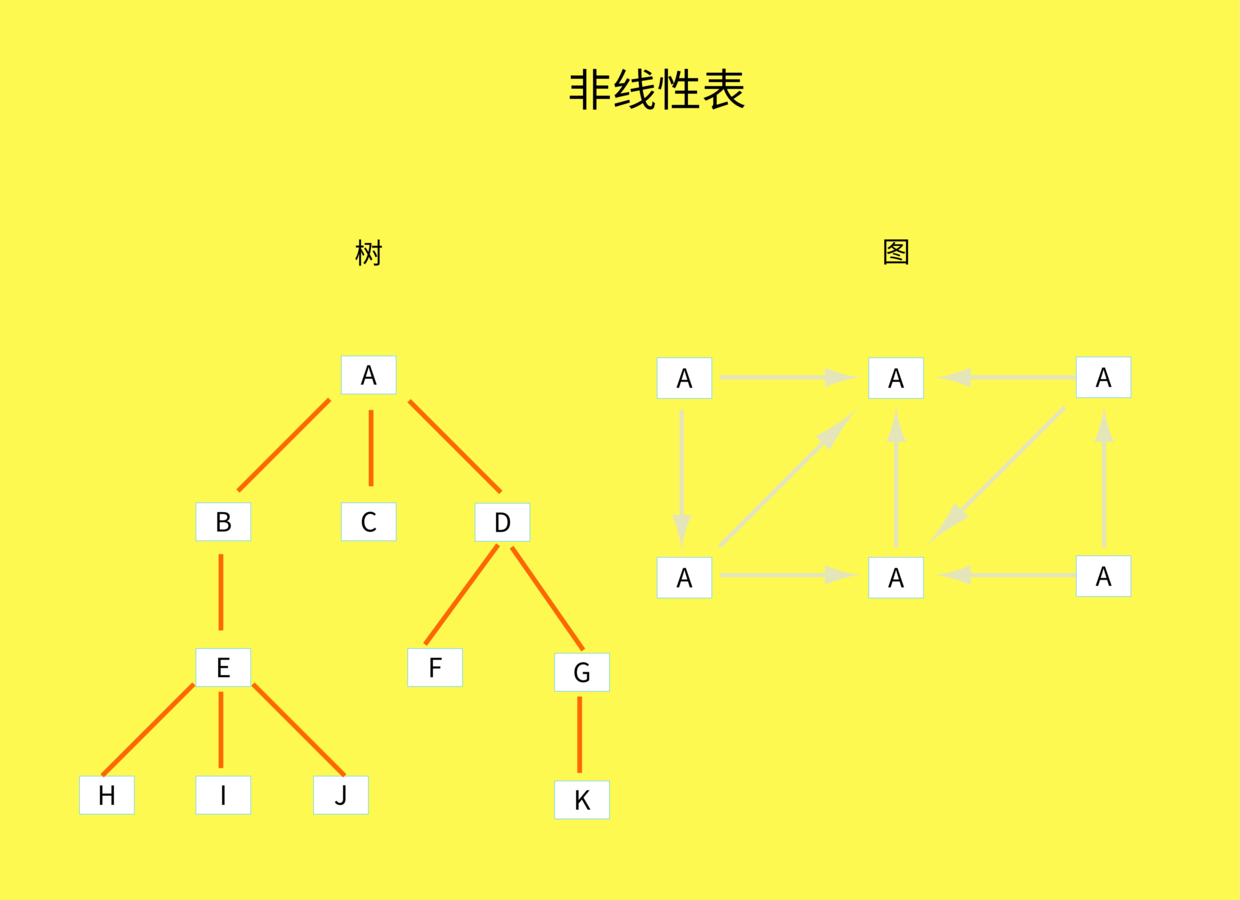

本文主要講線性表,非線性表會在後面章節講。
2. 數組


定義
- 數組 (Array) 是一個有序的數據集合,我們可以通過數組名稱 (name) 和索引 (index) 進行訪問。
- 數組的索引是從 0 開始的。
特點
-
數組是用一組連續的內存空間來存儲的。
所以數組支持 隨機訪問,根據下標隨機訪問的時間複雜度為 O(1)。 -
低效的插入和刪除。
數組為了保持內存數據的連續性,會導致插入、刪除這兩個操作比較低效,因為底層通常是要進行大量的數據搬移來保持數據的連續性。
插入與刪除的時間複雜度如下:
插入:從最好 O(1) ,最壞 O(n) ,平均 O(n)
刪除:從最好 O(1) ,最壞 O(n) ,平均 O(n)
注意
但是因為 JavaScript 是弱類型的語言,弱類型則允許隱式類型轉換。
隱式:是指源碼中沒有明顯的類型轉換代碼。也就是說,一個變量,可以賦值字符串,也可以賦值數值。
let str = "string" str = 123 console.log(str) // 123你還可以直接讓字符串類型的變量和數值類型的變量相加,雖然得出的最終結果未必是你想像的那樣,但一定不會報錯。
let a = 123 let b = "456" let c = a + b // 數值加字符串,結果是字符串 console.log(c) // "123456"數組的每一項可以是不同的類型,比如:
// 數組的類型有 數值、字符串,還可以隨意變更類型 const arr = [ 12, 34, "abc" ] arr[2] = { "key": "value" } // 把數組的第二項變成對象 console.log(arr) // [ 12, 34, { "key": "value"} ]定義的數組的大小是可變的,不像強類型語言,定義某個數組變量的時候就要定義該變量的大小。
const arr = [ 12, 34, "abc"] arr.push({ "key": "value" }) // 添加一項 對象 consolelog(arr) // [ 12, 34, "abc", { "key": "value" } ]實現
JavaScript 原生支持數組,而且提供了很多操作方法,這裡不展開講。
3. 棧

定義
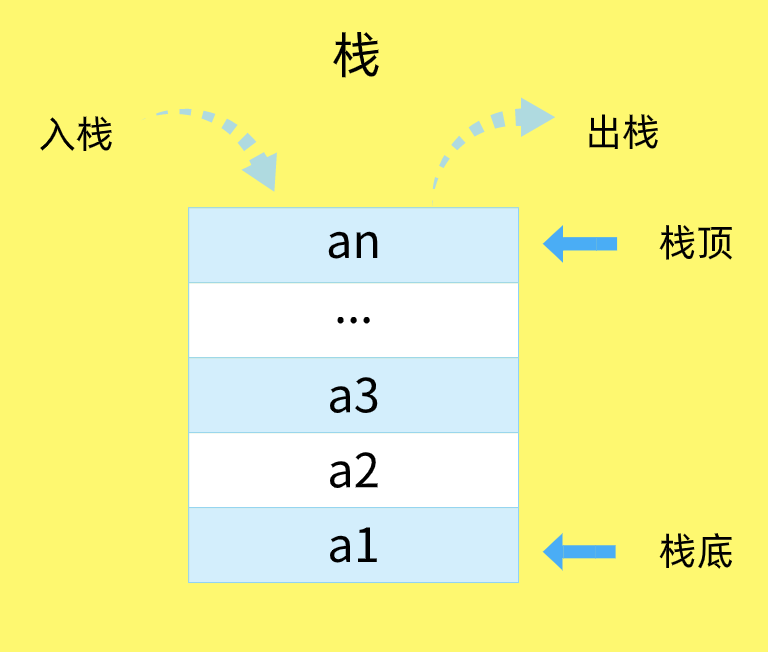
- 後進者先出,先進者後出,簡稱 後進先出(LIFO),這就是典型的
棧結構。 - 新添加的或待刪除的元素都保存在棧的末尾,稱作
棧頂,另一端就叫棧底。 - 在棧里,新元素都靠近棧頂,舊元素都接近棧底。
- 從棧的操作特性來看,是一種
操作受限的線性表,只允許在一端插入和刪除數據。 - 不包含任何元素的棧稱為
空棧。
棧也被用在編程語言的編譯器和內存中保存變量、方法調用等,比如函數的調用棧。
實現
棧的方法:
- push(element):添加一個(或幾個)新元素到棧頂。
- pop():移除棧頂的元素,同時返回被移除的元素。
- peek():返回棧頂的元素,不對棧做任何修改。
- isEmpty():如果棧里沒有任何元素就返回 true,否則返回 false。
- clear():移除棧里的所有元素。
- size():返回棧里的元素個數。
// Stack類 function Stack() { this.items = []; // 添加新元素到棧頂 this.push = function(element) { this.items.push(element); }; // 移除棧頂元素,同時返回被移除的元素 this.pop = function() { return this.items.pop(); }; // 查看棧頂元素 this.peek = function() { return this.items[this.items.length - 1]; }; // 判斷是否為空棧 this.isEmpty = function() { return this.items.length === 0; }; // 清空棧 this.clear = function() { this.items = []; }; // 查詢棧的長度 this.size = function() { return this.items.length; }; // 打印棧里的元素 this.print = function() { console.log(this.items.toString()); }; }測試:
// 創建Stack實例 var stack = new Stack(); console.log(stack.isEmpty()); // true stack.push(5); // undefined stack.push(8); // undefined console.log(stack.peek()); // 8 stack.push(11); // undefined console.log(stack.size()); // 3 console.log(stack.isEmpty()); // false stack.push(15); // undefined stack.pop(); // 15 console.log(stack.size()); // 3 stack.print(); // 5,8,11 stack.clear(); // undefined console.log(stack.size()); // 0棧的應用實例:JavaScript 數據結構與算法之美 – 實現一個前端路由,如何實現瀏覽器的前進與後退 ?
4. 隊列

普通隊列
定義
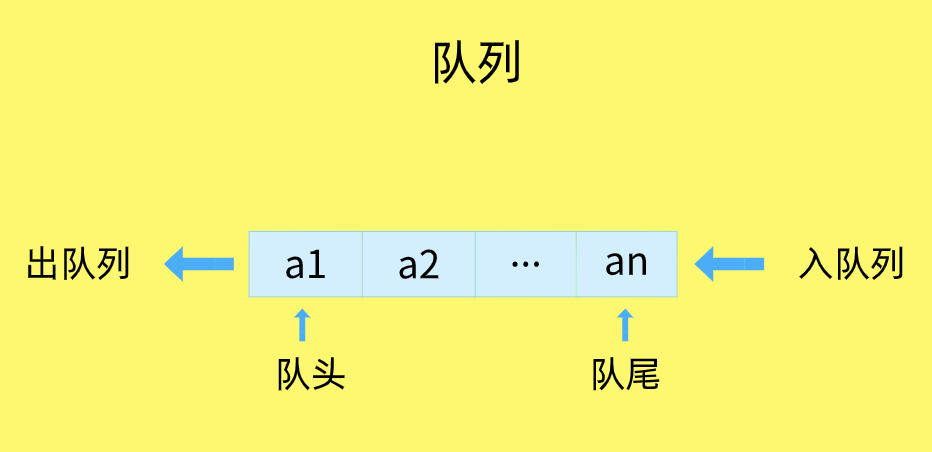
- 隊列是遵循 FIFO(First In First Out,先進先出)原則的一組有序的項。
- 隊列在尾部添加新元素,並從頂部移除元素。
- 最新添加的元素必須排在隊列的末尾。
- 隊列只有 入隊 push() 和出隊 pop()。
實現
隊列裏面有一些聲明的輔助方法:
- enqueue(element):向隊列尾部添加新項。
- dequeue():移除隊列的第一項,並返回被移除的元素。
- front():返回隊列中第一個元素,隊列不做任何變動。
- isEmpty():如果隊列中不包含任何元素,返回 true,否則返回 false。
- size():返回隊列包含的元素個數,與數組的 length 屬性類似。
- print():打印隊列中的元素。
- clear():清空整個隊列。
代碼:
// Queue類 function Queue() { this.items = []; // 向隊列尾部添加元素 this.enqueue = function(element) { this.items.push(element); }; // 移除隊列的第一個元素,並返回被移除的元素 this.dequeue = function() { return this.items.shift(); }; // 返回隊列的第一個元素 this.front = function() { return this.items[0]; }; // 判斷是否為空隊列 this.isEmpty = function() { return this.items.length === 0; }; // 獲取隊列的長度 this.size = function() { return this.items.length; }; // 清空隊列 this.clear = function() { this.items = []; }; // 打印隊列里的元素 this.print = function() { console.log(this.items.toString()); }; }測試:
// 創建Queue實例 var queue = new Queue(); console.log(queue.isEmpty()); // true queue.enqueue('John'); // undefined queue.enqueue('Jack'); // undefined queue.enqueue('Camila'); // undefined queue.print(); // "John,Jack,Camila" console.log(queue.size()); // 3 console.log(queue.isEmpty()); // false queue.dequeue(); // "John" queue.dequeue(); // "Jack" queue.print(); // "Camila" queue.clear(); // undefined console.log(queue.size()); // 0優先隊列
定義
優先隊列中元素的添加和移除是依賴優先級的。
應用
- 一個現實的例子就是機場登機的順序。頭等艙和商務艙乘客的優先級要高於經濟艙乘客。
- 再比如:火車,老年人、孕婦和帶小孩的乘客是享有優先檢票權的。
優先隊列分為兩類
- 最小優先隊列
- 最大優先隊列
最小優先隊列是把優先級的值最小的元素被放置到隊列的最前面(代表最高的優先級)。
比如:有四個元素:"John", "Jack", "Camila", "Tom",他們的優先級值分別為 4,3,2,1。
那麼最小優先隊列排序應該為:"Tom","Camila","Jack","John"。
最大優先隊列正好相反,把優先級值最大的元素放置在隊列的最前面。
以上面的為例,最大優先隊列排序應該為:"John", "Jack", "Camila", "Tom"。
實現
實現一個優先隊列,有兩種選項:
-
- 設置優先級,根據優先級正確添加元素,然後和普通隊列一樣正常移除
-
- 設置優先級,和普通隊列一樣正常按順序添加,然後根據優先級移除
這裡最小優先隊列和最大優先隊列我都採用第一種方式實現,大家可以嘗試一下第二種。
下面只重寫 enqueue() 方法和 print() 方法,其他方法和上面的普通隊列完全相同。
實現最小優先隊列
// 定義最小優先隊列 function MinPriorityQueue () { this.items = []; this.enqueue = enqueue; this.dequeue = dequeue; this.front = front; this.isEmpty = isEmpty; this.size = size; this.clear = clear; this.print = print; }實現最小優先隊列 enqueue() 方法和 print() 方法:
// 優先隊列添加元素,要根據優先級判斷在隊列中的插入順序 function enqueue (element, priority) { var queueElement = { element: element, priority: priority }; if (this.isEmpty()) { this.items.push(queueElement); } else { var added = false; for (var i = 0; i < this.size(); i++) { if (queueElement.priority < this.items[i].priority) { this.items.splice(i, 0, queueElement); added = true; break ; } } if (!added) { this.items.push(queueElement); } } } // 打印隊列里的元素 function print () { var strArr = []; strArr = this.items.map(function (item) { return `${item.element}->${item.priority}`; }); console.log(strArr.toString()); }最小優先隊列測試:
// 創建最小優先隊列minPriorityQueue實例 var minPriorityQueue = new MinPriorityQueue(); console.log(minPriorityQueue.isEmpty()); // true minPriorityQueue.enqueue("John", 1); // undefined minPriorityQueue.enqueue("Jack", 3); // undefined minPriorityQueue.enqueue("Camila", 2); // undefined minPriorityQueue.enqueue("Tom", 3); // undefined minPriorityQueue.print(); // "John->1,Camila->2,Jack->3,Tom->3" console.log(minPriorityQueue.size()); // 4 console.log(minPriorityQueue.isEmpty()); // false minPriorityQueue.dequeue(); // {element: "John", priority: 1} minPriorityQueue.dequeue(); // {element: "Camila", priority: 2} minPriorityQueue.print(); // "Jack->3,Tom->3" minPriorityQueue.clear(); // undefined console.log(minPriorityQueue.size()); // 0實現最大優先隊列
// 最大優先隊列 MaxPriorityQueue 類 function MaxPriorityQueue () { this.items = []; this.enqueue = enqueue; this.dequeue = dequeue; this.front = front; this.isEmpty = isEmpty; this.size = size; this.clear = clear; this.print = print; } // 優先隊列添加元素,要根據優先級判斷在隊列中的插入順序 function enqueue (element, priority) { var queueElement = { element: element, priority: priority }; if (this.isEmpty()) { this.items.push(queueElement); } else { var added = false; for (var i = 0; i < this.items.length; i++) { // 注意,只需要將這裡改為大於號就可以了 if (queueElement.priority > this.items[i].priority) { this.items.splice(i, 0, queueElement); added = true; break ; } } if (!added) { this.items.push(queueElement); } } }最大優先隊列測試:
// 創建最大優先隊列maxPriorityQueue實例 var maxPriorityQueue = new MaxPriorityQueue(); console.log(maxPriorityQueue.isEmpty()); // true maxPriorityQueue.enqueue("John", 1); // undefined maxPriorityQueue.enqueue("Jack", 3); // undefined maxPriorityQueue.enqueue("Camila", 2); // undefined maxPriorityQueue.enqueue("Tom", 3); // undefined maxPriorityQueue.print(); // "Jack->3,Tom->3,Camila->2,John->1" console.log(maxPriorityQueue.size()); // 4 console.log(maxPriorityQueue.isEmpty()); // false maxPriorityQueue.dequeue(); // {element: "Jack", priority: 3} maxPriorityQueue.dequeue(); // {element: "Tom", priority: 3} maxPriorityQueue.print(); // "Camila->2,John->1" maxPriorityQueue.clear(); // undefined console.log(maxPriorityQueue.size()); // 0循環隊列
定義
循環隊列,顧名思義,它長得像一個環。把它想像成一個圓的鐘就對了。
關鍵是:確定好隊空和隊滿的判定條件。
循環隊列的一個例子就是擊鼓傳花遊戲(Hot Potato)。在這個遊戲中,孩子們圍城一個圓圈,擊鼓的時候把花儘快的傳遞給旁邊的人。某一時刻擊鼓停止,這時花在誰的手裡,誰就退出圓圈直到遊戲結束。重複這個過程,直到只剩一個孩子(勝者)。
下面我們在普通隊列的基礎上,實現一個模擬的擊鼓傳花遊戲,下面只寫擊鼓傳花的代碼片段:
// 實現擊鼓傳花 function hotPotato (nameList, num) { var queue = new Queue(); for (var i = 0; i < nameList.length; i++) { queue.enqueue(nameList[i]); } var eliminated = ''; while (queue.size() > 1) { // 循環 num 次,隊首出來去到隊尾 for (var i = 0; i < num; i++) { queue.enqueue(queue.dequeue()); } // 循環 num 次過後,移除當前隊首的元素 eliminated = queue.dequeue(); console.log(`${eliminated} 在擊鼓傳花中被淘汰!`); } // 最後只剩一個元素 return queue.dequeue(); } // 測試 var nameList = ["John", "Jack", "Camila", "Ingrid", "Carl"]; var winner = hotPotato(nameList, 10); console.log(`最後的勝利者是:${winner}`);執行結果為:
// John 在擊鼓傳花中被淘汰! // Ingrid 在擊鼓傳花中被淘汰! // Jack 在擊鼓傳花中被淘汰! // Camila 在擊鼓傳花中被淘汰! // 最後的勝利者是:Carl隊列小結
一些具有某些額外特性的隊列,比如:循環隊列、阻塞隊列、並發隊列。它們在很多偏底層系統、框架、中間件的開發中,起着關鍵性的作用。
以上隊列的代碼要感謝 leocoder351。
5. 鏈表
定義
- 鏈表存儲有序的元素集合,但不同於數組,鏈表中的元素在內存中並不是連續放置的,它是通過 指針 將 零散的內存塊 串連起來的。
- 每個元素由一個存儲元素本身的 節點 和一個指向下一個元素的 引用(也稱指針或鏈接)組成。
簡單的鏈接結構圖:
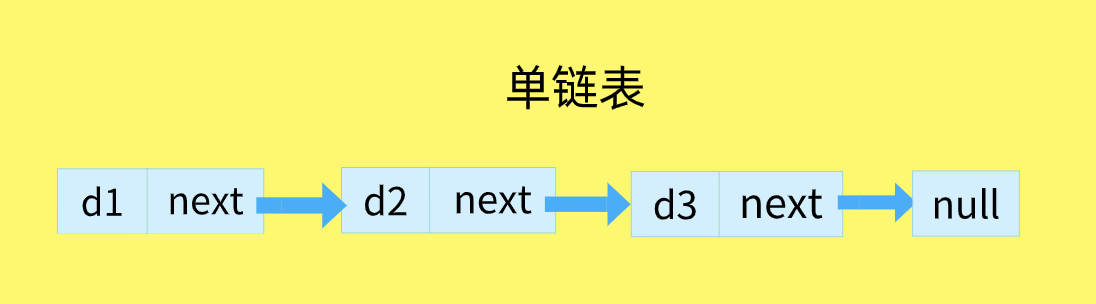

其中,data 中保存着數據,next 保存着下一個鏈表的引用。
上圖中,我們說 data2 跟在 data1 後面,而不是說 data2 是鏈表中的第二個元素。值得注意的是,我們將鏈表的尾元素指向了 null 節點,表示鏈接結束的位置。
特點
-
鏈表是通過指針將零散的內存塊串連起來的。
所以鏈表不支持 隨機訪問,如果要找特定的項,只能從頭開始遍歷,直到找到某個項。
所以訪問的時間複雜度為 O(n)。 -
高效的插入和刪除。
鏈表中插入或者刪除一個數據,我們並不需要為了保持內存的連續性而搬移結點,因為鏈表的存儲空間本身就不是連續的,只需要考慮相鄰結點的指針改變。
所以,在鏈表中插入和刪除一個數據是非常快速的,時間複雜度為 O(1)。
三種最常見的鏈表結構,它們分別是:
- 單鏈表
- 雙向鏈表
- 循環鏈表
單鏈表
定義
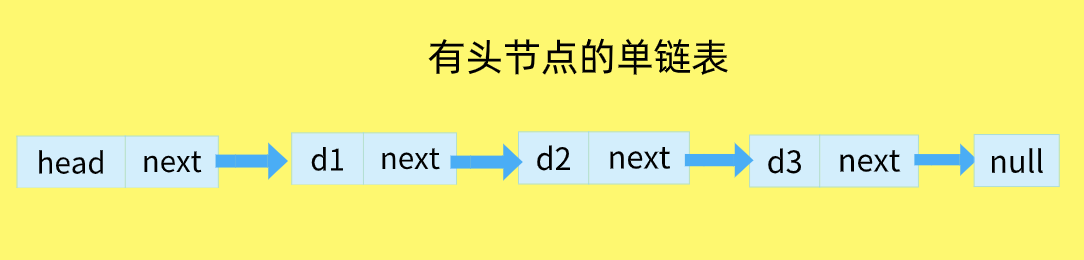
由於鏈表的起始點的確定比較麻煩,因此很多鏈表的實現都會在鏈表的最前面添加一個特殊的節點,稱為 頭節點,表示鏈表的頭部。
經過改造,鏈表就成了如下的樣子:

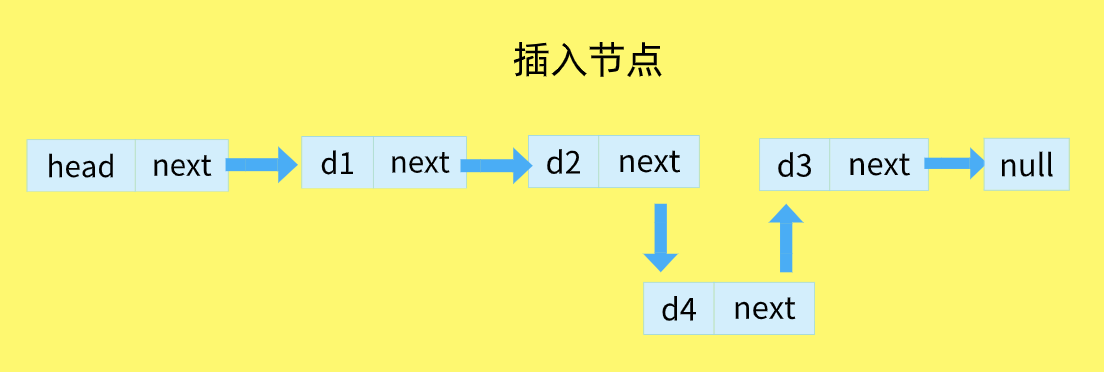
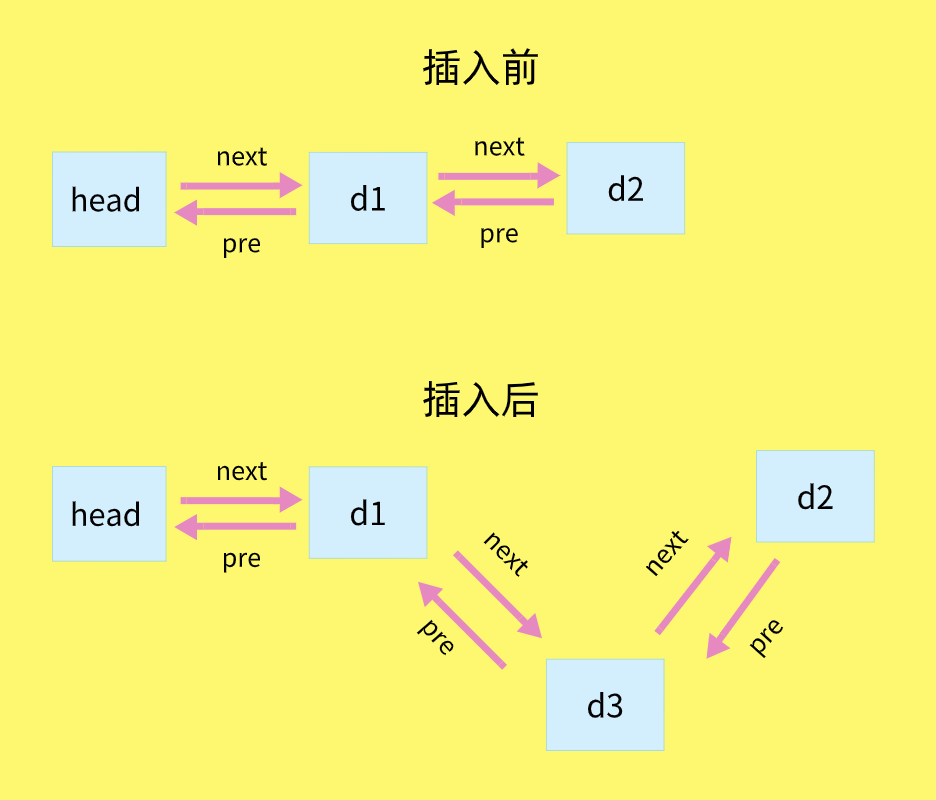
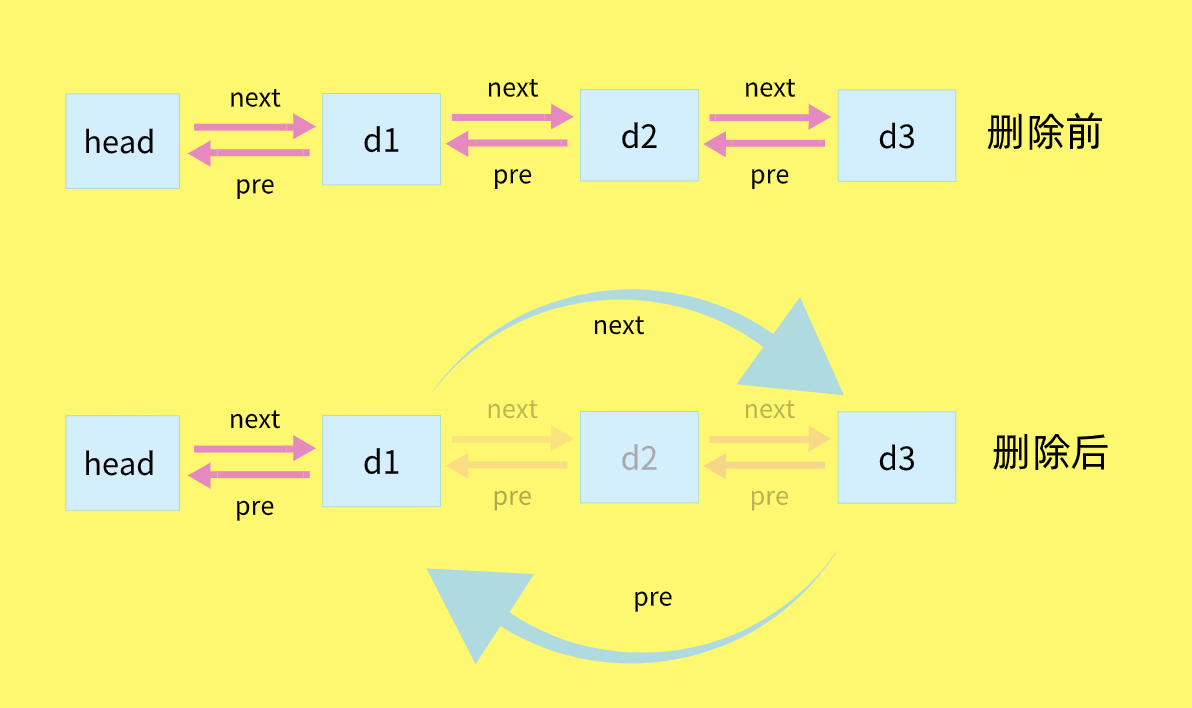
針對鏈表的插入和刪除操作,我們只需要考慮相鄰結點的指針改變,所以插入與刪除的時間複雜度為 O(1)。
在 d2 節點後面插入 d4 節點:

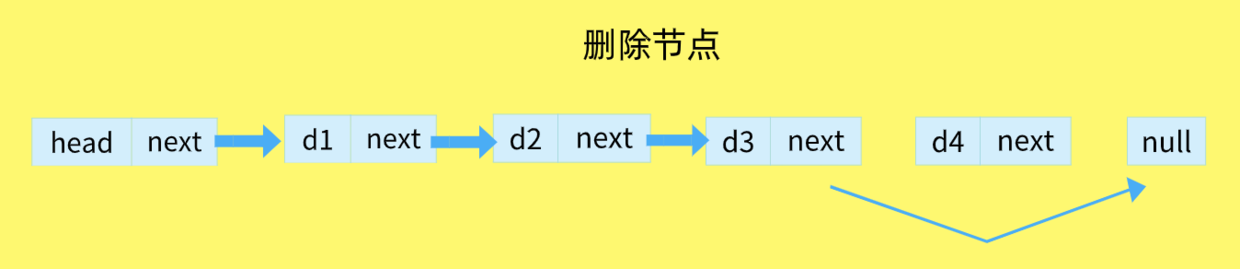
刪除 d4 節點:

實現
- Node 類用來表示節點。
- LinkedList 類提供插入節點、刪除節點等一些操作。
單向鏈表的八種常用操作:
- append(element):尾部添加元素。
- insert(position, element):特定位置插入一個新的項。
- removeAt(position):特定位置移除一項。
- remove(element):移除一項。
- indexOf(element):返回元素在鏈表中的索引。如果鏈表中沒有該元素則返回 -1。
- isEmpty():如果鏈表中不包含任何元素,返回 true,如果鏈表長度大於 0,返回 false。
- size():返回鏈表包含的元素個數,與數組的 length 屬性類似。
- getHead():返回鏈表的第一個元素。
- toString():由於鏈表使用了 Node 類,就需要重寫繼承自 JavaScript 對象默認的 toString() 方法,讓其只輸出元素的值。
- print():打印鏈表的所有元素。
具體代碼:
// 單鏈表 function SinglyLinkedList() { // 節點 function Node(element) { this.element = element; // 當前節點的元素 this.next = null; // 下一個節點指針 } var length = 0; // 鏈表的長度 var head = null; // 鏈表的頭部節點 // 向鏈表尾部添加一個新的節點 this.append = function(element) { var node = new Node(element); var currentNode = head; // 判斷是否為空鏈表 if (head === null) { // 是空鏈表,就把當前節點作為頭部節點 head = node; } else { // 從 head 開始一直找到最後一個 node while (currentNode.next) { // 後面還有 node currentNode = currentNode.next; } // 把當前節點的 next 指針 指向 新的節點 currentNode.next = node; } // 鏈表的長度加 1 length++; }; // 向鏈表特定位置插入一個新節點 this.insert = function(position, element) { if (position < 0 || position > length) { // 越界 return false; } else { var node = new Node(element); var index = 0; var currentNode = head; var previousNode; // 在最前插入節點 if (position === 0) { node.next = currentNode; head = node; } else { // 循環找到位置 while (index < position) { index++; previousNode = currentNode; currentNode = currentNode.next; } // 把前一個節點的指針指向新節點,新節點的指針指向當前節點,保持連接性 previousNode.next = node; node.next = currentNode; } length++; return true; } }; // 從鏈表的特定位置移除一項 this.removeAt = function(position) { if ((position < 0 && position >= length) || length === 0) { // 越界 return false; } else { var currentNode = head; var index = 0; var previousNode; if (position === 0) { head = currentNode.next; } else { // 循環找到位置 while (index < position) { index++; previousNode = currentNode; currentNode = currentNode.next; } // 把當前節點的 next 指針 指向 當前節點的 next 指針,即是 刪除了當前節點 previousNode.next = currentNode.next; } length--; return true; } }; // 從鏈表中移除指定項 this.remove = function(element) { var index = this.indexOf(element); return this.removeAt(index); }; // 返回元素在鏈表的索引,如果鏈表中沒有該元素則返回 -1 this.indexOf = function(element) { var currentNode = head; var index = 0; while (currentNode) { if (currentNode.element === element) { return index; } index++; currentNode = currentNode.next; } return -1; }; // 如果鏈表中不包含任何元素,返回 true,如果鏈表長度大於 0,返回 false this.isEmpty = function() { return length === 0; }; // 返回鏈表包含的元素個數,與數組的 length 屬性類似 this.size = function() { return length; }; // 獲取鏈表頭部元素 this.getHead = function() { return head.element; }; // 由於鏈表使用了 Node 類,就需要重寫繼承自 JavaScript 對象默認的 toString() 方法,讓其只輸出元素的值 this.toString = function() { var currentNode = head; var string = ''; while (currentNode) { string += ',' + currentNode.element; currentNode = currentNode.next; } return string.slice(1); }; // 打印鏈表數據 this.print = function() { console.log(this.toString()); }; // 獲取整個鏈表 this.list = function() { console.log('head: ', head); return head; }; }測試:
// 創建單向鏈表實例 var singlyLinked = new SinglyLinkedList(); console.log(singlyLinked.removeAt(0)); // false console.log(singlyLinked.isEmpty()); // true singlyLinked.append('Tom'); singlyLinked.append('Peter'); singlyLinked.append('Paul'); singlyLinked.print(); // "Tom,Peter,Paul" singlyLinked.insert(0, 'Susan'); singlyLinked.print(); // "Susan,Tom,Peter,Paul" singlyLinked.insert(1, 'Jack'); singlyLinked.print(); // "Susan,Jack,Tom,Peter,Paul" console.log(singlyLinked.getHead()); // "Susan" console.log(singlyLinked.isEmpty()); // false console.log(singlyLinked.indexOf('Peter')); // 3 console.log(singlyLinked.indexOf('Cris')); // -1 singlyLinked.remove('Tom'); singlyLinked.removeAt(2); singlyLinked.print(); // "Susan,Jack,Paul" singlyLinked.list(); // 具體控制台整個鏈表數據在 JavaScript 里是怎樣的呢 ?
為了看這個數據,特意寫了個 list 函數:
// 獲取整個鏈表 this.list = function() { console.log('head: ', head); return head; };重點上上面的最後一行代碼: singlyLinked.list() ,打印的數據如下:


所以,在 JavaScript 中,單鏈表的真實數據有點類似於對象,實際上是 Node 類生成的實例。
雙向鏈表
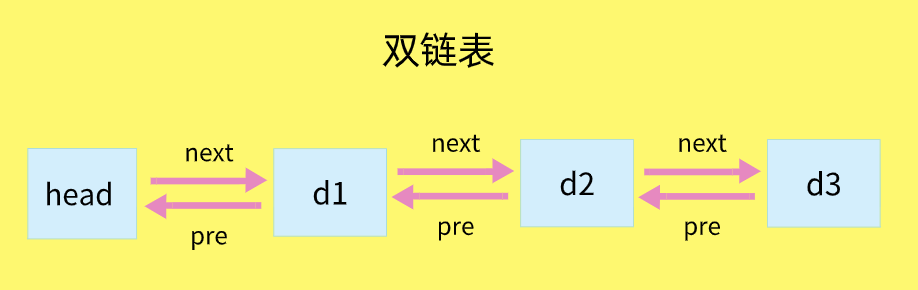
單向鏈表只有一個方向,結點只有一個後繼指針 next 指向後面的結點。
而雙向鏈表,它支持兩個方向,每個結點不止有一個後繼指針 next 指向後面的結點,還有一個前驅指針 prev 指向前面的結點。


單向鏈表與又向鏈表比較
- 雙向鏈表需要額外的兩個空間來存儲後繼結點和前驅結點的地址。
所以,如果存儲同樣多的數據,雙向鏈表要比單鏈表佔用更多的內存空間。
雖然兩個指針比較浪費存儲空間,但可以支持雙向遍歷,這樣也帶來了雙向鏈表操作的靈活性。 - 雙向鏈表提供了兩種迭代列表的方法:從頭到尾,或者從尾到頭。
我們可以訪問一個特定節點的下一個或前一個元素。 - 在單向鏈表中,如果迭代鏈表時錯過了要找的元素,就需要回到鏈表起點,重新開始迭代。
- 在雙向鏈表中,可以從任一節點,向前或向後迭代,這是雙向鏈表的一個優點。
- 所以,雙向鏈表可以支持 O(1) 時間複雜度的情況下找到前驅結點,正是這樣的特點,也使雙向鏈表在某些情況下的插入、刪除等操作都要比單鏈表簡單、高效。
實現
具體代碼:
// 創建雙向鏈表 DoublyLinkedList 類 function DoublyLinkedList() { function Node(element) { this.element = element; //當前節點的元素 this.next = null; //下一個節點指針 this.previous = null; //上一個節點指針 } var length = 0; // 鏈表長度 var head = null; // 鏈表頭部 var tail = null; // 鏈表尾部 // 向鏈表尾部添加一個新的項 this.append = function(element) { var node = new Node(element); var currentNode = tail; // 判斷是否為空鏈表 if (currentNode === null) { // 空鏈表 head = node; tail = node; } else { currentNode.next = node; node.prev = currentNode; tail = node; } length++; }; // 向鏈表特定位置插入一個新的項 this.insert = function(position, element) { if (position < 0 && position > length) { // 越界 return false; } else { var node = new Node(element); var index = 0; var currentNode = head; var previousNode; if (position === 0) { if (!head) { head = node; tail = node; } else { node.next = currentNode; currentNode.prev = node; head = node; } } else if (position === length) { this.append(element); } else { while (index < position) { index++; previousNode = currentNode; currentNode = currentNode.next; } previousNode.next = node; node.next = currentNode; node.prev = previousNode; currentNode.prev = node; } length++; return true; } }; // 從鏈表的特定位置移除一項 this.removeAt = function(position) { if ((position < 0 && position >= length) || length === 0) { // 越界 return false; } else { var currentNode = head; var index = 0; var previousNode; if (position === 0) { // 移除第一項 if (length === 1) { head = null; tail = null; } else { head = currentNode.next; head.prev = null; } } else if (position === length - 1) { // 移除最後一項 if (length === 1) { head = null; tail = null; } else { currentNode = tail; tail = currentNode.prev; tail.next = null; } } else { while (index < position) { index++; previousNode = currentNode; currentNode = currentNode.next; } previousNode.next = currentNode.next; previousNode = currentNode.next.prev; } length--; return true; } }; // 從鏈表中移除指定項 this.remove = function(element) { var index = this.indexOf(element); return this.removeAt(index); }; // 返回元素在鏈表的索引,如果鏈表中沒有該元素則返回 -1 this.indexOf = function(element) { var currentNode = head; var index = 0; while (currentNode) { if (currentNode.element === element) { return index; } index++; currentNode = currentNode.next; } return -1; }; // 如果鏈表中不包含任何元素,返回 true ,如果鏈表長度大於 0 ,返回 false this.isEmpty = function() { return length == 0; }; // 返回鏈表包含的元素個數,與數組的 length 屬性類似 this.size = function() { return length; }; // 獲取鏈表頭部元素 this.getHead = function() { return head.element; }; // 由於鏈表使用了 Node 類,就需要重寫繼承自 JavaScript 對象默認的 toString() 方法,讓其只輸出元素的值 this.toString = function() { var currentNode = head; var string = ''; while (currentNode) { string += ',' + currentNode.element; currentNode = currentNode.next; } return string.slice(1); }; this.print = function() { console.log(this.toString()); }; // 獲取整個鏈表 this.list = function() { console.log('head: ', head); return head; }; }測試:
// 創建雙向鏈表 var doublyLinked = new DoublyLinkedList(); console.log(doublyLinked.isEmpty()); // true doublyLinked.append('Tom'); doublyLinked.append('Peter'); doublyLinked.append('Paul'); doublyLinked.print(); // "Tom,Peter,Paul" doublyLinked.insert(0, 'Susan'); doublyLinked.print(); // "Susan,Tom,Peter,Paul" doublyLinked.insert(1, 'Jack'); doublyLinked.print(); // "Susan,Jack,Tom,Peter,Paul" console.log(doublyLinked.getHead()); // "Susan" console.log(doublyLinked.isEmpty()); // false console.log(doublyLinked.indexOf('Peter')); // 3 console.log(doublyLinked.indexOf('Cris')); // -1 doublyLinked.remove('Tom'); doublyLinked.removeAt(2); doublyLinked.print(); // "Susan,Jack,Paul" doublyLinked.list(); // 請看控制台輸出整個鏈表數據在 JavaScript 里是怎樣的呢 ?
// 獲取整個鏈表 this.list = function() { console.log('head: ', head); return head; };調用 doublyLinked.list(); .
控制台輸出如下:


鏈表代碼實現的關鍵是弄清楚:前節點與後節點與邊界。
循環鏈表
循環鏈表是一種特殊的單鏈表。
循環鏈表和單鏈表相似,節點類型都是一樣。
唯一的區別是,在創建循環鏈表的時候,讓其頭節點的 next 屬性指向它本身。
即:
head.next = head;這種行為會導致鏈表中每個節點的 next 屬性都指向鏈表的頭節點,換句話說,也就是鏈表的尾節點指向了頭節點,形成了一個循環鏈表。如下圖所示:
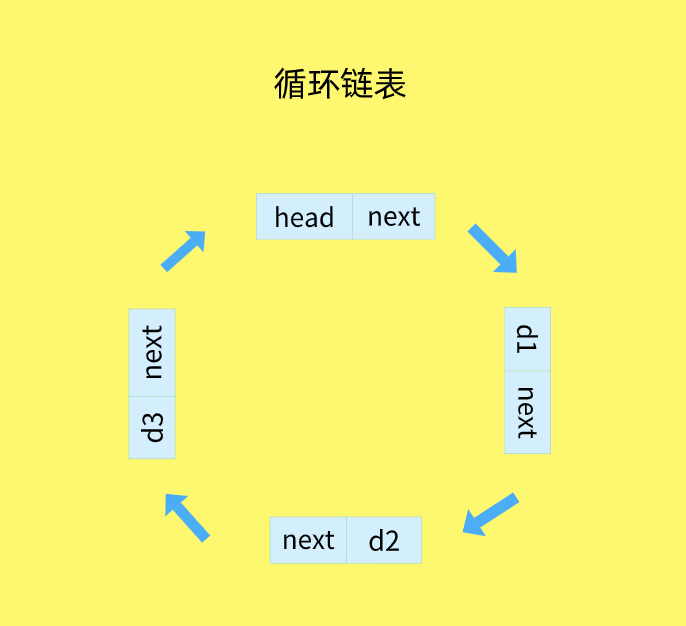

循環鏈表:在單鏈表的基礎上,將尾節點的指針指向頭結點,就構成了一個循環鏈表。環形鏈表從任意一個節點開始,都可以遍歷整個鏈表。
代碼:
// 循環鏈表 function CircularLinkedList() { // 節點 function Node(element) { this.element = element; // 當前節點的元素 this.next = null; // 下一個節點指針 } var length = 0, head = null; this.append = function(element) { var node = new Node(element), current; if (!head) { head = node; // 頭的指針指向自己 node.next = head; } else { current = head; while (current.next !== head) { current = current.next; } current.next = node; // 最後一個節點指向頭節點 node.next = head; } length++; return true; }; this.insert = function(position, element) { if (position > -1 && position < length) { var node = new Node(element), index = 0, current = head, previous; if (position === 0) { // 頭節點指向自己 node.next = head; head = node; } else { while (index++ < position) { previous = current; current = current.next; } previous.next = node; node.next = current; } length++; return true; } else { return false; } }; this.removeAt = function(position) { if (position > -1 && position < length) { var current = head, previous, index = 0; if (position === 0) { head = current.next; } else { while (index++ < position) { previous = current; current = current.next; } previous.next = current.next; } length--; return current.element; } else { return false; } }; this.remove = function(element) { var current = head, previous, indexCheck = 0; while (current && indexCheck < length) { if (current.element === element) { if (indexCheck == 0) { head = current.next; length--; return true; } else { previous.next = current.next; length--; return true; } } else { previous = current; current = current.next; indexCheck++; } } return false; }; this.remove = function() { if (length === 0) { return false; } var current = head, previous, indexCheck = 0; if (length === 1) { head = null; length--; return current.element; } while (indexCheck++ < length) { previous = current; current = current.next; } previous.next = head; length--; return current.element; }; this.indexOf = function(element) { var current = head, index = 0; while (current && index < length) { if (current.element === element) { return index; } else { index++; current = current.next; } } return -1; }; this.isEmpty = function() { return length === 0; }; this.size = function() { return length; }; // 由於鏈表使用了 Node 類,就需要重寫繼承自 JavaScript 對象默認的 toString() 方法,讓其只輸出元素的值 this.toString = function() { var current = head, string = '', indexCheck = 0; while (current && indexCheck < length) { string += ',' + current.element; current = current.next; indexCheck++; } return string.slice(1); }; // 獲取鏈表頭部元素 this.getHead = function() { return head.element; }; // 打印鏈表數據 this.print = function() { console.log(this.toString()); }; // 獲取整個鏈表 this.list = function() { console.log('head: ', head); return head; }; }測試:
// 創建單向鏈表實例 var circularLinked = new CircularLinkedList(); console.log(circularLinked.removeAt(0)); // false console.log(circularLinked.isEmpty()); // true circularLinked.append('Tom'); circularLinked.append('Peter'); circularLinked.append('Paul'); circularLinked.print(); // "Tom,Peter,Paul" circularLinked.insert(0, 'Susan'); circularLinked.print(); // "Susan,Tom,Peter,Paul" circularLinked.insert(1, 'Jack'); circularLinked.print(); // "Susan,Jack,Tom,Peter,Paul" console.log(circularLinked.getHead()); // "Susan" console.log(circularLinked.isEmpty()); // false console.log(circularLinked.indexOf('Peter')); // 3 console.log(circularLinked.indexOf('Cris')); // -1 circularLinked.remove('Tom'); circularLinked.removeAt(2); circularLinked.print(); // "Susan,Jack,Paul" circularLinked.list(); // 具體控制台整個鏈表數據在 JavaScript 里是怎樣的呢 ?
// 獲取整個鏈表 this.list = function() { console.log('head: ', head); return head; };調用 circularLinked.list() 。
控制台輸出如下:
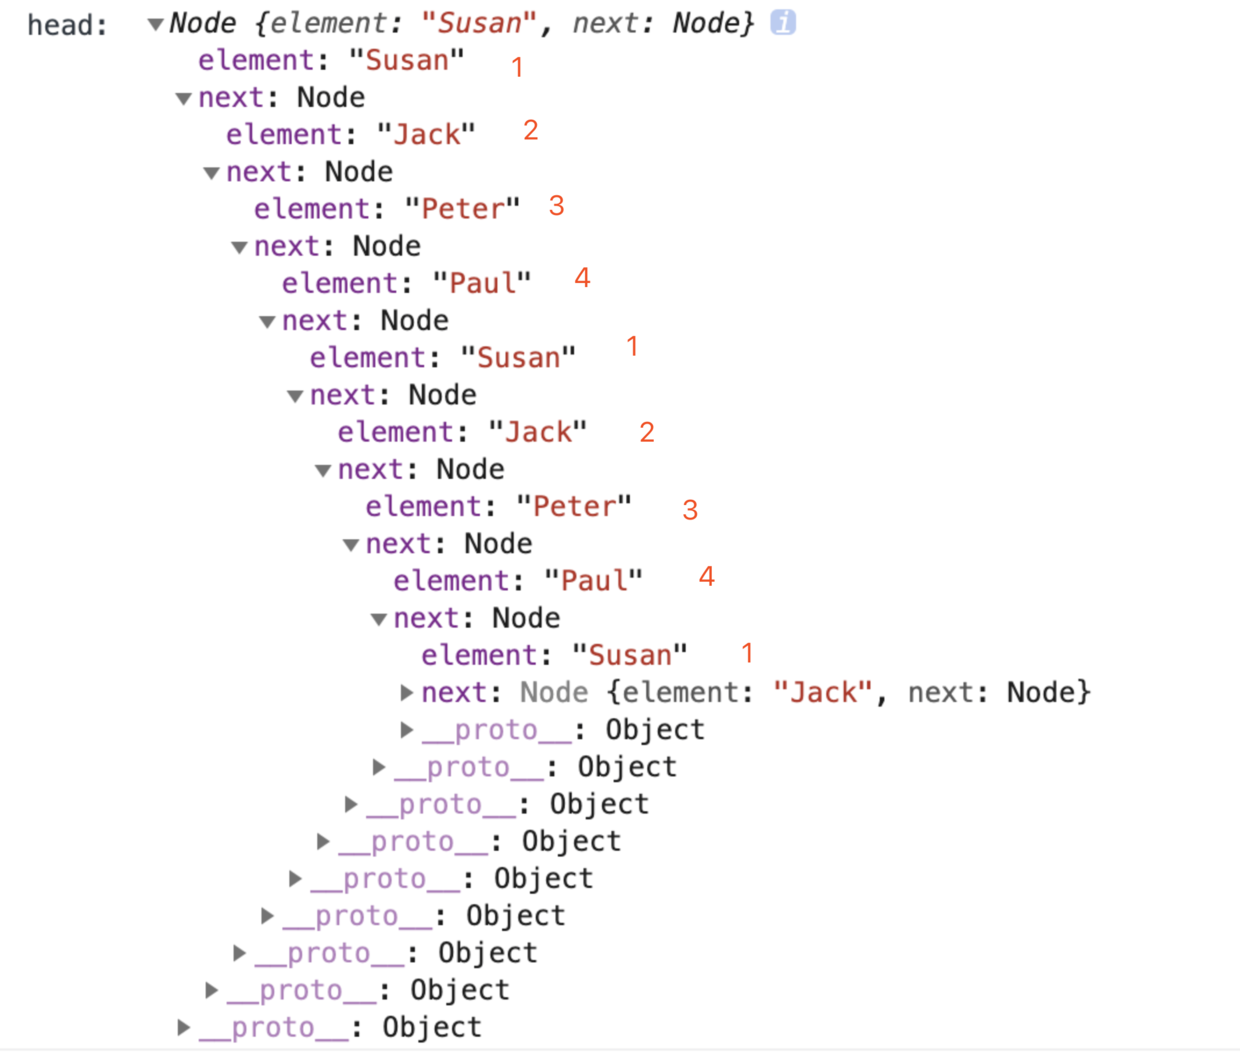

你知道大家發現沒有,為什麼從 1 – 4 – 1 了,還有 next 節點,而且是還可以一直點 next ,重複的展開下去,這正是 循環 的原因。
鏈表總結
- 寫鏈表代碼是最考驗邏輯思維能力的,要熟練鏈表,只有 多寫多練,沒有捷徑。
- 因為,鏈表代碼到處都是指針的操作、邊界條件的處理,稍有不慎就容易產生 Bug。
- 鏈表代碼寫得好壞,可以看出一個人寫代碼是否夠細心,考慮問題是否全面,思維是否縝密。
- 所以,這也是很多面試官喜歡讓人手寫鏈表代碼的原因。
- 一定要自己寫代碼實現一下,才有效果。
6. 文章輸出計劃
JavaScript 數據結構與算法之美 系列文章,暫時寫了如下的 11 篇文章,後續還有想寫的內容,再補充。
所寫的內容只是數據結構與算法內容的冰山一角,如果你還想學更多的內容,推薦學習王爭老師的 數據結構與算法之美。
從時間和空間複雜度、基礎數據結構到排序算法,文章的內容有一定的關聯性,所以閱讀時推薦按順序來閱讀,效果更佳。
- 1. JavaScript 數據結構與算法之美 – 時間和空間複雜度
- 2. JavaScript 數據結構與算法之美 – 線性表(數組、隊列、棧、鏈表)
- 3. JavaScript 數據結構與算法之美 – 實現一個前端路由,如何實現瀏覽器的前進與後退 ?
- 4. JavaScript 數據結構與算法之美 – 棧內存與堆內存 、淺拷貝與深拷貝
- 5. JavaScript 數據結構與算法之美 – 遞歸
- 6. JavaScript 數據結構與算法之美 – 非線性表(樹、堆)
- 7. JavaScript 數據結構與算法之美 – 冒泡排序、選擇排序、插入排序
- 8. JavaScript 數據結構與算法之美 – 歸併排序、快速排序、希爾排序、堆排序
- 9. JavaScript 數據結構與算法之美 – 計數排序、桶排序、基數排序
- 10. JavaScript 數據結構與算法之美 – 十大經典排序算法匯總
- 11. JavaScript 數據結構與算法之美 – 強烈推薦 GitHub 上值得前端學習的數據結構與算法項目
如果有錯誤或者不嚴謹的地方,請務必給予指正,以免誤人子弟,十分感謝。
7. 最後
文章中的代碼已經全部放在了我的 github 上,如果喜歡或者有所啟發,歡迎 star,對作者也是一種鼓勵。
參考文章:
數組:為什麼很多編程語言中數組都從 0 開始編號?
JS中的算法與數據結構——鏈表(Linked-list)
JavaScript數據結構 03 – 隊列
鏈表(上):如何實現 LRU 緩存淘汰算法?
JavaScript數據結構——隊列


