子線程調用invalidate()產生「Only the original thread that created a view hierarchy can touch its views.」原因分析
備註:本文基於sdk28, ViewActivity頁面禁用了硬件加速(AndroidManifest.xml中添加了android:hardwareAccelerated=”false”)。
1、異常出處
ViewActivity代碼鏈接://gitee.com/2820174512/application/blob/master/app/src/main/java/com/example/myapplication/threadcheck/ViewActivity.java
點擊Hello,World!後報如下異常:
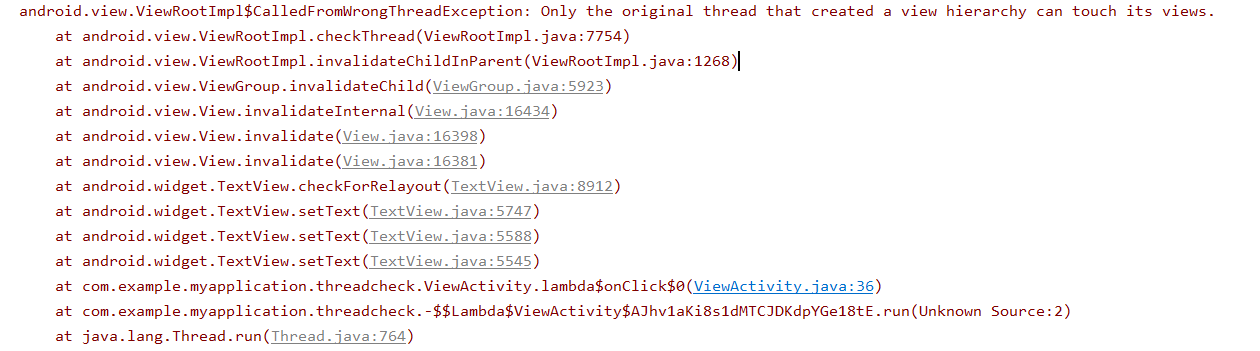
從圖片中可以看出異常在ViewRootImpl類的invalidateChildInParent方法中進行檢查的,判斷當前線程是否是創建線程(View類一般是在主線程創建的),部分代碼如下, 可以看出就是在checkThread方法中拋出的異常。
    @Override
    public ViewParent invalidateChildInParent(int[] location, Rect dirty) {
        checkThread();
        if (DEBUG_DRAW) Log.v(mTag, "Invalidate child: " + dirty);

        ...

        return null;
    }

    void checkThread() {
        if (mThread != Thread.currentThread()) {
            throw new CalledFromWrongThreadException(
                    "Only the original thread that created a view hierarchy can touch its views.");
        }
    }
2、從View.invalidate()方法開始分析
先看下TextView.invalidate()方法(View的invalidate()方法)
    public void invalidate() {
        invalidate(true);
    }

    public void invalidate(boolean invalidateCache) {
        invalidateInternal(0, 0, mRight - mLeft, mBottom - mTop, invalidateCache, true);
    }

    void invalidateInternal(int l, int t, int r, int b, boolean invalidateCache,
            boolean fullInvalidate) {
        ...

        // Reset content capture caches
        mCachedContentCaptureSession = null;

        if ((mPrivateFlags & (PFLAG_DRAWN | PFLAG_HAS_BOUNDS)) == (PFLAG_DRAWN | PFLAG_HAS_BOUNDS)
                || (invalidateCache && (mPrivateFlags & PFLAG_DRAWING_CACHE_VALID) == PFLAG_DRAWING_CACHE_VALID)
                || (mPrivateFlags & PFLAG_INVALIDATED) != PFLAG_INVALIDATED
                || (fullInvalidate && isOpaque() != mLastIsOpaque)) {
            ...

            // Propagate the damage rectangle to the parent view.
            final AttachInfo ai = mAttachInfo;
            final ViewParent p = mParent;
            if (p != null && ai != null && l < r && t < b) {
                final Rect damage = ai.mTmpInvalRect;
                damage.set(l, t, r, b);
                p.invalidateChild(this, damage);
            }

            ...
        }
    }
主要執行邏輯:向上請求父View執行invalidateChild()方法,
該方法為ViewParent接口的方法,ViewGroup類實現了該接口的invalidateChild方法
    public final void invalidateChild(View child, final Rect dirty) {
        final AttachInfo attachInfo = mAttachInfo;
        if (attachInfo != null && attachInfo.mHardwareAccelerated) {
            // HW accelerated fast path
            onDescendantInvalidated(child, child);
            return;
        }

        ViewParent parent = this;
        if (attachInfo != null) {

            ...

            do {
                View view = null;
                if (parent instanceof View) {
                    view = (View) parent;
                }

                if (drawAnimation) {
                    if (view != null) {
                        view.mPrivateFlags |= PFLAG_DRAW_ANIMATION;
                    } else if (parent instanceof ViewRootImpl) {
                        ((ViewRootImpl) parent).mIsAnimating = true;
                    }
                }

                ...

                parent = parent.invalidateChildInParent(location, dirty);
                if (view != null) {
                    // Account for transform on current parent
                    Matrix m = view.getMatrix();
                    if (!m.isIdentity()) {
                        RectF boundingRect = attachInfo.mTmpTransformRect;
                        boundingRect.set(dirty);
                        m.mapRect(boundingRect);
                        dirty.set((int) Math.floor(boundingRect.left),
                                (int) Math.floor(boundingRect.top),
                                (int) Math.ceil(boundingRect.right),
                                (int) Math.ceil(boundingRect.bottom));
                    }
                }
            } while (parent != null);
        }
    }

    public ViewParent invalidateChildInParent(final int[] location, final Rect dirty) {
        if ((mPrivateFlags & (PFLAG_DRAWN | PFLAG_DRAWING_CACHE_VALID)) != 0) {

            ...

            return mParent;
        }

        return null;
    }
do while循環一層層向上請求重繪,最終應該是到ViewRootImpl類的invalidateChildInParent方法
3、ViewRootImpl如何與View進行關聯:從Activity的setContentView開始分析
3.1 最頂層的View——DecorView
要將View顯示到界面上,需要在Activity中執行setContentView,這裡主要分析setContentView(View)方法
    public void setContentView(View view) {
        getWindow().setContentView(view);
        initWindowDecorActionBar();
    }

    public Window getWindow() {
        return mWindow;
    }

    final void attach(Context context, ActivityThread aThread,
            Instrumentation instr, IBinder token, int ident,
            Application application, Intent intent, ActivityInfo info,
            CharSequence title, Activity parent, String id,
            NonConfigurationInstances lastNonConfigurationInstances,
            Configuration config, String referrer, IVoiceInteractor voiceInteractor,
            Window window, ActivityConfigCallback activityConfigCallback) {
        attachBaseContext(context);

        mFragments.attachHost(null /*parent*/);

        mWindow = new PhoneWindow(this, window, activityConfigCallback);

        ...
    }
mWindow屬性在android.app.Activity#attach方法中進行賦值, 實現類為PhoneWindow,而PhoneWindow的setContentView實現如下:
    // This is the top-level view of the window, containing the window decor.
    private DecorView mDecor;

    @Override
    public void setContentView(View view) {
        setContentView(view, new ViewGroup.LayoutParams(MATCH_PARENT, MATCH_PARENT));
    }

    @Override
    public void setContentView(View view, ViewGroup.LayoutParams params) {
        // Note: FEATURE_CONTENT_TRANSITIONS may be set in the process of installing the window
        // decor, when theme attributes and the like are crystalized. Do not check the feature
        // before this happens.
        if (mContentParent == null) {
            installDecor();
        } else if (!hasFeature(FEATURE_CONTENT_TRANSITIONS)) {
            mContentParent.removeAllViews();
        }

        if (hasFeature(FEATURE_CONTENT_TRANSITIONS)) {
            view.setLayoutParams(params);
            final Scene newScene = new Scene(mContentParent, view);
            transitionTo(newScene);
        } else {
            mContentParent.addView(view, params);
        }
        mContentParent.requestApplyInsets();
        final Callback cb = getCallback();
        if (cb != null && !isDestroyed()) {
            cb.onContentChanged();
        }
        mContentParentExplicitlySet = true;
    }

    private void installDecor() {
        mForceDecorInstall = false;
        if (mDecor == null) {
            mDecor = generateDecor(-1);
            mDecor.setDescendantFocusability(ViewGroup.FOCUS_AFTER_DESCENDANTS);
            mDecor.setIsRootNamespace(true);
            if (!mInvalidatePanelMenuPosted && mInvalidatePanelMenuFeatures != 0) {
                mDecor.postOnAnimation(mInvalidatePanelMenuRunnable);
            }
        } else {
            mDecor.setWindow(this);
        }

        ...
    }

    protected DecorView generateDecor(int featureId) {
        // System process doesn't have application context and in that case we need to directly use
        // the context we have. Otherwise we want the application context, so we don't cling to the
        // activity.
        Context context;
        if (mUseDecorContext) {
            Context applicationContext = getContext().getApplicationContext();
            if (applicationContext == null) {
                context = getContext();
            } else {
                context = new DecorContext(applicationContext, getContext());
                if (mTheme != -1) {
                    context.setTheme(mTheme);
                }
            }
        } else {
            context = getContext();
        }
        return new DecorView(context, featureId, this, getAttributes());
    }
可以看出mDecor為View樹中最頂層的View,是DecorView類的一個實例。
3.2 DecorView與ViewRootImpl進行關聯
這裡我是通過搜索「DecorView如何與ViewRootImpl進行關聯」才知道具體關聯代碼,見鏈接//www.cnblogs.com/huansky/p/11911549.html
主要在ActivityThread類的handleResumeActivity方法中
    @Override
    public void handleResumeActivity(IBinder token, boolean finalStateRequest, boolean isForward,
            String reason) {
        // If we are getting ready to gc after going to the background, well
        // we are back active so skip it.
        unscheduleGcIdler();
        mSomeActivitiesChanged = true;

        // TODO Push resumeArgs into the activity for consideration
        final ActivityClientRecord r = performResumeActivity(token, finalStateRequest, reason);
        if (r == null) {
            // We didn't actually resume the activity, so skipping any follow-up actions.
            return;
        }

        final Activity a = r.activity;

        if (localLOGV) {
            Slog.v(TAG, "Resume " + r + " started activity: " + a.mStartedActivity
                    + ", hideForNow: " + r.hideForNow + ", finished: " + a.mFinished);
        }

        final int forwardBit = isForward
                ? WindowManager.LayoutParams.SOFT_INPUT_IS_FORWARD_NAVIGATION : 0;

        // If the window hasn't yet been added to the window manager,
        // and this guy didn't finish itself or start another activity,
        // then go ahead and add the window.
        boolean willBeVisible = !a.mStartedActivity;
        if (!willBeVisible) {
            try {
                willBeVisible = ActivityManager.getService().willActivityBeVisible(
                        a.getActivityToken());
            } catch (RemoteException e) {
                throw e.rethrowFromSystemServer();
            }
        }
        if (r.window == null && !a.mFinished && willBeVisible) {
            r.window = r.activity.getWindow();
            View decor = r.window.getDecorView();
            decor.setVisibility(View.INVISIBLE);
            ViewManager wm = a.getWindowManager();
            WindowManager.LayoutParams l = r.window.getAttributes();
            a.mDecor = decor;
            l.type = WindowManager.LayoutParams.TYPE_BASE_APPLICATION;
            l.softInputMode |= forwardBit;
            if (r.mPreserveWindow) {
                a.mWindowAdded = true;
                r.mPreserveWindow = false;
                // Normally the ViewRoot sets up callbacks with the Activity
                // in addView->ViewRootImpl#setView. If we are instead reusing
                // the decor view we have to notify the view root that the
                // callbacks may have changed.
                ViewRootImpl impl = decor.getViewRootImpl();
                if (impl != null) {
                    impl.notifyChildRebuilt();
                }
            }
            if (a.mVisibleFromClient) {
                if (!a.mWindowAdded) {
                    a.mWindowAdded = true;
                    wm.addView(decor, l);
                } else {
                    // The activity will get a callback for this {@link LayoutParams} change
                    // earlier. However, at that time the decor will not be set (this is set
                    // in this method), so no action will be taken. This call ensures the
                    // callback occurs with the decor set.
                    a.onWindowAttributesChanged(l);
                }
            }

            // If the window has already been added, but during resume
            // we started another activity, then don't yet make the
            // window visible.
        } else if (!willBeVisible) {
            if (localLOGV) Slog.v(TAG, "Launch " + r + " mStartedActivity set");
            r.hideForNow = true;
        }

        ...
    }
一般執行流程: 獲取Activity實例a對應的WindowManager實例wm,然後addView。
Activity的attach方法中對mWindowManager對象賦值,mWindowManager對象從mWindow對象中獲得
    final void attach(Context context, ActivityThread aThread,
            Instrumentation instr, IBinder token, int ident,
            Application application, Intent intent, ActivityInfo info,
            CharSequence title, Activity parent, String id,
            NonConfigurationInstances lastNonConfigurationInstances,
            Configuration config, String referrer, IVoiceInteractor voiceInteractor,
            Window window, ActivityConfigCallback activityConfigCallback) {
        attachBaseContext(context);

        mFragments.attachHost(null /*parent*/);

        mWindow = new PhoneWindow(this, window, activityConfigCallback);

        ...

        mWindowManager = mWindow.getWindowManager();
        ...
    }
mWindow對象為Window類,getWindowManager實現如下,則ActivityThread類中handleResumeActivity獲取的wm對象實現類為WindowManagerImpl類
    public WindowManager getWindowManager() {
        return mWindowManager;
    }

    public void setWindowManager(WindowManager wm, IBinder appToken, String appName,
            boolean hardwareAccelerated) {
        mAppToken = appToken;
        mAppName = appName;
        mHardwareAccelerated = hardwareAccelerated
                || SystemProperties.getBoolean(PROPERTY_HARDWARE_UI, false);
        if (wm == null) {
            wm = (WindowManager)mContext.getSystemService(Context.WINDOW_SERVICE);
        }
        mWindowManager = ((WindowManagerImpl)wm).createLocalWindowManager(this);
    }
WindowManagerImpl類addView(View, ViewGroup.LayoutParams)實現如下
    @Override
    public void addView(@NonNull View view, @NonNull ViewGroup.LayoutParams params) {
        applyDefaultToken(params);
        mGlobal.addView(view, params, mContext.getDisplay(), mParentWindow);
    }
委託給WindowManagerGlobal類的addView(View, ViewGroup.LayoutParams, Display, Window)實現,最終調用ViewRootImpl的setView方法關聯DecorView與ViewRootImpl
public void addView(View view, ViewGroup.LayoutParams params,
            Display display, Window parentWindow) {

        ...

        ViewRootImpl root;
        View panelParentView = null;

        synchronized (mLock) {
            ...

            root = new ViewRootImpl(view.getContext(), display);

            view.setLayoutParams(wparams);

            mViews.add(view);
            mRoots.add(root);
            mParams.add(wparams);

            // do this last because it fires off messages to start doing things
            try {
                root.setView(view, wparams, panelParentView);
            } catch (RuntimeException e) {
                // BadTokenException or InvalidDisplayException, clean up.
                if (index >= 0) {
                    removeViewLocked(index, true);
                }
                throw e;
            }
        }
    }
4、其他
4.1 獲取DecorView與ViewRootImpl的直接方法
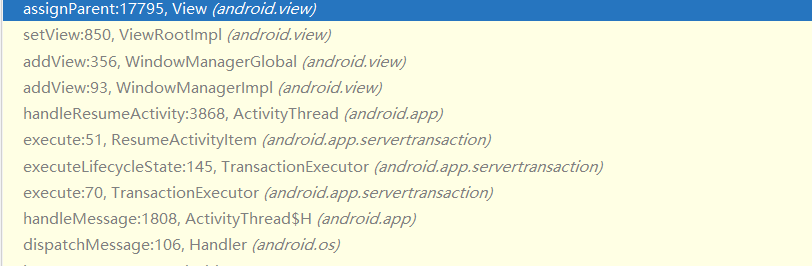
在View中mParent只有一處賦值,就是在void assignParent(ViewParent parent)方法中,可以在這裡添加一個條件斷點 parent instanceof ViewRootImpl, 就可以獲取對應的調用信息
4.2 硬件加速相關以及invalidate()流程圖
ViewGroup類的invalidateChild部分代碼如下,
    public final void invalidateChild(View child, final Rect dirty) {
        final AttachInfo attachInfo = mAttachInfo;
        if (attachInfo != null && attachInfo.mHardwareAccelerated) {
            // HW accelerated fast path
            onDescendantInvalidated(child, child);
            return;
        }

        ...

        do {
            View view = null;
            if (parent instanceof View) {
                view = (View) parent;
            }

            if (drawAnimation) {
                if (view != null) {
                    view.mPrivateFlags |= PFLAG_DRAW_ANIMATION;
                } else if (parent instanceof ViewRootImpl) {
                    ((ViewRootImpl) parent).mIsAnimating = true;
                }
            }

            // If the parent is dirty opaque or not dirty, mark it dirty with the opaque
            // flag coming from the child that initiated the invalidate
            if (view != null) {
                if ((view.mViewFlags & FADING_EDGE_MASK) != 0 &&
                        view.getSolidColor() == 0) {
                    opaqueFlag = PFLAG_DIRTY;
                }
                if ((view.mPrivateFlags & PFLAG_DIRTY_MASK) != PFLAG_DIRTY) {
                    view.mPrivateFlags = (view.mPrivateFlags & ~PFLAG_DIRTY_MASK) | opaqueFlag;
                }
            }

            parent = parent.invalidateChildInParent(location, dirty);
            if (view != null) {
                // Account for transform on current parent
                Matrix m = view.getMatrix();
                if (!m.isIdentity()) {
                    RectF boundingRect = attachInfo.mTmpTransformRect;
                    boundingRect.set(dirty);
                    m.mapRect(boundingRect);
                    dirty.set((int) Math.floor(boundingRect.left),
                            (int) Math.floor(boundingRect.top),
                            (int) Math.ceil(boundingRect.right),
                            (int) Math.ceil(boundingRect.bottom));
                }
            }
        } while (parent != null);
    }
其中attachInfo.mHardwareAccelerated表示啟用硬件加速,如果啟用硬件加速,子線程invalidate()不會產生異常(genymotion9.0模擬器中未產生異常,genymotion6.0模擬器中會產生異常)。
本文開始在activity中禁用硬件加速就是因為這個原因,而像子線程中requestLayout、addView等硬件沒有加速問題,一定會報異常。
invalidate()執行後方法調用流程圖如下:

4.3 View加載線程問題
只要View沒有添加到Window中View就可以在子線程中操作,不過會有線程安全問題。

