100天搞定機器學習|day39 Tensorflow Keras手寫數字識別
- 2019 年 10 月 3 日
- 筆記
提示:建議先看day36-38的內容
TensorFlow™ 是一個採用數據流圖(data flow graphs),用於數值計算的開源軟件庫。節點(Nodes)在圖中表示數學操作,圖中的線(edges)則表示在節點間相互聯繫的多維數據數組,即張量(tensor)。它靈活的架構讓你可以在多種平台上展開計算,例如台式計算機中的一個或多個CPU(或GPU),服務器,移動設備等等。
TensorFlow 最初由Google大腦小組(隸屬於Google機器智能研究機構)的研究員和工程師們開發出來,用於機器學習和深度神經網絡方面的研究,但這個系統的通用性使其也可廣泛用於其他計算領域。
1、安裝庫tensorflow
有些教程會推薦安裝nightly,它適用於在一個全新的環境下進行TensorFlow的安裝,默認會把需要依賴的庫也一起裝上。我使用的是anaconda,本文我們安裝的是純凈版的tensorflow,非常簡單,只需打開Prompt:
pip install tensorflow安裝成功

導入成功
#導入keras from tensorflow import keras #導入tensorflow import tensorflow as tf註:有些教程中導入Keras用的是import tensorflow.keras as keras會提示No module named ‘tensorflow.keras’
2、導入mnist數據
在上篇文章中我們已經提到過 MNIST 了,用有趣的方式解釋梯度下降算法
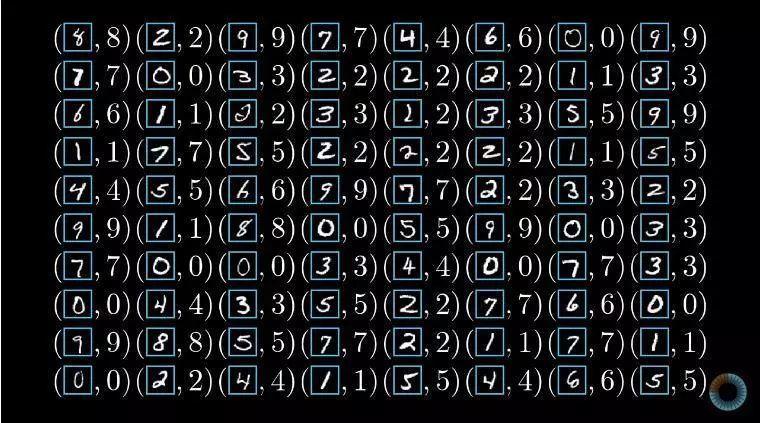
它是一個收錄了許多 28 x 28 像素手寫數字圖片(以灰度值矩陣存儲)及其對應的數字的數據集,可以把它理解成下圖這個樣子:
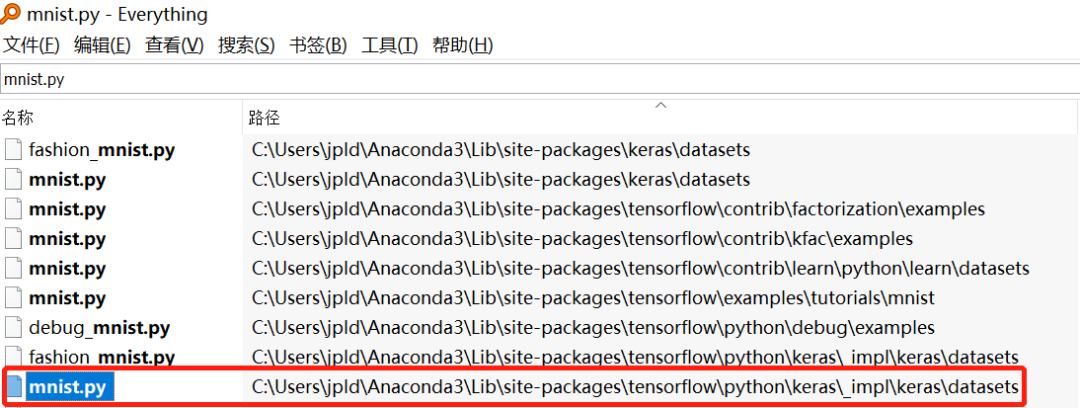
由於眾所周知的原因,Keras自帶minist數據集下載會報錯,無法下載。博客園崔小秋同學給出了很好的解決方法:
1、找到本地keras目錄下的mnist.py文件,通常在這個目錄下。
2、下載mnist.npz文件到本地,下載鏈接如下。
https://pan.baidu.com/s/1C3c2Vn-_616GqeEn7hQQ2Q
3、修改mnist.py文件為以下內容,並保存
from __future__ import absolute_import from __future__ import division from __future__ import print_function from ..utils.data_utils import get_file import numpy as np def load_data(path='mnist.npz'): """Loads the MNIST dataset. # Arguments path: path where to cache the dataset locally (relative to ~/.keras/datasets). # Returns Tuple of Numpy arrays: `(x_train, y_train), (x_test, y_test)`. """ path = 'E:/Data/Mnist/mnist.npz' #此處的path為你剛剛存放mnist.py的目錄。注意斜杠 f = np.load(path) x_train, y_train = f['x_train'], f['y_train'] x_test, y_test = f['x_test'], f['y_test'] f.close() return (x_train, y_train), (x_test, y_test)看一下數據
mnist = tf.keras.datasets.mnist (x_train, y_train),(x_test, y_test) = mnist.load_data() print(x_train[0].shape)(28, 28)
import matplotlib.pyplot as plt plt.imshow(x_train[0],cmap=plt.cm.binary) plt.show()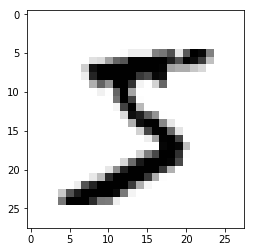
print(y_train[0])5
對數據進行歸一化處理
x_train = tf.keras.utils.normalize(x_train, axis=1) x_test = tf.keras.utils.normalize(x_test, axis=1)再看一下,圖像的像素值被限定在了 [0,1]
plt.imshow(x_train[0],cmap=plt.cm.binary) plt.show()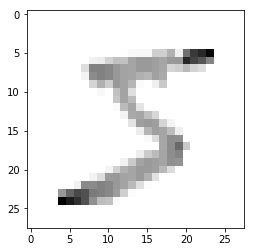
3 構建與訓練模型我們使用 Keras 的 Sequential 模型(順序模型),順序模型是多個網絡層的線性堆疊。本文旨在介紹TensorFlow 及Keras用法,不再展開,有興趣的同學們學習其具體用法,可以參考Keras文檔:
https://keras.io/zh/getting-started/sequential-model-guide/
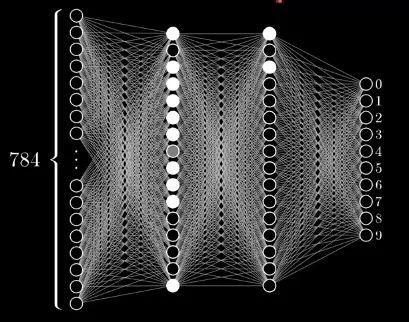
model = tf.keras.models.Sequential() model.add(tf.keras.layers.Flatten(input_shape=(28,28))) model.add(tf.keras.layers.Dense(128, activation=tf.nn.relu)) model.add(tf.keras.layers.Dense(128, activation=tf.nn.relu)) model.add(tf.keras.layers.Dense(10, activation=tf.nn.softmax)) model.compile(optimizer='adam', loss='sparse_categorical_crossentropy', metrics=['accuracy']) model.fit(x_train, y_train, epochs=3)我們構建出的模型大概是這個樣子的,區別是我們的隱藏層有128個單元
在訓練的過程中,我們會發現損失值(loss)在降低,而準確度(accuracy)在提高,最後達到了一個令人滿意的程度。
Epoch 1/3
60000/60000 – 8s 127us/step – loss: 0.2677 – acc: 0.9211Epoch 2/3
60000/60000 – 8s 130us/step – loss: 0.1106 – acc: 0.9655Epoch 3/3
60000/60000 – 8s 136us/step – loss: 0.0751 – acc: 0.9764
4 測試模型
val_loss, val_acc = model.evaluate(x_test, y_test) print(val_loss) print(val_acc)10000/10000 – 0s 45us/step0.0916121033909265
0.9713
損失和準確度看起來還湊合,嘗試識別訓練集
predictions = model.predict(x_test) print(predictions)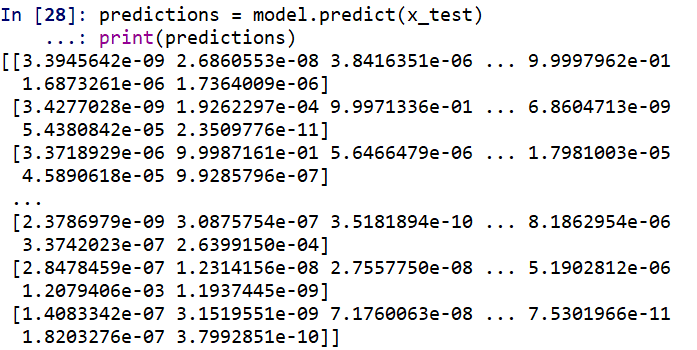
用 argmax 解析一下(就是找出最大數對應的索引,即為識別出的數字)
import numpy as np print(np.argmax(predictions[0]))7
plt.imshow(x_test[0],cmap=plt.cm.binary) plt.show()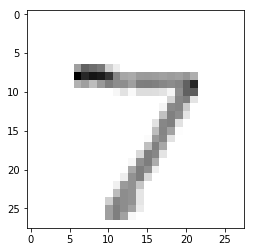
OK,模型可以識別數字了。
5、保存模型
主要用於模型的存儲和恢復。
model.save('epic_num_reader.model') # 加載保存的模型 new_model = tf.keras.models.load_model('epic_num_reader.model') # 測試保存的模型 predictions = new_model.predict(x_test)print(np.argmax(predictions[0]))
看到這裡的都是真愛,另推薦一個Keras教程
Colab超火的Keras/TPU深度學習免費實戰,有點Python基礎就能看懂的快速課程
參考:
https://www.cnblogs.com/shinny/p/9283372.html
https://www.cnblogs.com/wj-1314/p/9579490.html
https://github.com/MLEveryday/100-Days-Of-ML-Code/blob/master/Code/Day%2039.ipynb
