abp(net core)+easyui+efcore實現倉儲管理系統——使用 WEBAPI實現CURD (十三)
- 2019 年 10 月 3 日
- 筆記
abp(net core)+easyui+efcore實現倉儲管理系統目錄
abp(net core)+easyui+efcore實現倉儲管理系統——ABP總體介紹(一)
abp(net core)+easyui+efcore實現倉儲管理系統——解決方案介紹(二)
abp(net core)+easyui+efcore實現倉儲管理系統——領域層創建實體(三)
abp(net core)+easyui+efcore實現倉儲管理系統——定義倉儲並實現 (四)
abp(net core)+easyui+efcore實現倉儲管理系統——創建應用服務(五)
abp(net core)+easyui+efcore實現倉儲管理系統——展現層實現增刪改查之控制器(六)
abp(net core)+easyui+efcore實現倉儲管理系統——展現層實現增刪改查之列表視圖(七)
abp(net core)+easyui+efcore實現倉儲管理系統——展現層實現增刪改查之增刪改視圖(八)
abp(net core)+easyui+efcore實現倉儲管理系統——展現層實現增刪改查之菜單與測試(九)
abp(net core)+easyui+efcore實現倉儲管理系統——多語言(十)
abp(net core)+easyui+efcore實現倉儲管理系統——使用 WEBAPI實現CURD (十一)
abp(net core)+easyui+efcore實現倉儲管理系統——使用 WEBAPI實現CURD (十二)
上接(abp(net core)+easyui+efcore實現倉儲管理系統——使用 WEBAPI實現CURD (十二)),在這一篇文章中我們創建視圖模型、列表視圖、添加菜單。
六、創建視圖模型
1) 在Visual Studio 2017的“解決方案資源管理器”中,右鍵單擊在領域層“ABP.TPLMS.Web.Mvc”項目中的Models目錄。 選擇“添加” > “新建文件夾”。並將文件夾命名為“Supplier”。
2) 鼠標右鍵單擊“Supplier”文件夾,然後選擇“添加” > “類”。 將類命名為 EditSupplierModalViewModel,代碼如下。
using System.Collections.Generic; using System.Linq; using ABP.TPLMS.Modules.Dto; namespace ABP.TPLMS.Web.Models. Supplier { public class EditSupplierModalViewModel { public CreateUpdateSupplierDto Supplier { get; set; } } }
3) 鼠標右鍵單擊“Supplier”文件夾,然後選擇“添加” > “類”。 將類命名為 SupplierListViewModel,代碼如下。
using System.Collections.Generic; using ABP.TPLMS.Suppliers.Dto; namespace ABP.TPLMS.Web.Models.Supplier { public class SupplierListViewModel { public SupplierDto Supplier { get; set; } public IReadOnlyList<SupplierDto> Suppliers { get; set; } } }
七、創建列表視圖
我們參考“ABP.TPLMS.Web.Mvc”項目中的ViewsUsers目錄中的Index.cshtml文件,來編寫我們的Supplier的列表頁面。
1. 在Visual Studio 2017的“解決方案資源管理器”中,右鍵單擊在展現層“ABP.TPLMS.Web.Mvc”項目中的Views目錄。 選擇“添加” > “新建文件夾”。並重命名為“Supplier”。
2. 在Visual Studio 2017的“解決方案資源管理器”中,鼠標右鍵單擊“Supplier”文件夾,然後選擇“添加” > “新建項…”。 在“添加新項-ABP.TPLMS.Web.Mvc”對話框中,選擇“Razor視圖”,並將名稱命名為Index.cshmtl。
3. 在Index視圖中,我們通過循環遍歷,輸出模塊信息。代碼如下。
@using ABP.TPLMS.Web.Startup  @model ABP.TPLMS.Web.Models.Supplier.SupplierListViewModel    @{      ViewData["Title"] = PageNames.Supplier;  }    <div class="row clearfix">      <div class="col-lg-12 col-md-12 col-sm-12 col-xs-12">            <div class="card">              <div class="header">                  <h2>                      @L("Supplier")                    </h2>                    <button type="button" class="btn btn-primary btn-circle waves-effect waves-circle waves-float pull-right" data-toggle="modal"
data-target="#SupplierCreateModal">                        <i class="material-icons">add</i>                    </button>                  <ul class="header-dropdown m-r--5">                      <li class="dropdown">                          <a href="javascript:void(0);" class="dropdown-toggle" data-toggle="dropdown" role="button" aria-haspopup="true"
aria-expanded="false">                                <i class="material-icons">more_vert</i>                            </a>                          <ul class="dropdown-menu pull-right">                                <li><a id="RefreshButton" href="javascript:void(0);" class="waves-effect waves-block">
<i class="material-icons">refresh</i>@L("Refresh")</a></li>                            </ul>                      </li>                  </ul>              </div>                <div class="body table-responsive">                    <table class="table">                        <thead>                          <tr>                                <th>                                    @Html.DisplayNameFor(model => model.Supplier.Code)                                </th>                              <th>                                    @Html.DisplayNameFor(model => model.Supplier.Name)                                </th>                              <th>                                    @Html.DisplayNameFor(model => model.Supplier.LinkName)                                </th>                              <th>                                    @Html.DisplayNameFor(model => model.Supplier.Mobile)                                </th>                              <th>                                    @Html.DisplayNameFor(model => model.Supplier.Address)                                </th>                              <th>                                    @Html.DisplayNameFor(model => model.Supplier.Tel)                                </th>                              <th>                                    @Html.DisplayNameFor(model => model.Supplier.Status)                                </th>                              <th></th>                            </tr>                      </thead>                        <tbody>                            @foreach (var item in Model.Suppliers)                          {                            <tr>                              <td>                                  @Html.DisplayFor(modelItem => item.Code)                                </td>                                <td>                                  @Html.DisplayFor(modelItem => item.Name)                                </td>                              <td>                                  @Html.DisplayFor(modelItem => item.LinkName)                                </td>                              <td>                                  @Html.DisplayFor(modelItem => item.Mobile)                                </td>                                <td>                                  @Html.DisplayFor(modelItem => item.Address)                                </td>                              <td>                                  @Html.DisplayFor(modelItem => item.Tel)                                </td>                              <td>                                  @Html.DisplayFor(modelItem => item.Status)                                </td>                              <td class="dropdown">                                  <a href="#" class="dropdown-toggle" data-toggle="dropdown" role="button" aria-haspopup="true" aria-expanded="false">                                      <i class="material-icons">menu</i>                                  </a>                                  <ul class="dropdown-menu pull-right">                                      <li><a href="#" class="waves-effect waves-block edit-supplier" data-supplier-id="@item.Id" data-toggle="modal"
 data-target="#SupplierEditModal"><i class="material-icons">edit</i>@L("Edit")</a></li>                    <li><a href="#" class="waves-effect waves-block delete-supplier" data-supplier-id="@item.Id" data-module-name="@item.Name">
<i class="material-icons">delete_sweep</i>@L("Delete")</a></li>                                    </ul>                                </td>                            </tr>                            }                        </tbody>                  </table>                </div>          </div>      </div>  </div>
八、添加菜單
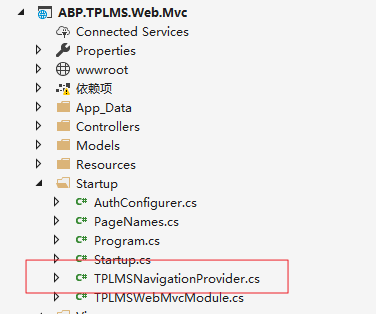
1. 在Visual Studio 2017的“解決方案資源管理器”中,打開單擊在展示層“ABP.TPLMS.Web.Mvc”項目中的Startup目錄。 找到TPLMSNavigationProvider.cs文件。如下圖。
2. 在Visual Studio 2017的“解決方案資源管理器”中,打開TPLMSNavigationProvider.cs文件,此文件就是ABP系統的菜單文件,我們進行如下修改,添加一個新的菜單Supplier。如下圖。
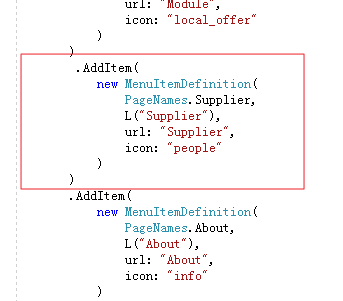
.AddItem( new MenuItemDefinition( PageNames.Supplier, L("Supplier"), url: "Supplier", icon: "people" ) )
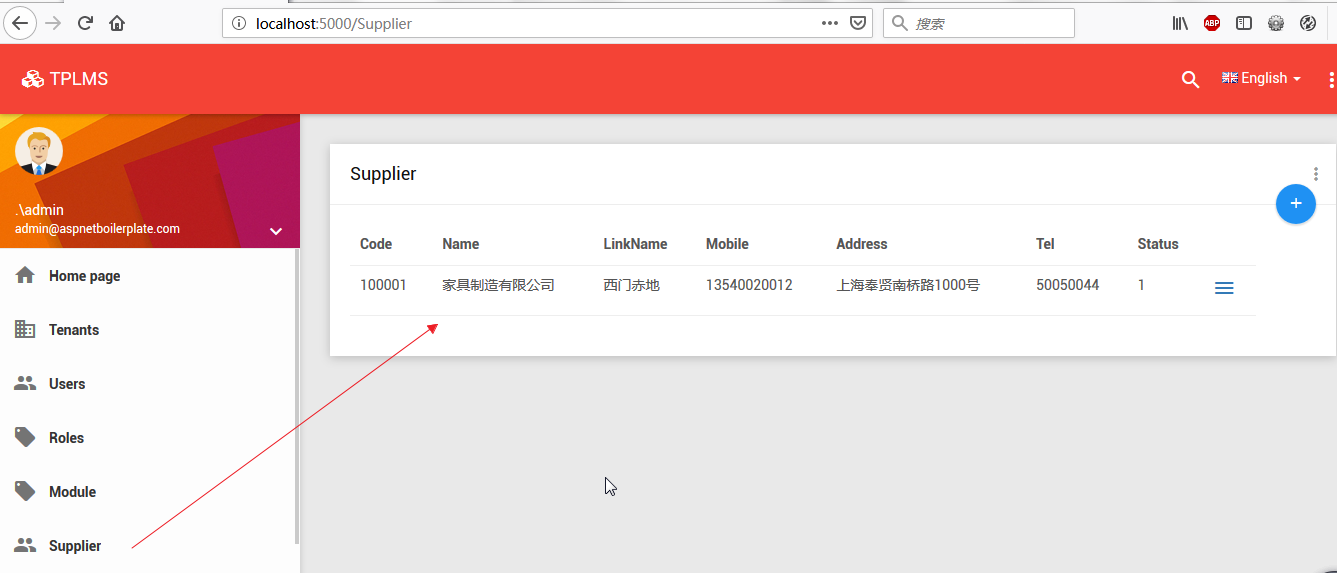
3.在Visual Studio 2017中按F5運行應用程序。登錄之後,點擊“Supplier”目錄,我們可以看到供應商列表頁面。如下圖。