SpringBoot2.x入門:使用CommandLineRunner鉤子接口
- 2020 年 7 月 14 日
- 筆記
- springboot
前提
這篇文章是《SpringBoot2.x入門》專輯的第6篇文章,使用的SpringBoot版本為2.3.1.RELEASE,JDK版本為1.8。
這篇文章主要簡單聊聊鉤子接口CommandLineRunner和ApplicationRunner,下文有時候統稱兩者為Runner。
Runner的回調時機
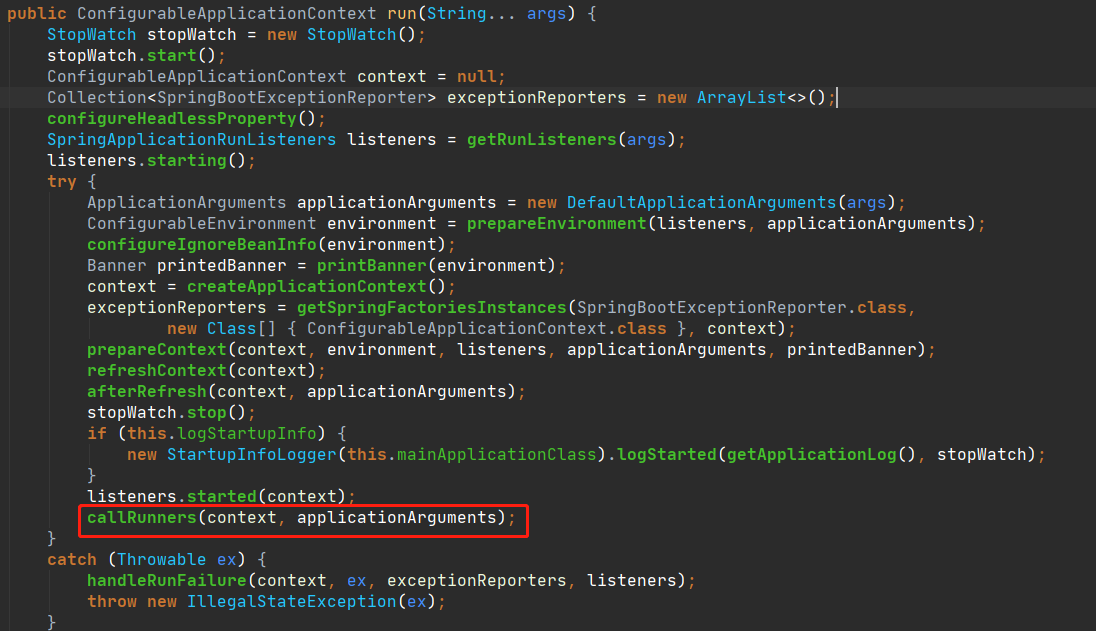
參考org.springframework.boot.SpringApplication#run()方法的源碼,可以知道CommandLineRunner和ApplicationRunner的回調時機:
在所有的CommandLineRunner和ApplicationRunner回調之前,下面的步驟已經確保執行完畢:
Environment內置變量的創建和屬性填充已經完成。Banner已經打印完畢。ApplicationContext和BeanFactory創建完成,並且完成了上下文刷新(refreshContext),意味着所有單例的Bean完成了初始化以及屬性裝配。Servlet容器啟動成功,如內置的Tomcat、Jetty容器已經正常啟動,可以正常接收請求和處理。- 啟動信息完成打印,一般會看到日誌輸出類似
Started OrderExportApplication in XXX seconds (JVM running for YYY)。
也就是CommandLineRunner或者ApplicationRunner回調的時候,可以使用所有上下文中存在的單例Bean和Environment內置變量中已經存在的屬性值,所以很多時候demo項目都會在CommandLineRunner或者ApplicationRunner中進行操作。
Runner的簡單使用
CommandLineRunner和ApplicationRunner沒有本質區別,唯一的區別在:CommandLineRunner#run()接收來自於main方法的參數,類型是字符串數組(不定字符串數組),而ApplicationRunner#run()接收ApplicationArguments類型的參數,對應的實現類是DefaultApplicationArguments。
可以直接把註解@Component應用在CommandLineRunner或者ApplicationRunner的實現類上,相對於把對應的實現單例添加到Spring上下文中。例如:
@Slf4j
@Component
public class CustomCommandLineRunner implements CommandLineRunner {

    @Override
    public void run(String... args) throws Exception {
        log.info("CustomCommandLineRunner runs...");
    }
}
也可以通過@Bean註解,直接作用於CommandLineRunner的匿名類對應的方法上,例如:
@Slf4j
@Configuration
public class CommandLineRunners {

    @Bean
    public CommandLineRunner commandLineRunner(){
        return args -> log.info("CommandLineRunners commandLineRunner");
    }
}
或者直接在啟動類實現CommandLineRunner接口(這種方式不推薦使用):
@Slf4j
@SpringBootApplication
public class Ch5Application implements CommandLineRunner {

    public static void main(String[] args) {
        SpringApplication.run(Ch5Application.class, args);
    }

    @Override
    public void run(String... args) throws Exception {
        log.info("Ch5Application CommandLineRunner runs...");
    }
}
此外,可以通過實現org.springframework.core.Ordered接口或者@Order註解定義Runner回調的順序,指定的順序數越小,優先級越高。
Runner的使用場景
這一小節是根據個人的編程習慣提出的建議。Runner鉤子接口回調的時候如果拋出異常,會直接導致應用進程退出,所以如果在Runner回調方法中一定要注意異常的捕獲和處理。基於這個特性,結合前面分析Runner接口的回調時機,它適用的主要場景有:
- 打印日誌用於標識服務啟動成功或者標識某些屬性加載成功。
- 設置屬性值或者啟動組件,例如開啟某些組件的開關、一些應用級別緩存的加載、啟動定時任務等等。
- 預加載數據(更常見於一些測試場景中,可以結合
@Profile註解使用,指定特定的profile才生效)。 - 需要使用
main方法的入參。
下面使用CommandLineRunner啟動所有Quartz中的Job(記得先引入依賴spring-boot-starter-quartz以及quartz),為了簡單起見調度器使用內存態:
@Slf4j
@DisallowConcurrentExecution
public class SimpleJob extends QuartzJobBean {

    @Override
    protected void executeInternal(JobExecutionContext context) throws JobExecutionException {
        log.info("SimpleJob run...");
    }
}

@Component
public class QuartzCommandLineRunner implements CommandLineRunner {

    @Autowired
    private Scheduler scheduler;

    @Override
    public void run(String... args) throws Exception {
        JobDetail job = JobBuilder.newJob(SimpleJob.class).storeDurably().withIdentity(JobKey.jobKey("SimpleJob")).build();
        // 30秒執行一次
        Trigger trigger = TriggerBuilder.newTrigger()
                .withSchedule(SimpleScheduleBuilder.simpleSchedule().repeatForever().withIntervalInSeconds(30))
                .forJob(job).build();
        scheduler.scheduleJob(job, trigger);
    }
}
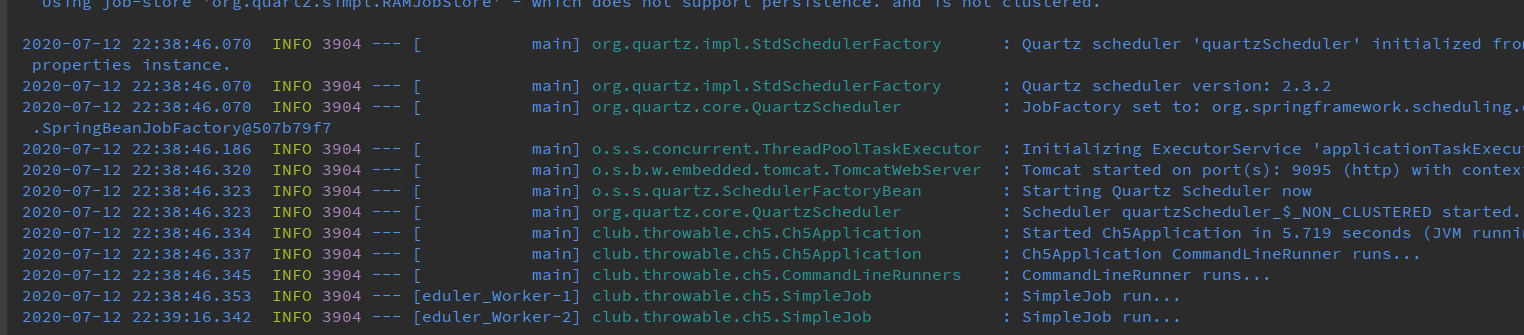
啟動應用後,日誌如下:
小結
本文demo項目倉庫:
(本文完 c-2-d e-a-20200712)
技術公眾號《Throwable文摘》(id:throwable-doge),不定期推送筆者原創技術文章(絕不抄襲或者轉載):
![]()


