如何讓你的YOLOV3模型更小更快?
1. 前言
之前講過關於模型剪枝的文章深度學習算法優化系列七 | ICCV 2017的一篇模型剪枝論文,也是2019年眾多開源剪枝項目的理論基礎 並分析過如何利用這個通道剪枝算法對常見的分類模型如VGG16/ResNet/DenseNet進行剪枝,見深度學習算法優化系列八 | VGG,ResNet,DenseNe模型剪枝代碼實戰 ,感興趣的可以去看看。這篇推文主要是介紹一下如何將這個通道剪枝算法應用到YOLOV3上,參考的Github工程地址為://github.com/Lam1360/YOLOv3-model-pruning。
2. 項目整體把握
這個YOLOV3的剪枝工程是基於U版的YOLOV3的,也就是說我們可以直接將U版訓練的YOLOV3模型加載到這裡進行剪枝。另外還在工程下的models.py中也實現了對DarkNet模型的加載和保存(無論是官方的DarkNet還是AlexeyAB的DarkNet),對應着models.py里Darknet類的load_darknet_weights和save_darknet_weights函數,這裡可以簡單看一下:
def load_darknet_weights(self, weights_path):
        """解析和存儲在'weights_path'路徑的DarkNet模型"""

        # 打開權重文件
        with open(weights_path, "rb") as f:
            header = np.fromfile(f, dtype=np.int32, count=5)  # 前5行是頭部的標題值
            self.header_info = header  # 保存權重時需要寫入標題值
            self.seen = header[3]  # 訓練的時候每次訓練幾張圖片
            weights = np.fromfile(f, dtype=np.float32)  # 剩下的是權重

        # 確定加載骨幹網絡的截斷節點
        cutoff = None
        if "darknet53.conv.74" in weights_path:
            cutoff = 75

        ptr = 0
        # 遍歷整個模型(Pytorch下的)
        for i, (module_def, module) in enumerate(zip(self.module_defs, self.module_list)):
            if i == cutoff:
                break
            if module_def["type"] == "convolutional":
                conv_layer = module[0]
                if module_def["batch_normalize"]:
                    # Load BN bias, weights, running mean and running variance
                    bn_layer = module[1]
                    num_b = bn_layer.bias.numel()  # Number of biases
                    # Bias
                    bn_b = torch.from_numpy(weights[ptr : ptr + num_b]).view_as(bn_layer.bias)
                    bn_layer.bias.data.copy_(bn_b)
                    ptr += num_b
                    # Weight
                    bn_w = torch.from_numpy(weights[ptr : ptr + num_b]).view_as(bn_layer.weight)
                    bn_layer.weight.data.copy_(bn_w)
                    ptr += num_b
                    # Running Mean
                    bn_rm = torch.from_numpy(weights[ptr : ptr + num_b]).view_as(bn_layer.running_mean)
                    bn_layer.running_mean.data.copy_(bn_rm)
                    ptr += num_b
                    # Running Var
                    bn_rv = torch.from_numpy(weights[ptr : ptr + num_b]).view_as(bn_layer.running_var)
                    bn_layer.running_var.data.copy_(bn_rv)
                    ptr += num_b
                    # Load conv. weights
                    num_w = conv_layer.weight.numel()
                    conv_w = torch.from_numpy(weights[ptr: ptr + num_w]).view_as(conv_layer.weight)
                    conv_layer.weight.data.copy_(conv_w)
                    ptr += num_w
                else:
                    # 對於yolov3.weights,不帶bn的卷積層就是YOLO前的卷積層
                    if "yolov3.weights" in weights_path:
                        num_b = 255
                        ptr += num_b
                        num_w = int(self.module_defs[i-1]["filters"]) * 255
                        ptr += num_w
                    else:
                        # Load conv. bias
                        num_b = conv_layer.bias.numel()
                        conv_b = torch.from_numpy(weights[ptr : ptr + num_b]).view_as(conv_layer.bias)
                        conv_layer.bias.data.copy_(conv_b)
                        ptr += num_b
                        # Load conv. weights
                        num_w = conv_layer.weight.numel()
                        conv_w = torch.from_numpy(weights[ptr : ptr + num_w]).view_as(conv_layer.weight)
                        conv_layer.weight.data.copy_(conv_w)
                        ptr += num_w
        # 確保指針到達權重的最後一個位置
        assert ptr == len(weights)
	# 保存DarkNet類型權重(*.weights)
    def save_darknet_weights(self, path, cutoff=-1):
        """
            @:param path    - 新的權重的路徑
            @:param cutoff  - 保存0到cutoff層之間的所有層權重(cutoff=-1代表所有層全部保留)
        """
        fp = open(path, "wb")
        self.header_info[3] = self.seen
        self.header_info.tofile(fp)

        # Iterate through layers
        for i, (module_def, module) in enumerate(zip(self.module_defs[:cutoff], self.module_list[:cutoff])):
            if module_def["type"] == "convolutional":
                conv_layer = module[0]
                # If batch norm, load bn first
                if module_def["batch_normalize"]:
                    bn_layer = module[1]
                    bn_layer.bias.data.cpu().numpy().tofile(fp)
                    bn_layer.weight.data.cpu().numpy().tofile(fp)
                    bn_layer.running_mean.data.cpu().numpy().tofile(fp)
                    bn_layer.running_var.data.cpu().numpy().tofile(fp)
                # Load conv bias
                else:
                    conv_layer.bias.data.cpu().numpy().tofile(fp)
                # Load conv weights
                conv_layer.weight.data.cpu().numpy().tofile(fp)

        fp.close()
所以這個工程對我們來說是非常容易上手使用的,特別是關注公眾號時間稍長的讀者都知道我們針對U版的YOLOV3寫了一個非常不錯的PDF,地址如下:從零開始學習YOLOv3教程資源分享 。
切回正題,我們現在可以方便的加載預訓練模型了,既可以是BackBone也可以是整個YOLOV3模型,那麼接下來我們就可以針對這個YOLOV3模型進行稀疏訓練。當然也可以不用預訓練模型直接從頭開始稀疏訓練,但這樣可能訓練時間需要更久一些。注意在訓練之前應該先組織好自己的目標檢測數據集,這一點在上面的PDF或者作者的README都寫的很清楚這裡就不再講了。
2.1 稀疏訓練的原理
深度學習算法優化系列七 | ICCV 2017的一篇模型剪枝論文,也是2019年眾多開源剪枝項目的理論基礎 的想法是對於每一個通道都引入一個縮放因子\gamma,然後和通道的輸出相乘。接着聯合訓練網絡權重和這些縮放因子,最後將小縮放因子的通道直接移除,微調剪枝後的網絡,特別地,目標函數被定義為:

其中(x,y)代表訓練數據和標籤,W是網絡的可訓練參數,第一項是CNN的訓練損失函數。g(.)是在縮放因子上的乘法項,\lambda是兩項的平衡因子。論文的實驗過程中選擇g(s)=|s|,即L1正則化,這也被廣泛的應用於稀疏化。次梯度下降法作為不平滑(不可導)的L1懲罰項的優化方法,另一個建議是使用平滑的L1正則項取代L1懲罰項,盡量避免在不平滑的點使用次梯度。
這裡的縮放因子就是BN層的gamma參數。
在train.py的實現中支持了稀疏訓練,其中下面這2行代碼即添加了稀疏訓練的稀疏係數\lambda,注意\lambda是作用在BN層的縮放係數\gamma上的:
parser.add_argument('--sparsity-regularization', '-sr', dest='sr', action='store_true',
                        help='train with channel sparsity regularization')
parser.add_argument('--s', type=float, default=0.01, help='scale sparse rate')
而稀疏訓練的具體實現就在工程下面的utils/prune_utils.py中,代碼如下:
class BNOptimizer():

    @staticmethod
    def updateBN(sr_flag, module_list, s, prune_idx):
        if sr_flag:
            for idx in prune_idx:
                # Squential(Conv, BN, Lrelu)
                bn_module = module_list[idx][1]
                bn_module.weight.grad.data.add_(s * torch.sign(bn_module.weight.data))  # L1
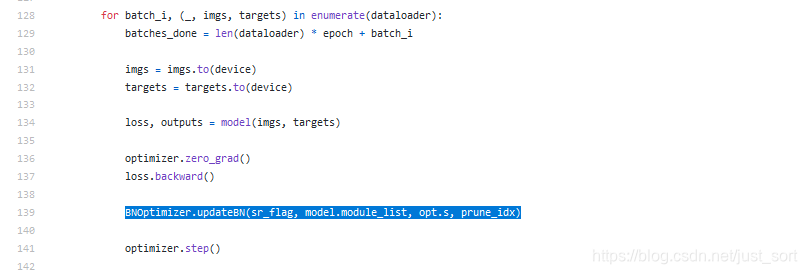
可以看到這裡實現了一個BNOptimizer類,並重寫了updateBN成員函數,然後在train.py中執行反向傳播之後再手動調用這個函數更新一下BN層的梯度,如下:
2.2 YOLOV3模型剪枝
在稀疏訓練之後我們就可以考慮對YOLOV3模型進行剪枝了,即調用工程下的test_prune.py文件,代碼解釋如下:
from models import *
from utils.utils import *
import torch
import numpy as np
from copy import deepcopy
from test import evaluate
from terminaltables import AsciiTable #AsciiTable是最簡單的表。它使用+,|和-字符來構建邊框。
import time
from utils.prune_utils import * #剪枝相關的實現都在這裡

class opt():
    model_def = "config/yolov3-hand.cfg" # cfg文件,存儲網絡結構
    data_config = "config/oxfordhand.data" # 存儲類別,訓練驗證集路徑,類別對應名字等
    model = 'checkpoints/yolov3_ckpt.pth' # 稀疏訓練之後的模型


#%%
device = torch.device("cuda" if torch.cuda.is_available() else "cpu") #設備
model = Darknet(opt.model_def).to(device)
model.load_state_dict(torch.load(opt.model)) #加載模型
# 解析config文件
data_config = parse_data_config(opt.data_config)
valid_path = data_config["valid"] #獲取驗證集路徑
class_names = load_classes(data_config["names"]) #加載類別對應名字

eval_model = lambda model:evaluate(model, path=valid_path, iou_thres=0.5, conf_thres=0.01,
    nms_thres=0.5, img_size=model.img_size, batch_size=8)
obtain_num_parameters = lambda model:sum([param.nelement() for param in model.parameters()])#前向推理的模型

origin_model_metric = eval_model(model)#原始模型的評價指標(還沒有剪枝)
origin_nparameters = obtain_num_parameters(model)#原始模型的參數
# 返回CBL組件的id,單獨的Conv層的id,以及需要被剪枝的層的id
CBL_idx, Conv_idx, prune_idx= parse_module_defs(model.module_defs)
# 獲取CBL組件的BN層的權重,即Gamma參數,我們會根據這個參數來剪枝
bn_weights = gather_bn_weights(model.module_list, prune_idx)
# 按照Gamma參數的大小進行排序,注意[0]返回的是值不是下標
sorted_bn = torch.sort(bn_weights)[0]

# 避免剪掉所有channel的最高閾值(每個BN層的gamma的最大值的最小值即為閾值上限)
highest_thre = []
for idx in prune_idx:
    highest_thre.append(model.module_list[idx][1].weight.data.abs().max().item())
highest_thre = min(highest_thre)

# 找到highest_thre對應的下標對應的百分比
percent_limit = (sorted_bn==highest_thre).nonzero().item()/len(bn_weights)

print(f'Threshold should be less than {highest_thre:.4f}.')
print(f'The corresponding prune ratio is {percent_limit:.3f}.')

#開始剪枝
def prune_and_eval(model, sorted_bn, percent=.0):
    # 請看//blog.csdn.net/sodalife/article/details/89461030的解釋
    model_copy = deepcopy(model)
    # 需要剪枝的下標閾值
    thre_index = int(len(sorted_bn) * percent)
    # 需要剪枝的權重閾值,即<thre那麼這個通道就剪枝掉,因為這個通道不那麼重要了
    thre = sorted_bn[thre_index]

    print(f'Channels with Gamma value less than {thre:.4f} are pruned!')

    remain_num = 0
    for idx in prune_idx:

        bn_module = model_copy.module_list[idx][1]
		# 返回不需要剪枝的通道下標
        mask = obtain_bn_mask(bn_module, thre)
		# 記錄保留的通道數目
        remain_num += int(mask.sum())
        # BN層的權重(gamma)乘以這個mask,就相當於剪枝了
        bn_module.weight.data.mul_(mask)
	# 計算剪枝後的模型的mAP
    mAP = eval_model(model_copy)[2].mean()

    print(f'Number of channels has been reduced from {len(sorted_bn)} to {remain_num}')
    print(f'Prune ratio: {1-remain_num/len(sorted_bn):.3f}')
    print(f'mAP of the pruned model is {mAP:.4f}')
    # 返回需要剪枝的權重閾值
    return thre
# 表示剪枝掉85%的參數
percent = 0.85
# 求需要剪枝的權重閾值
threshold = prune_and_eval(model, sorted_bn, percent)
# 獲取每一個BN層通道狀態
def obtain_filters_mask(model, thre, CBL_idx, prune_idx):

    pruned = 0
    total = 0
    num_filters = []
    filters_mask = []
    for idx in CBL_idx:
        bn_module = model.module_list[idx][1]
        # 如果idx是在剪枝下標的列表中,就執行剪枝
        if idx in prune_idx:

            mask = obtain_bn_mask(bn_module, thre).cpu().numpy()
            # 保留的通道數
            remain = int(mask.sum())
            # 剪掉的通道數
            pruned = pruned + mask.shape[0] - remain

            if remain == 0:
                print("Channels would be all pruned!")
                raise Exception

            print(f'layer index: {idx:>3d} \t total channel: {mask.shape[0]:>4d} \t '
                  f'remaining channel: {remain:>4d}')
        else:
        	# 不用剪枝就全部保留
            mask = np.ones(bn_module.weight.data.shape)
            remain = mask.shape[0]

        total += mask.shape[0]
        num_filters.append(remain)
        filters_mask.append(mask.copy())

    prune_ratio = pruned / total
    print(f'Prune channels: {pruned}\tPrune ratio: {prune_ratio:.3f}')
	# 輸出每層保留的通道數列表和每一個需要剪枝的BN層的保留通道數狀態
    return num_filters, filters_mask
# 調用上面的函數
num_filters, filters_mask = obtain_filters_mask(model, threshold, CBL_idx, prune_idx)

#映射成一個字典,idx->mask
CBLidx2mask = {idx: mask for idx, mask in zip(CBL_idx, filters_mask)}
# 獲得剪枝後的模型
pruned_model = prune_model_keep_size(model, prune_idx, CBL_idx, CBLidx2mask)
# 對剪枝後的模型進行評價
eval_model(pruned_model)


# 拷貝一份原始模型的參數
compact_module_defs = deepcopy(model.module_defs)
# 遍歷需要剪枝的CBL模塊,將通道數設置為剪枝後的通道數
for idx, num in zip(CBL_idx, num_filters):
    assert compact_module_defs[idx]['type'] == 'convolutional'
    compact_module_defs[idx]['filters'] = str(num)

#compact_model是剪枝之後的網絡的真實結構(注意上面的剪枝網絡只是把那些需要剪枝的卷積層/BN層/激活層通道的權重置0了,並沒有保存剪枝後的網絡)
compact_model = Darknet([model.hyperparams.copy()] + compact_module_defs).to(device)
# obtain_num_parameters = lambda model:sum([param.nelement() for param in model.parameters()])
# 計算參數量,MFLOPs
compact_nparameters = obtain_num_parameters(compact_model)
# 為剪枝後的真實網絡結構重新複製權重參數
init_weights_from_loose_model(compact_model, pruned_model, CBL_idx, Conv_idx, CBLidx2mask)

# 隨機初始化一個輸入
random_input = torch.rand((1, 3, model.img_size, model.img_size)).to(device)
# 獲取模型的推理時間
def obtain_avg_forward_time(input, model, repeat=200):

    model.eval()
    start = time.time()
    with torch.no_grad():
        for i in range(repeat):
            output = model(input)
    avg_infer_time = (time.time() - start) / repeat

    return avg_infer_time, output
# 分別獲取原始模型和剪枝後的模型的推理時間和輸出
pruned_forward_time, pruned_output = obtain_avg_forward_time(random_input, pruned_model)
compact_forward_time, compact_output = obtain_avg_forward_time(random_input, compact_model)
# 計算原始模型推理結果和剪枝後的模型的推理結果,如果差距比較大說明哪裡錯了
diff = (pruned_output-compact_output).abs().gt(0.001).sum().item()
if diff > 0:
    print('Something wrong with the pruned model!')

#%%
# 在測試集上測試剪枝後的模型, 並統計模型的參數數量
compact_model_metric = eval_model(compact_model)

#%%
# 比較剪枝前後參數數量的變化、指標性能的變化
metric_table = [
    ["Metric", "Before", "After"],
    ["mAP", f'{origin_model_metric[2].mean():.6f}', f'{compact_model_metric[2].mean():.6f}'],
    ["Parameters", f"{origin_nparameters}", f"{compact_nparameters}"],
    ["Inference", f'{pruned_forward_time:.4f}', f'{compact_forward_time:.4f}']
]
print(AsciiTable(metric_table).table)

#%%
# 生成剪枝後的cfg文件並保存模型
pruned_cfg_name = opt.model_def.replace('/', f'/prune_{percent}_')
pruned_cfg_file = write_cfg(pruned_cfg_name, [model.hyperparams.copy()] + compact_module_defs)
print(f'Config file has been saved: {pruned_cfg_file}')

compact_model_name = opt.model.replace('/', f'/prune_{percent}_')
torch.save(compact_model.state_dict(), compact_model_name)
print(f'Compact model has been saved: {compact_model_name}')
然後我們針對utils/prune_utils.py裏面的一些核心函數再解析一下,首先parse_module_defs這個函數:
def parse_module_defs(module_defs):

    CBL_idx = []#Conv+BN+ReLU
    Conv_idx = []#Conv
    for i, module_def in enumerate(module_defs):
        if module_def['type'] == 'convolutional':
            if module_def['batch_normalize'] == '1':
                CBL_idx.append(i)
            else:
                Conv_idx.append(i)

    ignore_idx = set()#哪些層不需要剪枝
    for i, module_def in enumerate(module_defs):
        if module_def['type'] == 'shortcut':
            ignore_idx.add(i-1)
            identity_idx = (i + int(module_def['from']))
            if module_defs[identity_idx]['type'] == 'convolutional':
                ignore_idx.add(identity_idx)
            elif module_defs[identity_idx]['type'] == 'shortcut':
                ignore_idx.add(identity_idx - 1)

    ignore_idx.add(84)
    ignore_idx.add(96)

    prune_idx = [idx for idx in CBL_idx if idx not in ignore_idx]
    # 返回CBL組件的id,單獨的Conv層的id,以及需要被剪枝的層的id
    return CBL_idx, Conv_idx, prune_idx
接下來是gather_bn_weights函數:
def gather_bn_weights(module_list, prune_idx):

    size_list = [module_list[idx][1].weight.data.shape[0] for idx in prune_idx]

    bn_weights = torch.zeros(sum(size_list))
    index = 0
    for idx, size in zip(prune_idx, size_list):
        bn_weights[index:(index + size)] = module_list[idx][1].weight.data.abs().clone()
        index += size
	# 獲取CBL組件的BN層的權重,即Gamma參數,我們會根據這個參數來剪枝
    return bn_weights
再看下obtain_bn_mask函數,這個函數返回是否需要剪枝的通道狀態:
def obtain_bn_mask(bn_module, thre):

    thre = thre.cuda()
    # ge(a, b)相當於 a>= b
    mask = bn_module.weight.data.abs().ge(thre).float()
	# 返回通道是否需要剪枝的通道狀態
    return mask
還有prune_model_keep_size函數,這個函數將原始模型利用我們剛獲得的每個CBL模塊的通道保留狀態值對每個層的權重進行更新,包括卷積層,BN層和LeakyReLU層。需要注意的是上面的prune_and_eval函數只是更新了BN層剪枝後的權重,沒有更新卷積層的權重和LeakyReLU層的權重,代碼實現如下:
def prune_model_keep_size(model, prune_idx, CBL_idx, CBLidx2mask):
	# 先拷貝一份原始的模型參數
    pruned_model = deepcopy(model)
    # 對需要剪枝的層分別處理
    for idx in prune_idx:
        # 需要保留的通道
        mask = torch.from_numpy(CBLidx2mask[idx]).cuda()
        # 獲取BN層的gamma參數,即BN層的權重
        bn_module = pruned_model.module_list[idx][1]

        bn_module.weight.data.mul_(mask)
        # 獲取保留下來的通道產生的激活值,注意是每個通道分別獲取的
        activation = F.leaky_relu((1 - mask) * bn_module.bias.data, 0.1)

        # 兩個上採樣層前的卷積層
        next_idx_list = [idx + 1]
        if idx == 79:
            next_idx_list.append(84)
        elif idx == 91:
            next_idx_list.append(96)
        # 對下一層進行處理
        for next_idx in next_idx_list:
            # 當前層的BN剪枝之後會對下一個卷積層造成影響
            next_conv = pruned_model.module_list[next_idx][0]
            # dim=(2,3)即在(w,h)維度上進行求和,因為是通道剪枝,一個通道對應着(w,h)這個矩形
            conv_sum = next_conv.weight.data.sum(dim=(2, 3))
            # 將卷積層的權重和激活值想乘獲得剪枝後的每個通道的偏執,以更新下一個BN層或者下一個帶偏執的卷積層的偏執(因為單獨的卷積層是不會被剪枝的,所以只對偏執有影響)
            offset = conv_sum.matmul(activation.reshape(-1, 1)).reshape(-1)
            if next_idx in CBL_idx:
                next_bn = pruned_model.module_list[next_idx][1]
                next_bn.running_mean.data.sub_(offset)
            else:
                next_conv.bias.data.add_(offset)

        bn_module.bias.data.mul_(mask)
	# 返回剪枝後的模型
    return pruned_model
最後就是本文最核心的代碼部分了,在上面的test_prune.py中代碼段如下:
# 拷貝一份原始模型的參數
compact_module_defs = deepcopy(model.module_defs)
# 遍歷需要剪枝的CBL模塊,將通道數設置為剪枝後的通道數
for idx, num in zip(CBL_idx, num_filters):
    assert compact_module_defs[idx]['type'] == 'convolutional'
    compact_module_defs[idx]['filters'] = str(num)

#compact_model是剪枝之後的網絡的真實結構(注意上面的剪枝網絡只是把那些需要剪枝的卷積層/BN層/激活層通道的權重置0了,並沒有保存剪枝後的網絡)
compact_model = Darknet([model.hyperparams.copy()] + compact_module_defs).to(device)
# obtain_num_parameters = lambda model:sum([param.nelement() for param in model.parameters()])
# 計算參數量,MFLOPs
compact_nparameters = obtain_num_parameters(compact_model)
# 為剪枝後的真實網絡結構重新複製權重參數
init_weights_from_loose_model(compact_model, pruned_model, CBL_idx, Conv_idx, CBLidx2mask)
可以看到獲得剪枝後的網絡結構不難,要給這個剪枝後的網絡結構重新拷貝一份參數看起來麻煩一些,我們一起來看看這個init_weights_from_loose_model函數,代碼如下:
def init_weights_from_loose_model(compact_model, loose_model, CBL_idx, Conv_idx, CBLidx2mask):

    for idx in CBL_idx:
        compact_CBL = compact_model.module_list[idx]
        loose_CBL = loose_model.module_list[idx]
        # np.argwhere返回非0元素的索引,X[:,0]是numpy中數組的一種寫法,表示對一個二維數組,取該二維數組第一維中的所有數據,第二維中取第0個數據
        out_channel_idx = np.argwhere(CBLidx2mask[idx])[:, 0].tolist()
		# 獲取剪枝後的模型當前BN層的權重
        compact_bn, loose_bn         = compact_CBL[1], loose_CBL[1]
        compact_bn.weight.data       = loose_bn.weight.data[out_channel_idx].clone()
        compact_bn.bias.data         = loose_bn.bias.data[out_channel_idx].clone()
        compact_bn.running_mean.data = loose_bn.running_mean.data[out_channel_idx].clone()
        compact_bn.running_var.data  = loose_bn.running_var.data[out_channel_idx].clone()
		# 獲取剪枝後的模型當前卷積層的權重,這和上一個卷積層的剪枝情況有關
        input_mask = get_input_mask(loose_model.module_defs, idx, CBLidx2mask)
        in_channel_idx = np.argwhere(input_mask)[:, 0].tolist()
        compact_conv, loose_conv = compact_CBL[0], loose_CBL[0]
        # 拷貝權重到剪枝後的模型中去
        tmp = loose_conv.weight.data[:, in_channel_idx, :, :].clone()
        compact_conv.weight.data = tmp[out_channel_idx, :, :, :].clone()

    for idx in Conv_idx:
        compact_conv = compact_model.module_list[idx][0]
        loose_conv = loose_model.module_list[idx][0]
		# 雖然當前層是不帶BN的卷積層,但仍然和上一個層的剪枝情況是相關的
        input_mask = get_input_mask(loose_model.module_defs, idx, CBLidx2mask)
        in_channel_idx = np.argwhere(input_mask)[:, 0].tolist()
        # 拷貝權重到剪枝後的模型中去
        compact_conv.weight.data = loose_conv.weight.data[:, in_channel_idx, :, :].clone()
        compact_conv.bias.data   = loose_conv.bias.data.clone()
其中還有一個關鍵函數get_input_mask,這是獲取網絡中當前層的前一層的通道狀態,因為在剪枝的時候當前層的通道保留情況是受到它前面是哪些層影響的。
def get_input_mask(module_defs, idx, CBLidx2mask):
	# 獲取上一層的通道狀態
    if idx == 0:
        return np.ones(3)

    if module_defs[idx - 1]['type'] == 'convolutional':
        return CBLidx2mask[idx - 1]
    elif module_defs[idx - 1]['type'] == 'shortcut':
        return CBLidx2mask[idx - 2]
    elif module_defs[idx - 1]['type'] == 'route':
        route_in_idxs = []
        for layer_i in module_defs[idx - 1]['layers'].split(","):
            if int(layer_i) < 0:
                route_in_idxs.append(idx - 1 + int(layer_i))
            else:
                route_in_idxs.append(int(layer_i))
        if len(route_in_idxs) == 1:
            return CBLidx2mask[route_in_idxs[0]]
        elif len(route_in_idxs) == 2:
            return np.concatenate([CBLidx2mask[in_idx - 1] for in_idx in route_in_idxs])
        else:
            print("Something wrong with route module!")
            raise Exception
到這裡剪枝這部分就講完了,我基本上是一句句理清了整個流程,希望對想接觸模型剪枝的同學有所幫助。
2.3 微調
在訓練完之後如果準確率不夠高還需要適當的FineTune一下,因為剪枝之後模型的結構有變化可能會對準確率有些影響,所以可以適當的微調幾個Epoch。
3. 結果
//github.com/Lam1360/YOLOv3-model-pruning/blob/master/config/prune_yolov3-hand.cfg展示了在Oxfard人手數據集上對YOLOV3模型進行剪枝後的模型結構,可以看到部分卷積層的通道數大幅度減少。
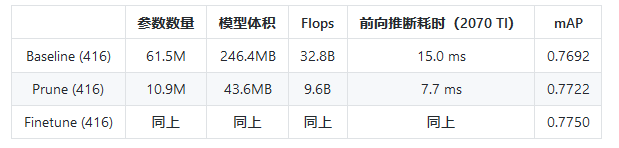
最後,剪枝前後的模型指標對比如下:
4. 結論
本文還是展示了如何對YOLOV3模型進行剪枝的原理和詳細代碼解析,希望可以幫助到正在學習模型剪枝的同學。不過需要強調的是,不是所有的模型通過這個方法都能得到很好的剪枝效果,這和你模型本身的容量以及數據集等等都是相關的,後面我會繼續分享更多的模型加速技術,謝謝觀看。
5. 參考
歡迎關注GiantPandaCV, 在這裡你將看到獨家的深度學習分享,堅持原創,每天分享我們學習到的新鮮知識。( • ̀ω•́ )✧
有對文章相關的問題,或者想要加入交流群,歡迎添加BBuf微信:

為了方便讀者獲取資料以及我們公眾號的作者發佈一些Github工程的更新,我們成立了一個QQ群,二維碼如下,感興趣可以加入。