Redis總結(八)如何搭建高可用的Redis集群
- 2019 年 10 月 3 日
- 筆記
以前總結Redis 的一些基本的安裝和使用,大家可以這這裡查看Redis 系列文章:https://www.cnblogs.com/zhangweizhong/category/771056.html。
今天補一下redis集群功能吧。需要注意,Redis 3.0 以後才有集群的功能,下載Redis的時候注意下版本。
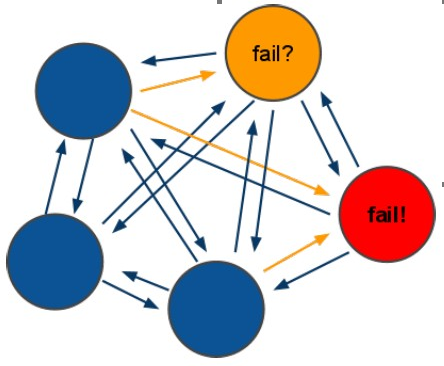
1. Redis集群原理
先看看redis-cluster架構圖:

架構細節:
(1)所有的redis節點彼此互聯(PING-PONG機制),內部使用二進制協議優化傳輸速度和帶寬。
(2)節點的fail是通過集群中超過半數的節點檢測失效時才生效。
(3)客戶端與redis節點直連,不需要中間proxy層,客戶端不需要連接集群所有節點,連接集群中任何一個可用節點即可。
(4)redis-cluster把所有的物理節點映射到[0-16383]slot(哈希槽)上,cluster 負責維護node<->slot<->value。
Redis 集群中內置了 16384 個slot(哈希槽),當需要在 Redis 集群中放置一個 key-value 時,redis 先對 key 使用 crc16 算法算出一個結果,然後把結果對 16384 求餘數,這樣每個 key 都會對應一個編號在 0-16383 之間的哈希槽,redis 會根據節點數量大致均等的將哈希槽映射到不同的節點。
容錯機制: redis-cluster投票
(1)領着投票過程是集群中所有master參與,如果半數以上master節點與master節點通信超過(cluster-node-timeout),認為當前master節點掛掉.
(2):什麼時候整個集群不可用(cluster_state:fail)?
a:如果集群任意master掛掉,且當前master沒有slave.集群進入fail狀態,也可以理解成集群的slot映射[0-16383]不完成時進入fail狀態.
b:如果集群超過半數以上master掛掉,無論是否有slave集群進入fail狀態.
注意:1. 當集群不可用時,所有對集群的操作做都不可用,收到((error) CLUSTERDOWN The cluster is down)錯誤。
2. redis-3.0.0.rc1加入cluster-require-full-coverage參數,默認關閉,打開改配置,允許集群兼容部分失敗。
2. 安裝Redis
redis 的單機安裝之前已經講過,網絡上也有很多教程,這裡就不重複了。
文章最後提供了Redis 3.0 的源碼,Redis集群腳本等資源。大家可以用我提供的版本來測試。
3. 安裝ruby環境
redis3.0 源碼中自帶的集群管理工具redis-trib.rb依賴ruby環境,首先需要安裝ruby環境:
1. 安裝ruby環境
yum install ruby yum install rubygems
2. 安裝ruby和redis的接口程序
拷貝redis-3.0.0.gem至/usr/local下
執行:gem install /usr/local/redis-3.0.0.gem
4. 創建集群
集群結點規劃
一般Redis集群的實例,都安裝在各個主從服務器上,這裡為了演示方便,只是在同一台服務器用不同的端口表示不同的redis服務器,如下:
主節點:172.16.0.17:7001,172.16.0.17:7002,172.16.0.17:7003
從節點:172.16.0.17:7004,172.16.0.17:7005,172.16.0.17:7006
1. 在/usr/local下創建redis-cluster目錄,其下創建Redis01到Redis06等6個redis實例,端口號為:7001-7006,具體目錄如下:

2. 將redis源碼目錄src下的redis-trib.rb拷貝到redis-cluster目錄下。
3. 修改每個redis實例的redis.conf配置文件:
port 7001 //這裡要改成各個實例對應的端口,7001-7006 #bind 172.16.0.17 cluster-enabled yes
啟動每個結點redis服務
分別進入Redis01、Redis02、…Redis06目錄,執行:
./redis-server ./redis.conf
查看redis進程:ps aux|grep redis

以上,Redis 的6個實例,就已經啟動了。
執行創建集群命令
執行redis-trib.rb,此腳本是ruby腳本,它依賴ruby環境。
./redis-trib.rb create --replicas 1 172.16.0.17:7001 172.16.0.17:7002 172.16.0.17:7003 172.16.0.17:7004 172.16.0.17:7005 172.16.0.17:7006
說明:
redis集群至少需要3個主節點,每個主節點有一個從節點總共6個節點
replicas指定為1表示每個主節點有一個從節點
注意:
如果執行時報如下錯誤:
[ERR] Node XXXXXX is not empty. Either the node already knows other nodes (check with CLUSTER NODES) or contains some key in database 0
解決方法是刪除生成的配置文件nodes.conf,如果不行則說明現在創建的結點包括了舊集群的結點信息,需要刪除redis的持久化文件後再重啟redis,比如:appendonly.aof、dump.rdb
創建集群輸出如下:
>>> Creating cluster Connecting to node 172.16.0.17:7001: OK Connecting to node 172.16.0.17:7002: OK Connecting to node 172.16.0.17:7003: OK Connecting to node 172.16.0.17:7004: OK Connecting to node 172.16.0.17:7005: OK Connecting to node 172.16.0.17:7006: OK >>> Performing hash slots allocation on 6 nodes... Using 3 masters: 172.16.0.17:7001 172.16.0.17:7002 172.16.0.17:7003 Adding replica 172.16.0.17:7004 to 172.16.0.17:7001 Adding replica 172.16.0.17:7005 to 172.16.0.17:7002 Adding replica 172.16.0.17:7006 to 172.16.0.17:7003 M: cad9f7413ec6842c971dbcc2c48b4ca959eb5db4 172.16.0.17:7001 slots:0-5460 (5461 slots) master M: 4e7c2b02f0c4f4cfe306d6ad13e0cfee90bf5841 172.16.0.17:7002 slots:5461-10922 (5462 slots) master M: 1a8420896c3ff60b70c716e8480de8e50749ee65 172.16.0.17:7003 slots:10923-16383 (5461 slots) master S: 69d94b4963fd94f315fba2b9f12fae1278184fe8 172.16.0.17:7004 replicates cad9f7413ec6842c971dbcc2c48b4ca959eb5db4 S: d2421a820cc23e17a01b597866fd0f750b698ac5 172.16.0.17:7005 replicates 4e7c2b02f0c4f4cfe306d6ad13e0cfee90bf5841 S: 444e7bedbdfa40714ee55cd3086b8f0d5511fe54 172.16.0.17:7006 replicates 1a8420896c3ff60b70c716e8480de8e50749ee65 Can I set the above configuration? (type 'yes' to accept): yes >>> Nodes configuration updated >>> Assign a different config epoch to each node >>> Sending CLUSTER MEET messages to join the cluster Waiting for the cluster to join... >>> Performing Cluster Check (using node 172.16.0.17:7001) M: cad9f7413ec6842c971dbcc2c48b4ca959eb5db4 172.16.0.17:7001 slots:0-5460 (5461 slots) master M: 4e7c2b02f0c4f4cfe306d6ad13e0cfee90bf5841 172.16.0.17:7002 slots:5461-10922 (5462 slots) master M: 1a8420896c3ff60b70c716e8480de8e50749ee65 172.16.0.17:7003 slots:10923-16383 (5461 slots) master M: 69d94b4963fd94f315fba2b9f12fae1278184fe8 172.16.0.17:7004 slots: (0 slots) master replicates cad9f7413ec6842c971dbcc2c48b4ca959eb5db4 M: d2421a820cc23e17a01b597866fd0f750b698ac5 172.16.0.17:7005 slots: (0 slots) master replicates 4e7c2b02f0c4f4cfe306d6ad13e0cfee90bf5841 M: 444e7bedbdfa40714ee55cd3086b8f0d5511fe54 172.16.0.17:7006 slots: (0 slots) master replicates 1a8420896c3ff60b70c716e8480de8e50749ee65 [OK] All nodes agree about slots configuration. >>> Check for open slots... >>> Check slots coverage... [OK] All 16384 slots covered.
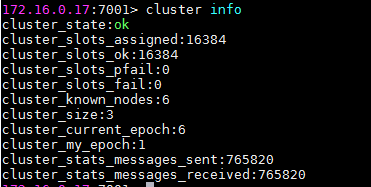
5. 查詢集群信息
集群創建成功登陸任意redis結點查詢集群中的節點情況。
客戶端以集群方式登陸:
./redis-cli -c -h 172.16.0.17 -p 7001 -c //其中-c表示以集群方式連接redis,-h指定ip地址,-p指定端口號
查詢集群信息
cluster nodes 查詢集群結點信息

cluster info 查詢集群狀態信息
6. 添加主節點
集群創建成功後可以向集群中添加節點,下面是添加一個master主節點
1. 增加Redis07實例,參考集群結點規劃章節添加一個“7007”目錄作為新節點。
2. 將Redis07實例添加到集群中,執行下邊命令:
./redis-trib.rb add-node 172.16.0.17:7007 172.16.0.17:7001
3. 查看集群結點發現7007已添加到集群中:
[root@VM_0_17_centos redis-cluster]# ./redis-trib.rb add-node  172.16.0.17:7007 172.16.0.17:7001  >>> Adding node 172.16.0.17:7007 to cluster 172.16.0.17:7001  Connecting to node 172.16.0.17:7001: OK  .
.
.
Connecting to node 172.16.0.17:7003: OK  Connecting to node 172.16.0.17:7005: OK  Connecting to node 172.16.0.17:7002: OK  Connecting to node 172.16.0.17:7006: OK  Connecting to node 172.16.0.17:7004: OK  >>> Performing Cluster Check (using node 172.16.0.17:7001)  M: 977962f18ec51f363747961137dc903f0078b248 172.16.0.17:7001     slots:0-5460 (5461 slots) master     1 additional replica(s)  M: defe4ce0421ee6b50bdab3da58754e98cc80fca3 172.16.0.17:7003     slots:10923-16383 (5461 slots) master     1 additional replica(s)  S: a64fc273c0b90700397f5bac2b393dc5587d8ba8 172.16.0.17:7005     slots: (0 slots) slave     replicates f277758189eba36c5b5732e9189d8554bf4385cb  M: f277758189eba36c5b5732e9189d8554bf4385cb 172.16.0.17:7002     slots:5461-10922 (5462 slots) master     1 additional replica(s)  S: 4f16e5adcc141ca284d4a9ec6d04f455aee84a48 172.16.0.17:7006     slots: (0 slots) slave     replicates defe4ce0421ee6b50bdab3da58754e98cc80fca3  S: 479d5a077893184cd0b05a8e1b6cb5c0625215f4 172.16.0.17:7004     slots: (0 slots) slave     replicates 977962f18ec51f363747961137dc903f0078b248  [OK] All nodes agree about slots configuration.  >>> Check for open slots...  >>> Check slots coverage...  [OK] All 16384 slots covered.  Connecting to node 172.16.0.17:7007: OK
.
.
.  >>> Send CLUSTER MEET to node 172.16.0.17:7007 to make it join the cluster.  [OK] New node added correctly.
哈希槽重新分配
添加完主節點後,集群並不會自動給新添加的節點分配哈希槽,需要我們手動對主節點進行hash槽分配重新分配,這樣該主節才可以存儲數據。
redis集群有16384個槽,集群中的每個結點分配自已槽,通過查看集群結點可以看到槽佔用情況。可以看到剛才添加的主節點Redis07,沒有分配哈希槽(slot)。

下面就來說說如何給剛添加的Redis01結點分配槽:
第一步:連接上集群
./redis-trib.rb reshard 172.16.0.17:7001 //(連接集群中任意一個可用結點都行)
第二步:輸入要分配的槽數量

第三步:輸入接收槽的結點id
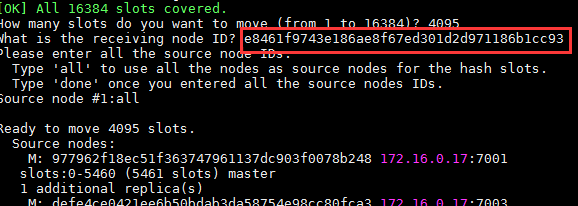
這裡準備給Redis07分配哈希槽,通過cluster nodes查看Redis07節點id為:e8461f9743e186ae8f67ed301d2d971186b1cc93
輸入:e8461f9743e186ae8f67ed301d2d971186b1cc93,
第四步:輸入源結點id

如果只是想從單個主節點獲取哈希槽,那直接輸入相應的節點id即可。
如果想從所有的主節點獲取輸入:all,
第五步:輸入yes開始移動槽到目標結點id

第六步:分配完成之後,可以查詢集群節點信息,查看哈希槽是否分配成功。

7. 添加從節點
集群創建成功後可以向集群中添加節點,下面是添加一個slave從節點的命令。
./redis-trib.rb add-node --slave --master-id 主節點id 添加節點的ip和端口 集群中已存在節點ip和端口
1. 添加Redis08實例為從結點,將Redis08作為Redis07的從結點。
執行如下命令:
./redis-trib.rb add-node --slave --master-id e8461f9743e186ae8f67ed301d2d971186b1cc93 172.16.0.17:7008 172.16.0.17:7001
e8461f9743e186ae8f67ed301d2d971186b1cc93 是Redis07實例的節點id,可通過cluster nodes查看。
注意:如果原來該結點在集群中的配置信息已經生成集群節點的配置文件(如果集群配置cluster-config-file默認指定則為nodes.conf),這時可能會報錯:
[ERR] Node XXXXXX is not empty. Either the node already knows other nodes (check with CLUSTER NODES) or contains some key in database 0
解決方法是:刪除生成的配置文件nodes.conf,刪除後再執行./redis-trib.rb add-node指令
2. 查看集群中的結點,剛添加的Redis08已經成為Redis07的從節點:

8. 刪除結點:
集群創建成功後可以向集群中刪除其中的一個節點,應該怎麼刪除呢?
執行如下命令即可:
./redis-trib.rb del-node 172.16.0.17 :7005 e8461f9743e186ae8f67ed301d2d971186b1cc93
注意:刪除已經分配了有hash槽的節點會失敗,報錯如下:
[ERR] Node 172.16.0.17:7007 is not empty! Reshard data away and try again.
解決辦法就是:將該結點佔用的hash槽分配出去,請參考前面哈希槽重新分配的操作,這裡就不重複了。
最後
以上就已經將如何搭建redis的集群講完了。
redis3.0源碼和ruby腳本,點擊這裡下載。
