JavaScript數據結構——字典和散列表的實現
- 2019 年 10 月 3 日
- 筆記
在前一篇文章中,我們介紹了如何在JavaScript中實現集合。字典和集合的主要區別就在於,集合中數據是以[值,值]的形式保存的,我們只關心值本身;而在字典和散列表中數據是以[鍵,值]的形式保存的,鍵不能重複,我們不僅關心鍵,也關心鍵所對應的值。
我們也可以把字典稱之為映射表。由於字典和集合很相似,我們可以在前一篇文章中的集合類Set的基礎上來實現我們的字典類Dictionary。與Set類相似,ES6的原生Map類已經實現了字典的全部功能,稍後我們會介紹它的用法。
下面是我們的Dictionary字典類的實現代碼:
class Dictionary { constructor () { this.items = {}; } set (key, value) { // 向字典中添加或修改元素 this.items[key] = value; } get (key) { // 通過鍵值查找字典中的值 return this.items[key]; } delete (key) { // 通過使用鍵值來從字典中刪除對應的元素 if (this.has(key)) { delete this.items[key]; return true; } return false; } has (key) { // 判斷給定的鍵值是否存在於字典中 return this.items.hasOwnProperty(key); } clear() { // 清空字典內容 this.items = {}; } size () { // 返回字典中所有元素的數量 return Object.keys(this.items).length; } keys () { // 返回字典中所有的鍵值 return Object.keys(this.items); } values () { // 返回字典中所有的值 return Object.values(this.items); } getItems () { // 返回字典中的所有元素 return this.items; } }
與Set類很相似,只是把其中value的部分替換成了key。我們來看看一些測試用例:
let Dictionary = require('./dictionary'); let dictionary = new Dictionary(); dictionary.set('Gandalf', '[email protected]'); dictionary.set('John', '[email protected]'); dictionary.set('Tyrion', '[email protected]'); console.log(dictionary.has('Gandalf')); // true console.log(dictionary.size()); // 3 console.log(dictionary.keys()); // [ 'Gandalf', 'John', 'Tyrion' ] console.log(dictionary.values()); // [ '[email protected]', '[email protected]', '[email protected]' ] console.log(dictionary.get('Tyrion')); // [email protected] dictionary.delete('John'); console.log(dictionary.keys()); // [ 'Gandalf', 'Tyrion' ] console.log(dictionary.values()); // [ '[email protected]', '[email protected]' ] console.log(dictionary.getItems()); // { Gandalf: '[email protected]', Tyrion: '[email protected]' }
相應地,下面是使用ES6的原生Map類的測試結果:
let dictionary = new Map(); dictionary.set('Gandalf', '[email protected]'); dictionary.set('John', '[email protected]'); dictionary.set('Tyrion', '[email protected]'); console.log(dictionary.has('Gandalf')); // true console.log(dictionary.size); // 3 console.log(dictionary.keys()); // [Map Iterator] { 'Gandalf', 'John', 'Tyrion' } console.log(dictionary.values()); // [Map Iterator] { '[email protected]', '[email protected]', '[email protected]' } console.log(dictionary.get('Tyrion')); // [email protected] dictionary.delete('John'); console.log(dictionary.keys()); // [Map Iterator] { 'Gandalf', 'Tyrion' } console.log(dictionary.values()); // [Map Iterator] { '[email protected]', '[email protected]' } console.log(dictionary.entries()); // [Map Iterator] { [ Gandalf: '[email protected]' ], [ Tyrion: '[email protected]' ] }
和前面我們自定義的Dictionary類稍微有一點不同,values()方法和keys()方法返回的不是一個數組,而是Iterator迭代器。另一個就是這裡的size是一個屬性而不是方法,然後就是Map類沒有getItems()方法,取而代之的是entries()方法,它返回的也是一個Iterator。有關Map類的詳細詳細介紹可以查看這裡。
在ES6中,除了原生的Set和Map類外,還有它們的弱化版本,分別是WeakSet和WeakMap,我們在《JavaScript數據結構——棧的實現與應用》一文中已經見過WeakMap的使用了。Map和Set與它們各自的弱化版本之間的主要區別是:
- WeakSet或WeakMap類沒有entries、keys和values等迭代器方法,只能通過get和set方法訪問和設置其中的值。這也是為什麼我們在《JavaScript數據結構——棧的實現與應用》一文中要使用WeakMap類來定義類的私有屬性的原因。
- 只能用對應作為鍵值,或者說其中的內容只能是對象,而不能是數字、字符串、布爾值等基本數據類型。
弱化的Map和Set類主要是為了提供JavaScript代碼的性能。
散列表
散列表(或者叫哈希表),是一種改進的dictionary,它將key通過一個固定的算法(散列函數或哈希函數)得出一個數字,然後將dictionary中key所對應的value存放到這個數字所對應的數組下標所包含的存儲空間中。在原始的dictionary中,如果要查找某個key所對應的value,我們需要遍歷整個字典。為了提高查詢的效率,我們將key對應的value保存到數組裡,只要key不變,使用相同的散列函數計算出來的數字就是固定的,於是就可以很快地在數組中找到你想要查找的value。下面是散列表的數據結構示意圖:

下面是我們散列函數loseloseHashCode()的實現代碼:
loseloseHashCode (key) { let hash = 0; for (let i = 0; i < key.length; i++) { hash += key.charCodeAt(i); } return hash % 37; }
這個散列函數的實現很簡單,我們將傳入的key中的每一個字符使用charCodeAt()函數(有關該函數的詳細內容可以查看這裡)將其轉換成ASCII碼,然後將這些ASCII碼相加,最後用37求余,得到一個數字,這個數字就是這個key所對應的hash值。接下來要做的就是將value存放到hash值所對應的數組的存儲空間內。下面是我們的HashTable類的主要實現代碼:
class HashTable { constructor () { this.table = []; } loseloseHashCode (key) { // 散列函數 let hash = 0; for (let i = 0; i < key.length; i++) { hash += key.charCodeAt(i); } return hash % 37; } put (key, value) { // 將鍵值對存放到哈希表中 let position = this.loseloseHashCode(key); console.log(`${position} - ${key}`); this.table[position] = value; } get (key) { // 通過key查找哈希表中的值 return this.table[this.loseloseHashCode(key)]; } remove (key) { // 通過key從哈希表中刪除對應的值 this.table[this.loseloseHashCode(key)] = undefined; } isEmpty () { // 判斷哈希表是否為空 return this.size() === 0; } size () { // 返回哈希表的長度 let count = 0; this.table.forEach(item => { if (item !== undefined) count++; }); return count; } clear () { // 清空哈希表 this.table = []; } }
測試一下上面的這些方法:
let HashTable = require('./hashtable'); let hash = new HashTable(); hash.put('Gandalf', '[email protected]'); // 19 - Gandalf hash.put('John', '[email protected]'); // 29 - John hash.put('Tyrion', '[email protected]'); // 16 - Tyrion console.log(hash.isEmpty()); // false console.log(hash.size()); // 3 console.log(hash.get('Gandalf')); // [email protected] console.log(hash.get('Loiane')); // undefined hash.remove('Gandalf'); console.log(hash.get('Gandalf')); // undefined hash.clear(); console.log(hash.size()); // 0 console.log(hash.isEmpty()); // true
為了方便查看hash值和value的對應關係,我們在put()方法中加入了一行console.log(),用來打印key的hash值和value之間的對應關係。可以看到,測試的結果和前面我們給出的示意圖是一致的。
散列集合的實現和散列表類似,只不過在散列集合中不再使用鍵值對,而是只有值沒有鍵。這個我們在前面介紹集合和字典的時候已經講過了,這裡不再贅述。
細心的同學可能已經發現了,這裡我們提供的散列函數可能過於簡單,以致於我們無法保證通過散列函數計算出來的hash值一定是唯一的。換句話說,傳入不同的key值,我們有可能會得到相同的hash值。嘗試一下下面這些keys:
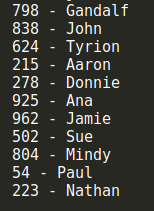
let hash = new HashTable(); hash.put('Gandalf', '[email protected]'); hash.put('John', '[email protected]'); hash.put('Tyrion', '[email protected]'); hash.put('Aaron', '[email protected]'); hash.put('Donnie', '[email protected]'); hash.put('Ana', '[email protected]'); hash.put('Jamie', '[email protected]'); hash.put('Sue', '[email protected]'); hash.put('Mindy', '[email protected]'); hash.put('Paul', '[email protected]'); hash.put('Nathan', '[email protected]');
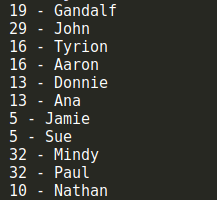
從結果中可以看到,儘管有些keys不同,但是通過我們提供的散列函數居然得到了相同的hash值,這顯然違背了我們的設計原則。在哈希表中,這個叫做散列衝突,為了得到一個可靠的哈希表,我們必須儘可能地避免散列衝突。那如何避免這種衝突呢?這裡介紹兩種解決衝突的方法:分離鏈接和線性探查。
分離鏈接
所謂分離鏈接,就是將原本存儲在哈希表中的值改成鏈表,這樣在哈希表的同一個位置上,就可以存儲多個不同的值。鏈表中的每一個元素,同時存儲了key和value。示意圖如下:
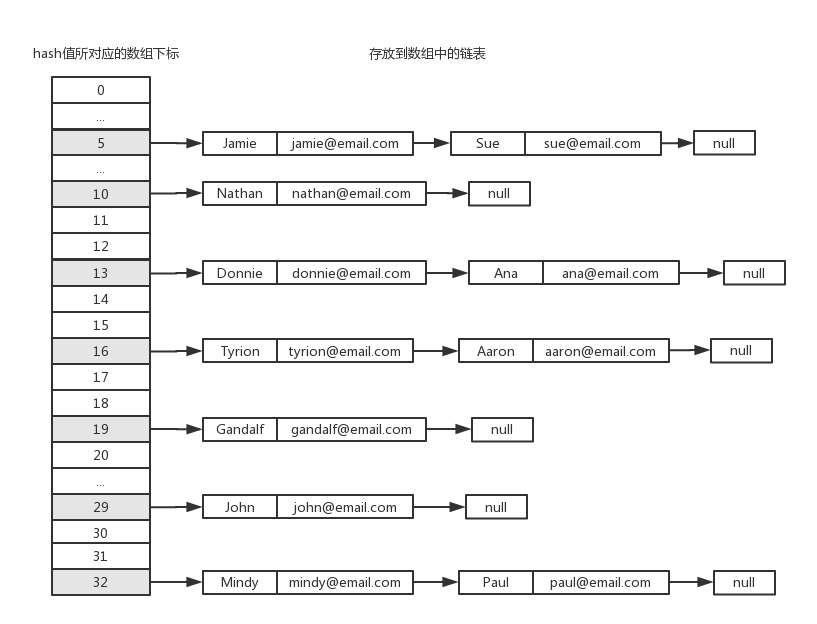
這樣,當不同的key通過散列函數計算出相同的hash值時,我們只需要找到數組中對應的位置,然後往其中的鏈表添加新的節點即可,從而有效地避免了散列衝突。為了實現這種數據結構,我們需要定義一個新的輔助類ValuePair,它的內容如下:
let ValuePair = function (key, value) { this.key = key; this.value = value; this.toString = function () { // 提供toString()方法以方便我們測試 return `[${this.key} - ${this.value}]`; } };
ValuePair類具有兩個屬性,key和value,用來保存我們要存入到散列表中的元素的鍵值對。toString()方法在這裡不是必須的,該方法是為了後面我們方便測試。
新的採用了分離鏈接的HashTableSeparateChaining類可以繼承自前面的HashTable類,完整的代碼如下:
class HashTableSeparateChaining extends HashTable { constructor () { super(); } put (key, value) { let position = this.loseloseHashCode(key); if (this.table[position] === undefined) { this.table[position] = new LinkedList(); // 單向鏈表,需要引入LinkedList類 } this.table[position].append(new ValuePair(key, value)); } get (key) { let position = this.loseloseHashCode(key); if (this.table[position] !== undefined) { let current = this.table[position].getHead(); while (current) { if (current.element.key === key) return current.element.value; current = current.next; } } return undefined; } remove (key) { let position = this.loseloseHashCode(key); let hash = this.table[position]; if (hash !== undefined) { let current = hash.getHead(); while (current) { if (current.element.key === key) { hash.remove(current.element); if (hash.isEmpty()) this.table[position] = undefined; return true; } current = current.next; } } return false; } size () { let count = 0; this.table.forEach(item => { if (item !== undefined) count += item.size(); }); return count; } toString() { let objString = ""; for (let i = 0; i < this.table.length; i++) { let ci = this.table[i]; if (ci === undefined) continue; objString += `${i}: `; let current = ci.getHead(); while (current) { objString += current.element.toString(); current = current.next; if (current) objString += ', '; } objString += 'rn'; } return objString; } }
其中的LinkedList類為單向鏈表,具體內容可以查看《JavaScript數據結構——鏈表的實現與應用》。注意,現在hash數組中的每一個元素都是一個單向鏈表,單向鏈表的所有操作我們可以藉助於LinkedList類來完成。我們重寫了size()方法,因為現在要計算的是數組中所有鏈表的長度總和。
下面是HashTableSeparateChaining類的測試用例及結果:
let hash = new HashTableSeparateChaining(); hash.put('Gandalf', '[email protected]'); hash.put('John', '[email protected]'); hash.put('Tyrion', '[email protected]'); hash.put('Aaron', '[email protected]'); hash.put('Donnie', '[email protected]'); hash.put('Ana', '[email protected]'); hash.put('Jamie', '[email protected]'); hash.put('Sue', '[email protected]'); hash.put('Mindy', '[email protected]'); hash.put('Paul', '[email protected]'); hash.put('Nathan', '[email protected]'); console.log(hash.toString()); console.log(`size: ${hash.size()}`); console.log(hash.get('John')); console.log(hash.remove('Ana')); console.log(hash.remove('John')); console.log(hash.toString());

可以看到,結果和上面示意圖上給出的是一致的,size()、remove()和get()方法的執行結果也符合預期。
線性探查
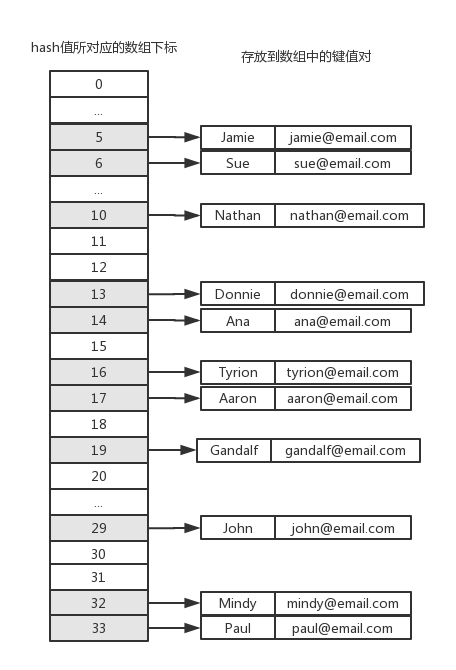
避免散列衝突的另一種方法是線性探查。當向哈希數組中添加某一個新元素時,如果該位置上已經有數據了,就繼續嘗試下一個位置,直到對應的位置上沒有數據時,就在該位置上添加數據。我們將上面的例子改成線性探查的方式,存儲結果如下圖所示:
現在我們不需要單向鏈表LinkedList類了,但是ValuePair類仍然是需要的。同樣的,我們的HashTableLinearProbing類繼承自HashTable類,完整的代碼如下:
class HashTableLinearProbing extends HashTable { constructor () { super(); } put (key, value) { let position = this.loseloseHashCode(key); if (this.table[position] === undefined) { this.table[position] = new ValuePair(key, value); } else { let index = position + 1; while (this.table[index] !== undefined) { index ++; } this.table[index] = new ValuePair(key, value); } } get (key) { let position = this.loseloseHashCode(key); if (this.table[position] !== undefined) { if (this.table[position].key === key) return this.table[position].value; let index = position + 1; while (this.table[index] !== undefined && this.table[index].key === key) { index ++; } return this.table[index].value; } return undefined; } remove (key) { let position = this.loseloseHashCode(key); if (this.table[position] !== undefined) { if (this.table[position].key === key) { this.table[position] = undefined; return true; } let index = position + 1; while (this.table[index] !== undefined && this.table[index].key !== key) { index ++; } this.table[index] = undefined; return true; } return false; } toString() { let objString = ""; for (let i = 0; i < this.table.length; i++) { let ci = this.table[i]; if (ci === undefined) continue; objString += `${i}: ${ci}rn`; } return objString; } }
使用上面和HashTableSeparateChaining類相同的測試用例,我們來看看測試結果:
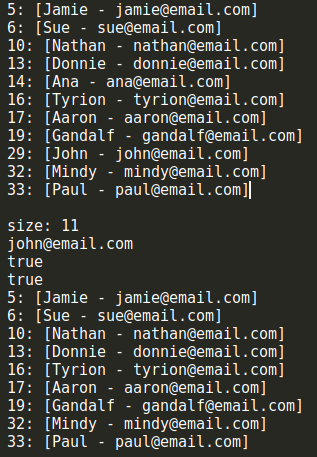
可以和HashTableSeparateChaining類的測試結果比較一下,多出來的位置6、14、17、33,正是HashTableSeparateChaining類中每一個鏈表的剩餘部分。get()和remove()方法也能正常工作,我們不需要重寫size()方法,和基類HashTable中一樣,hash數組中每一個位置只保存了一個元素。另一個要注意的地方是,由於JavaScript中定義數組時不需要提前給出數組的長度,因此我們可以很容易地利用JavaScript語言的這一特性來實現線性探查。在某些編程語言中,數組的定義是必須明確給出長度的,這時我們就需要重新考慮我們的HashLinearProbing類的實現了。
loseloseHashCode()散列函數並不是一個表現良好的散列函數,正如你所看到的,它會很輕易地產生散列衝突。一個表現良好的散列函數必須能夠儘可能低地減少散列衝突,並提高性能。我們可以在網上找一些不同的散列函數的實現方法,下面是一個比loseloseHashCode()更好的散列函數djb2HashCode():
djb2HashCode (key) { let hash = 5381; for (let i = 0; i < key.length; i++) { hash = hash * 33 + key.charCodeAt(i); } return hash % 1013; }
我們用相同的測試用例來測試dj2HashCode(),下面是測試結果:
這次沒有衝突!然而這並不是最好的散列函數,但它是社區最推崇的散列函數之一。
下一章我們將介紹如何用JavaScript來實現樹。
