【JDK】JDK源碼分析-AbstractQueuedSynchronizer(2)
- 2019 年 10 月 3 日
- 筆記
概述
前文「JDK源碼分析-AbstractQueuedSynchronizer(1)」初步分析了 AQS,其中提到了 Node 節點的「獨佔模式」和「共享模式」,其實 AQS 也主要是圍繞對這兩種模式的操作進行的。
Node 節點是對線程 Thread 類的封裝,因此兩種模式可以理解如下:
獨佔模式(exclusive):線程對資源的訪問是排他的,即某個時間只能一個線程單獨訪問資源;
共享模式(shared):與獨佔模式不同,多個線程可以同時訪問資源。
本文先分析獨佔模式下的各種操作,後面再分析共享模式。
獨佔模式
方法概述
獨佔模式下的操作主要有以下幾個方法(可與前面分析的 Lock 接口的方法類比):
1. acquire(int arg)
以獨佔模式獲取資源,忽略中斷;可以類比 Lock 接口的 lock 方法;
2. acquireInterruptibly(int arg)
以獨佔模式獲取資源,響應中斷;可以類比 Lock 接口的 lockInterruptibly 方法;
3. tryAcquireNanos(int arg, long nanosTimeout)
以獨佔模式獲取資源,響應中斷,且有超時等待;可以類比 Lock 接口的 tryLock(long, TimeUnit) 方法;
4. release(int arg)
釋放資源,可以類比 Lock 接口的 unlock 方法。
方法分析
1. 獨佔模式獲取資源(忽略中斷)
這幾種獲取資源的方法很多地方是類似的。我們先從 acquire 方法開始分析,如下:
public final void acquire(int arg) { if (!tryAcquire(arg) && acquireQueued(addWaiter(Node.EXCLUSIVE), arg)) selfInterrupt(); }
該方法看似很短,其實是內部做了封裝。這幾行代碼包含了如下四個操作步驟:
1. tryAcquire
2. addWaiter(Node.EXECUSIVE)
3. acquireQueued(final Node node, arg))
4. selfInterrupt
上面的四個步驟不一定全部執行,下面依次進行分析。
step 1: tryAcquire
protected boolean tryAcquire(int arg) { throw new UnsupportedOperationException(); }
該方法的作用是嘗試以獨佔模式獲取資源,若成功則返回 true。
可以看到該方法是一個 protected 方法,而且 AQS 中該方法直接拋出了異常,其實是它把實現委託給了子類。這也是 ReentrantLock、CountdownLatch 等類(嚴格來說是其內部類 Sync)的實現功能不同的地方,這些類正是通過對該方法的不同實現來制定了自己的“遊戲規則”。
若 step 1 中的 tryAcquire 方法返回 true,則表示當前線程獲取資源成功,方法直接返回,該線程接下來就可以“為所欲為”了;否則表示獲取失敗,接下來會依次執行 step 2 和 step 3。
step 2: addWaiter(Node.EXECUSIVE)
private Node addWaiter(Node mode) { // 將當前線程封裝為一個 Node 節點,指定 mode // PS: 獨佔模式 Node.EXECUSIVE, 共享模式 Node.SHARED Node node = new Node(Thread.currentThread(), mode); // Try the fast path of enq; backup to full enq on failure Node pred = tail; if (pred != null) { node.prev = pred; // 通過 CAS 操作設置主隊列的尾節點 if (compareAndSetTail(pred, node)) { pred.next = node; return node; } } // 尾節點 tail 為 null,表示主隊列未初始化 enq(node); return node; }
enq 方法:
private Node enq(final Node node) { for (;;) { Node t = tail; // 尾節點為空,表明當前隊列未初始化 if (t == null) { // Must initialize // 將隊列的頭尾節點都設置為一個新的節點 if (compareAndSetHead(new Node())) tail = head; } else { // 將 node 節點插入主隊列末尾 node.prev = t; if (compareAndSetTail(t, node)) { t.next = node; return t; } } } }
可以看到 addWaiter(Node.EXECUSIVE) 方法的作用是:把當前線程封裝成一個獨佔模式的 Node 節點,並插入到主隊列末尾(若主隊列未初始化,則將其初始化後再插入)。
step 3: acquireQueued(final Node node, arg))
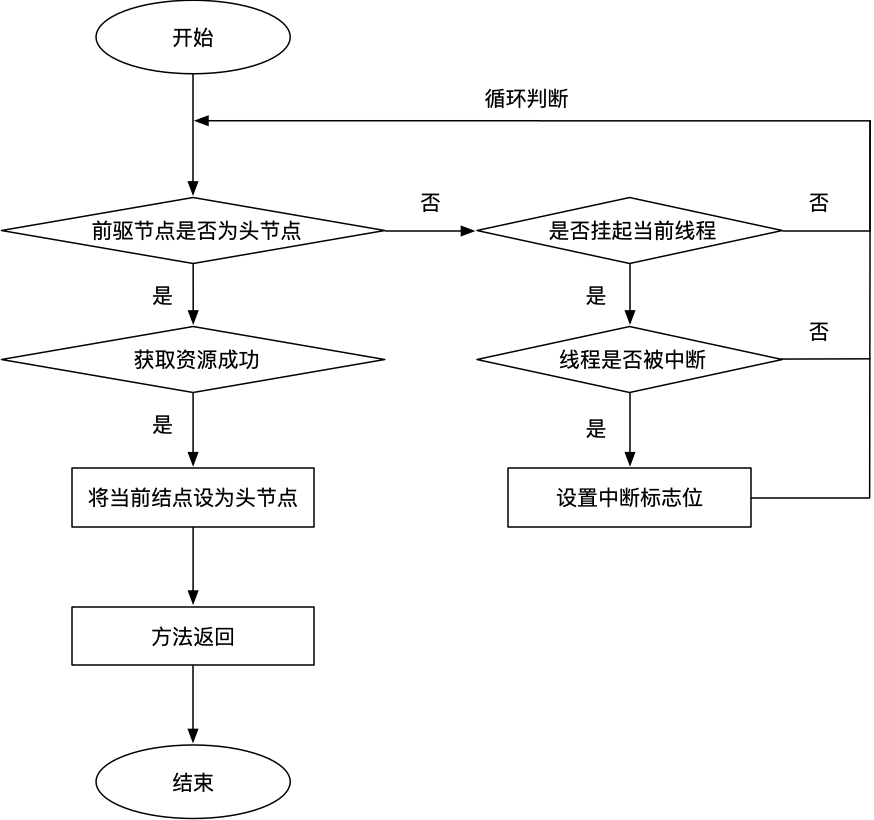
final boolean acquireQueued(final Node node, int arg) { boolean failed = true; try { // 中斷標誌位 boolean interrupted = false; for (;;) { // 獲取該節點的前驅節點 final Node p = node.predecessor(); // 若前驅節點為頭節點,則嘗試獲取資源 if (p == head && tryAcquire(arg)) { // 若獲取成功,則將該節點設置為頭節點並返回 setHead(node); p.next = null; // help GC failed = false; return interrupted; } // 若上麵條件不滿足,即前驅節點不是頭節點,或嘗試獲取失敗 // 判斷當前線程是否可以休眠 if (shouldParkAfterFailedAcquire(p, node) && parkAndCheckInterrupt()) interrupted = true; } } finally { if (failed) cancelAcquire(node); } }
若當前節點的前驅節點為頭節點,則會再次嘗試獲取資源(tryAcuqire),若獲取成功,則將當前節點設置為頭節點並返回;否則,若前驅節點不是頭節點,或者獲取資源失敗,則執行如下兩個方法:
private static boolean shouldParkAfterFailedAcquire(Node pred, Node node) { // 前驅節點的等待狀態 int ws = pred.waitStatus; // 若前驅節點的等待狀態為 SIGNAL,返回 true,表示當前線程可以休眠 if (ws == Node.SIGNAL) /* * This node has already set status asking a release * to signal it, so it can safely park. */ return true; // 若前驅節點的狀態大於 0,表示前驅節點處於取消(CANCELLED)狀態 // 則將前驅節點跳過(相當於踢出隊列) if (ws > 0) { /* * Predecessor was cancelled. Skip over predecessors and * indicate retry. */ do { node.prev = pred = pred.prev; } while (pred.waitStatus > 0); pred.next = node; } else { /* * waitStatus must be 0 or PROPAGATE. Indicate that we * need a signal, but don't park yet. Caller will need to * retry to make sure it cannot acquire before parking. */ // 此時 waitStatus 只能為 0 或 PROPAGATE 狀態,將前驅節點的等着狀態設置為 SIGNAL compareAndSetWaitStatus(pred, ws, Node.SIGNAL); } return false; }
該方法的流程:
1. 若前驅節點的等待狀態為 SIGNAL,返回 true,表示當前線程可以休眠(park);
2. 若前驅節點是取消狀態 (ws > 0),則將其清理出隊列,以此類推;
3. 若前驅節點為 0 或 PROPAGATE,則將其設置為 SIGNAL 狀態。
正如其名,該方法(shouldParkAfterFailedAcquire)的作用就是判斷當前線程在獲取資源失敗後,是否可以休眠(park)。
parkAndCheckInterrupt:
private final boolean parkAndCheckInterrupt() { // 將當前線程休眠 LockSupport.park(this); return Thread.interrupted(); }
該方法的作用:
1. 使當前線程休眠(park);
2. 返回該線程是否被中斷(其他線程對其發過中斷信號)。
上面就是 acquireQueued(final Node node, arg)) 方法的執行過程,為了便於理解,可參考下面的流程圖:
若此期間被其他線程中斷過,則此時再去執行 selfInterrupt 方法去響應中斷請求:
static void selfInterrupt() { Thread.currentThread().interrupt(); }
以上就是 acquire 方法執行的整體流程。
2. 以獨佔模式獲取資源(響應中斷)
該操作其實與前面的過程類似,因此分析相對簡單些,代碼如下:
public final void acquireInterruptibly(int arg) throws InterruptedException // 若線程被中斷過,則拋出異常 if (Thread.interrupted()) throw new InterruptedException(); // 嘗試獲取資源 if (!tryAcquire(arg)) // 嘗試獲取資源失敗 doAcquireInterruptibly(arg); }
tryAcquire 與前面的操作一樣,若嘗試獲取資源成功則直接返回;否則,執行 doAcquireInterruptibly:
private void doAcquireInterruptibly(int arg) throws InterruptedException // 將當前線程封裝成 Node 節點插入主隊列末尾 final Node node = addWaiter(Node.EXCLUSIVE); boolean failed = true; try { for (;;) { final Node p = node.predecessor(); if (p == head && tryAcquire(arg)) { setHead(node); p.next = null; // help GC failed = false; return; } if (shouldParkAfterFailedAcquire(p, node) && parkAndCheckInterrupt()) // 拋出中斷異常 throw new InterruptedException(); } } finally { if (failed) cancelAcquire(node); } }
通過與前面的 acquire 方法對比可以發現,二者代碼幾乎一樣,區別在於 acquire 方法檢測到中斷(parkAndCheckInterrupt)時只是記錄了標誌位,並未響應;而此處直接拋出了異常。這也是二者僅有的區別,此處不再詳細分析。
3. 以獨佔模式獲取資源(響應中斷,且有超時)
該操作與前者也是類似的,代碼如下:
public final boolean tryAcquireNanos(int arg, long nanosTimeout) throws InterruptedException // 若被中斷,則響應 if (Thread.interrupted()) throw new InterruptedException(); return tryAcquire(arg) || doAcquireNanos(arg, nanosTimeout); }
doAcquireNanos:
static final long spinForTimeoutThreshold = 1000L; private boolean doAcquireNanos(int arg, long nanosTimeout) throws InterruptedException { // 若超時時間小於等於 0,直接獲取失敗 if (nanosTimeout <= 0L) return false; // 計算截止時間 final long deadline = System.nanoTime() + nanosTimeout; final Node node = addWaiter(Node.EXCLUSIVE); boolean failed = true; try { for (;;) { final Node p = node.predecessor(); if (p == head && tryAcquire(arg)) { setHead(node); p.next = null; // help GC failed = false; return true; } nanosTimeout = deadline - System.nanoTime(); // 已經超時了,獲取失敗 if (nanosTimeout <= 0L) return false; // 若大於自旋時間,則線程休眠;否則自旋 if (shouldParkAfterFailedAcquire(p, node) && nanosTimeout > spinForTimeoutThreshold) LockSupport.parkNanos(this, nanosTimeout); // 若被中斷,則響應 if (Thread.interrupted()) throw new InterruptedException(); } } finally { if (failed) cancelAcquire(node); } }
這裡有個變量 spinForTimeoutThreshold,表示自旋時間,若大於該值則將線程休眠,否則繼續自旋。個人理解這裡增加該時間是為了提高效率,即,只有在等待時間較長的時候才讓線程休眠。
該方法與 acquireInterruptibly 也是類似的,在前者的基礎上增加了 timeout,不再詳細分析。
4. 釋放資源
前面分析了三種獲取資源的方式,自然也有釋放資源。下面分析釋放資源的 release 操作:
public final boolean release(int arg) { // 嘗試釋放資源,若成功則返回 true if (tryRelease(arg)) { Node h = head; // 若頭節點不為空,且等待狀態不為 0(此時為 SIGNAL) // 則喚醒其後繼節點 if (h != null && h.waitStatus != 0) unparkSuccessor(h); return true; } return false; }
與 tryAcquire 方法類似,tryRelease 方法在 AQS 中也是拋出異常,同樣交由子類實現:
protected boolean tryRelease(int arg) { throw new UnsupportedOperationException(); }
unparkSuccessor 的主要作用是喚醒 node 的後繼節點,代碼如下:
private void unparkSuccessor(Node node) { /* * If status is negative (i.e., possibly needing signal) try * to clear in anticipation of signalling. It is OK if this * fails or if status is changed by waiting thread. */ int ws = node.waitStatus; if (ws < 0) compareAndSetWaitStatus(node, ws, 0); /* * Thread to unpark is held in successor, which is normally * just the next node. But if cancelled or apparently null, * traverse backwards from tail to find the actual * non-cancelled successor. */ // 後繼節點 Node s = node.next; if (s == null || s.waitStatus > 0) { // 若後繼節點是取消狀態,則從尾節點向前遍歷,找到 node 節點後面一個未取消狀態的節點 s = null; for (Node t = tail; t != null && t != node; t = t.prev) if (t.waitStatus <= 0) s = t; } // 喚醒node節點的後繼節點 if (s != null) LockSupport.unpark(s.thread); }
若 node 節點的後繼節點是取消狀態(ws > 0),則從主隊列中取其後面一個非取消狀態的線程喚醒。
前面三個獲取資源的方法中,finally 代碼塊中都用到了 cancelAcquire 方法,都是獲取失敗時的操作,這裡也分析一下:
private void cancelAcquire(Node node) { // Ignore if node doesn't exist if (node == null) return; node.thread = null; // Skip cancelled predecessors // 跳過取消狀態的前驅節點 Node pred = node.prev; while (pred.waitStatus > 0) node.prev = pred = pred.prev; // predNext is the apparent node to unsplice. CASes below will // fail if not, in which case, we lost race vs another cancel // or signal, so no further action is necessary. // 前驅節點的後繼節點引用 Node predNext = pred.next; // Can use unconditional write instead of CAS here. // After this atomic step, other Nodes can skip past us. // Before, we are free of interference from other threads. // 將當前節點設置為取消狀態 node.waitStatus = Node.CANCELLED; // If we are the tail, remove ourselves. // 若該節點為尾節點(後面沒其他節點了),將 predNext 指向 null if (node == tail && compareAndSetTail(node, pred)) { compareAndSetNext(pred, predNext, null); } else { // If successor needs signal, try to set pred's next-link // so it will get one. Otherwise wake it up to propagate. int ws; if (pred != head && ((ws = pred.waitStatus) == Node.SIGNAL || (ws <= 0 && compareAndSetWaitStatus(pred, ws, Node.SIGNAL))) && pred.thread != null) { Node next = node.next; if (next != null && next.waitStatus <= 0) compareAndSetNext(pred, predNext, next); } else { // 前驅節點為頭節點,表明當前節點為第一個,取消時喚醒它的下一個節點 unparkSuccessor(node); } node.next = node; // help GC } }
該方法的主要操作:
1. 將 node 節點設置為取消(CANCELLED)狀態;
2. 找到它在隊列中非取消狀態的前驅節點 pred:
2.1 若 node 節點是尾節點,則前驅節點的後繼設為空,
2.2 若 pred 不是頭節點,且狀態為 SIGNAL,則後繼節點設為 node 的後繼節點;
2.3 若 pred 是頭節點,則喚醒 node 的後繼節點。
PS: 該過程可以跟雙鏈表刪除一個節點的過程進行對比分析。
小結
本文分析了以獨佔模式獲取資源的三種方式,以及釋放資源的操作。分別為:
1. acquire: 獨佔模式獲取資源,忽略中斷;
2. acquireInterruptibly: 獨佔模式獲取資源,響應中斷;
tryAcquireNanos: 獨佔模式獲取資源,響應中斷,有超時;
4. release: 釋放資源,喚醒主隊列中的下一個線程。
這幾個方法都可以類比 Lock 接口的相關方法定義。
相關閱讀:
JDK源碼分析-AbstractQueuedSynchronizer(1)
Stay hungry, stay foolish.

PS: 本文首發於微信公眾號【WriteOnRead】。
