WEB应用之httpd基础入门(四)
- 2020 年 3 月 29 日
- 笔记
前文我们聊到了httpd的虚拟主机实现,状态页的实现,回顾请参考https://www.cnblogs.com/qiuhom-1874/p/12570900.html;今天我们来聊一聊后面的常用基础配置;
1、user/group:这两个指令用于指定httpd进程的运行用户和组
示例:

提示:以上配置就表示httpd启动进程的用户是身份是apache用户和apache组;众所周知一个进程要访问某一个文件,它能对文件有哪些权限,取决于进程是以那个用户或属组启动的,以及该文件的属主和属组以及other权限,如果启动该进程的用户和被访问的文件用户相同,那么该进程对文件的权限就是该文件中属主的权限,如果启动进程的用户和被访问的文件用户不同是,则就会看该进程启动的属组是否和文件属组相同,相同则应用文件属组的权限,不同时则应用文件other权限;如果文件有acl权限,那么也是同样的道理,如果启动进程的用户在acl权限列表中,就应用acl权限列表中的权限;

提示:最上面的那个httpd进程是httpd的主控进程,主要管控下面的子进程的,所以它的用户必须是root;
2、使用mod_deflate模块压缩页面优化传输速度;
在启用压缩功能的前提是我们httpd服务器上必须要加载mod_deflate模块,其次我们还需要定义一个过滤器,然后明确的把那一类资源类型进行压缩,通常情况文件和文本内心的资源压缩比例最高,效果最好,图片和一些二进制文件都不建议压缩,图片本来就是一个高度压缩的,如果再压缩可能存在图片不可用的状态;
示例:
首先确认mod_deflate模块是否启用,如果没有启用使用loadmodule指令启用

提示:如果能够过滤出来deflate_module,说明httpd是加载了该模块
定义一个过滤器,定义过滤器的指令是setoutputfilter FILTER_NAME 过滤器的名称可以说任意合法名称,通常情况下我们使用DEFLATE作为过滤器的名称,如下所示

提示:该指令表示设置一个输出文件过滤器,该指令可以用在server配置段中,虚拟主机配置段中,directory 和.htaccess中
把某一资源类型(mime类型)添加到过滤器中,表示如果用户访问该类型资源启用压缩,这里还需要注意一点的是,压缩资源不是说一个字符也压缩,通常情况页面资源要达到某一大小后才可压缩,因为资源太小,没必要启动压缩,如果资源太小启用压缩,不但没有起到加速的效果反而会降低响应速度;httpd里配置某一资源加入到过滤器中用addoutputfilterbytype指令指定过滤器名称,以及资源的mime类型名称;如下

deflatecompressionlevel number:该指令表示指定deflate压缩级别,范围是1-9 ,9级别最高,压缩后的文件更小,当然消耗的CPU资源就越多;

提示:以上表示指定压缩级别为5,配置了以上三个指令后,客户端访问服务器就应该可以启动压缩功能了(资源必须要达到一定的大小才能压缩,太小即便我们配置了压缩功能,也不会压缩)
在没有重载配置文件前,用浏览器访问服务器资源响应首部是这样的

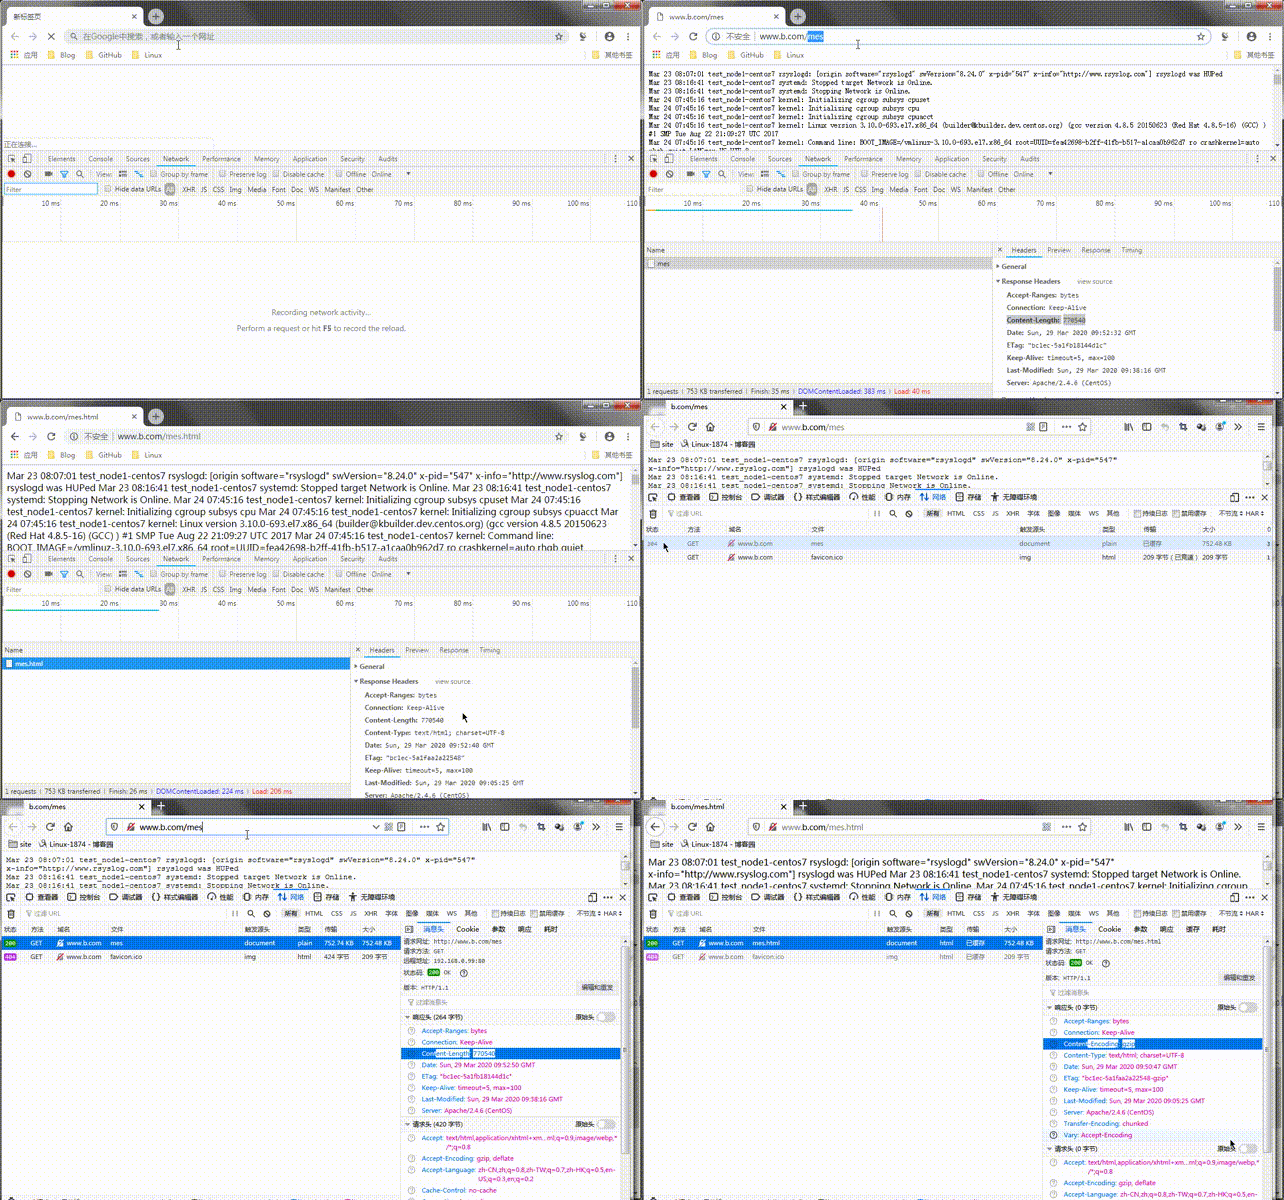
提示:可以看到在没有重载配置文件前,我们访问服务器资源是不压缩的,服务器静态资源是多少字节,响应报文对应的content-lenght的值就是多少;
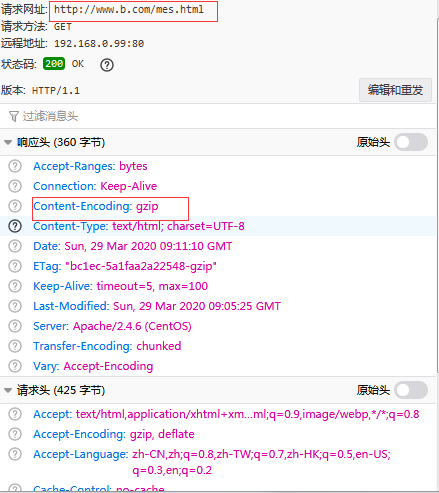
重新加载配置文件生效后,我们再用浏览器访问同样的资源,对应资源响应首部就没有content-lenght首部,却有了content-encoding首部,并告诉我们是使用的gzip压缩;如下

当然压缩传输了,对应传输大小在哪里呢?如下

提示:可以看到压缩后的资源传输只用了93.77KB,而该资源在服务器上存储是785.48KB;从上面的数据来看,压缩传输在一定程度上给我们节省了带宽;但是还有一个问题,不是所有的客户端浏览器都支持压缩功能,比如对于一些比较古老的浏览器,或者我们刻意让某一种浏览器访问服务器资源时,不启用压缩功能;如下

提示:以上配置表示如果匹配到用户请求报文User-Agent中包含Firefox的字样,仅对访问文本格式和html格式的资源用gzip压缩,匹配到Chrome字样,不压缩,意思就是火狐浏览器访问服务器上的.html的文件,仅gzip压缩,其他类型的文件不启用压缩传输,谷歌浏览器不管访问什么类型的资源都不予压缩;

提示:可以看到谷歌浏览器访问/mes和访问/mes.html资源都没有启动压缩功能,而火狐浏览器访问/mes没有启动压缩功能,而访问/mes.html时就启用了压缩功能;这里还需要注意一点,mime类型资源的区分是靠文件名后缀来区分的,不同的文件名后缀表示不同的mime类型资源;
3、httpd启用https对外提供访问
什么是https?所谓https就是httpd+ssl,简单讲就是加密版的http,众所周知http协议是明文传输,不加密,而https是加密传输的,相对于http协议,它更加安全,但同时它处理流程更多,响应相比http要慢一些;
首先我们来说一下ssl会话的过程吧!
(1) 客户端发送可供选择的加密方式,并向服务器请求证书;
(2) 服务器端发送证书以及选定的加密方式给客户端;
(3) 客户端取得证书并进行证书验正,如果信任给其发证书的CA:
(a) 验正证书来源的合法性;用CA的公钥解密证书上数字签名;
(b) 验正证书的内容的合法性:完整性验正;
(c) 检查证书的有效期限;
(d) 检查证书是否被吊销;
(e) 证书中拥有者的名字,与访问的目标主机要一致;
(4) 客户端生成临时会话密钥(对称密钥),并使用服务器端的公钥加密此数据发送给服务器,完成密钥交换;
(5) 服务器用此密钥加密用户请求的资源,响应给客户端;
这里需要注意一点,ssl会话是基于ip地址创建,所以单ip地址的主机上,仅可以使用一个https虚拟主机;
示例:httpd实现https
首先我们要去申请一证书,而申请证书又需要CA,所以我们不打算去网上买证书,就需要主机搭建CA服务器,有关CA服务器详细搭建可以参考本人博客https://www.cnblogs.com/qiuhom-1874/p/12237944.html;我这里只是简单说下过程,CA服务器最主要的就两步,第一步是生成私钥,第二步就是生成自签名证书;接下来我们先生成CA私钥和自签名证书;
[root@test_node1-centos7 CA]# pwd /etc/pki/CA [root@test_node1-centos7 CA]# ll total 0 drwxr-xr-x. 2 root root 6 Aug 4 2017 certs drwxr-xr-x. 2 root root 6 Aug 4 2017 crl drwxr-xr-x. 2 root root 6 Aug 4 2017 newcerts drwx------. 2 root root 6 Aug 4 2017 private [root@test_node1-centos7 CA]# (umask 077;openssl genrsa -out cakey.pem 1024) Generating RSA private key, 1024 bit long modulus .......++++++ .......................++++++ e is 65537 (0x10001) [root@test_node1-centos7 CA]# ll total 4 -rw------- 1 root root 891 Mar 29 18:24 cakey.pem drwxr-xr-x. 2 root root 6 Aug 4 2017 certs drwxr-xr-x. 2 root root 6 Aug 4 2017 crl drwxr-xr-x. 2 root root 6 Aug 4 2017 newcerts drwx------. 2 root root 6 Aug 4 2017 private [root@test_node1-centos7 CA]# openssl req -new -x509 -key cakey.pem -out cacert.pem -days 365 You are about to be asked to enter information that will be incorporated into your certificate request. What you are about to enter is what is called a Distinguished Name or a DN. There are quite a few fields but you can leave some blank For some fields there will be a default value, If you enter '.', the field will be left blank. ----- Country Name (2 letter code) [XX]:CN State or Province Name (full name) []:SC Locality Name (eg, city) [Default City]:GY Organization Name (eg, company) [Default Company Ltd]:TEST Organizational Unit Name (eg, section) []:OPS Common Name (eg, your name or your server's hostname) []:ca.test.com Email Address []: [root@test_node1-centos7 CA]# ll total 8 -rw-r--r-- 1 root root 932 Mar 29 18:25 cacert.pem -rw------- 1 root root 891 Mar 29 18:24 cakey.pem drwxr-xr-x. 2 root root 6 Aug 4 2017 certs drwxr-xr-x. 2 root root 6 Aug 4 2017 crl drwxr-xr-x. 2 root root 6 Aug 4 2017 newcerts drwx------. 2 root root 6 Aug 4 2017 private [root@test_node1-centos7 CA]#
提示:CA可以和httpd在同一服务器
生成httpd的应用程序私钥和证书签发文件
[root@test_node1-centos7 CA]# ll total 8 -rw-r--r-- 1 root root 932 Mar 29 18:25 cacert.pem -rw------- 1 root root 891 Mar 29 18:24 cakey.pem drwxr-xr-x. 2 root root 6 Aug 4 2017 certs drwxr-xr-x. 2 root root 6 Aug 4 2017 crl drwxr-xr-x. 2 root root 6 Aug 4 2017 newcerts drwx------. 2 root root 6 Aug 4 2017 private [root@test_node1-centos7 CA]# (umask 077;openssl genrsa -out httpd.pem 1024) Generating RSA private key, 1024 bit long modulus ..............++++++ ....++++++ e is 65537 (0x10001) [root@test_node1-centos7 CA]# openssl req -new -key httpd.pem -out httpd.csr You are about to be asked to enter information that will be incorporated into your certificate request. What you are about to enter is what is called a Distinguished Name or a DN. There are quite a few fields but you can leave some blank For some fields there will be a default value, If you enter '.', the field will be left blank. ----- Country Name (2 letter code) [XX]:CN State or Province Name (full name) []:SC Locality Name (eg, city) [Default City]:GY Organization Name (eg, company) [Default Company Ltd]:TEST Organizational Unit Name (eg, section) []:OPS Common Name (eg, your name or your server's hostname) []:www.test.com Email Address []: Please enter the following 'extra' attributes to be sent with your certificate request A challenge password []: An optional company name []: [root@test_node1-centos7 CA]# ll total 16 -rw-r--r-- 1 root root 932 Mar 29 18:25 cacert.pem -rw------- 1 root root 891 Mar 29 18:24 cakey.pem drwxr-xr-x. 2 root root 6 Aug 4 2017 certs drwxr-xr-x. 2 root root 6 Aug 4 2017 crl -rw-r--r-- 1 root root 635 Mar 29 18:30 httpd.csr -rw------- 1 root root 887 Mar 29 18:26 httpd.pem drwxr-xr-x. 2 root root 6 Aug 4 2017 newcerts drwx------. 2 root root 6 Aug 4 2017 private [root@test_node1-centos7 CA]#
签发证书,生成httpd应用证书
[root@test_node1-centos7 CA]# touch index.txt [root@test_node1-centos7 CA]# echo "01" >serial [root@test_node1-centos7 CA]# openssl ca -in httpd.csr -out httpd.crt.pem -days 365 Using configuration from /etc/pki/tls/openssl.cnf Check that the request matches the signature Signature ok Certificate Details: Serial Number: 1 (0x1) Validity Not Before: Mar 29 10:36:47 2020 GMT Not After : Mar 29 10:36:47 2021 GMT Subject: countryName = CN stateOrProvinceName = SC organizationName = TEST organizationalUnitName = OPS commonName = www.test.com X509v3 extensions: X509v3 Basic Constraints: CA:FALSE Netscape Comment: OpenSSL Generated Certificate X509v3 Subject Key Identifier: 38:DE:20:C0:0F:F7:CB:C2:2F:F4:1E:2D:FD:BB:A0:54:EA:DE:61:FE X509v3 Authority Key Identifier: keyid:6C:33:A5:78:22:17:22:73:34:45:5B:95:AC:0D:B9:BD:33:B6:B3:1D Certificate is to be certified until Mar 29 10:36:47 2021 GMT (365 days) Sign the certificate? [y/n]:y 1 out of 1 certificate requests certified, commit? [y/n]y Write out database with 1 new entries Data Base Updated [root@test_node1-centos7 CA]# ll total 36 -rw-r--r-- 1 root root 932 Mar 29 18:25 cacert.pem -rw------- 1 root root 891 Mar 29 18:24 cakey.pem drwxr-xr-x. 2 root root 6 Aug 4 2017 certs drwxr-xr-x. 2 root root 6 Aug 4 2017 crl -rw-r--r-- 1 root root 3022 Mar 29 18:36 httpd.crt.pem -rw-r--r-- 1 root root 635 Mar 29 18:30 httpd.csr -rw------- 1 root root 887 Mar 29 18:26 httpd.pem -rw-r--r-- 1 root root 70 Mar 29 18:36 index.txt -rw-r--r-- 1 root root 21 Mar 29 18:36 index.txt.attr -rw-r--r-- 1 root root 0 Mar 29 18:36 index.txt.old drwxr-xr-x. 2 root root 20 Mar 29 18:36 newcerts drwx------. 2 root root 6 Aug 4 2017 private -rw-r--r-- 1 root root 3 Mar 29 18:36 serial -rw-r--r-- 1 root root 3 Mar 29 18:36 serial.old [root@test_node1-centos7 CA]# pwd /etc/pki/CA [root@test_node1-centos7 CA]#
证书生成好了,接下就是配置httpd支持https访问即可,在这之前,我们需要在服务器上确认httpd是否装载了mod_ssl模块,默认httpd是没有这个模块的,我们需要手动安装才行
[root@test_node1-centos7 CA]# httpd -M |grep ssl [root@test_node1-centos7 CA]# yum info mod_ssl Loaded plugins: fastestmirror Loading mirror speeds from cached hostfile * base: mirrors.aliyun.com * extras: mirrors.aliyun.com * updates: mirrors.cn99.com Available Packages Name : mod_ssl Arch : x86_64 Epoch : 1 Version : 2.4.6 Release : 90.el7.centos Size : 112 k Repo : base/7/x86_64 Summary : SSL/TLS module for the Apache HTTP Server URL : http://httpd.apache.org/ License : ASL 2.0 Description : The mod_ssl module provides strong cryptography for the Apache Web : server via the Secure Sockets Layer (SSL) and Transport Layer : Security (TLS) protocols. [root@test_node1-centos7 CA]# yum install -y mod_ssl Loaded plugins: fastestmirror base | 3.6 kB 00:00:00 epel | 4.7 kB 00:00:00 extras | 2.9 kB 00:00:00 updates | 2.9 kB 00:00:00 (1/5): epel/x86_64/group_gz | 95 kB 00:00:00 (2/5): extras/7/x86_64/primary_db | 164 kB 00:00:00 (3/5): epel/x86_64/updateinfo | 1.0 MB 00:00:00 (4/5): updates/7/x86_64/primary_db | 7.6 MB 00:00:01 (5/5): epel/x86_64/primary_db | 6.8 MB 00:00:01 Loading mirror speeds from cached hostfile * base: mirrors.aliyun.com * extras: mirrors.aliyun.com * updates: mirrors.cn99.com Resolving Dependencies --> Running transaction check ---> Package mod_ssl.x86_64 1:2.4.6-90.el7.centos will be installed --> Finished Dependency Resolution Dependencies Resolved ======================================================================================================== Package Arch Version Repository Size ======================================================================================================== Installing: mod_ssl x86_64 1:2.4.6-90.el7.centos base 112 k Transaction Summary ======================================================================================================== Install 1 Package Total download size: 112 k Installed size: 224 k Downloading packages: mod_ssl-2.4.6-90.el7.centos.x86_64.rpm | 112 kB 00:00:00 Running transaction check Running transaction test Transaction test succeeded Running transaction Installing : 1:mod_ssl-2.4.6-90.el7.centos.x86_64 1/1 Verifying : 1:mod_ssl-2.4.6-90.el7.centos.x86_64 1/1 Installed: mod_ssl.x86_64 1:2.4.6-90.el7.centos Complete! [root@test_node1-centos7 CA]# rpm -ql mod_ssl /etc/httpd/conf.d/ssl.conf /etc/httpd/conf.modules.d/00-ssl.conf /usr/lib64/httpd/modules/mod_ssl.so /usr/libexec/httpd-ssl-pass-dialog /var/cache/httpd/ssl [root@test_node1-centos7 CA]#
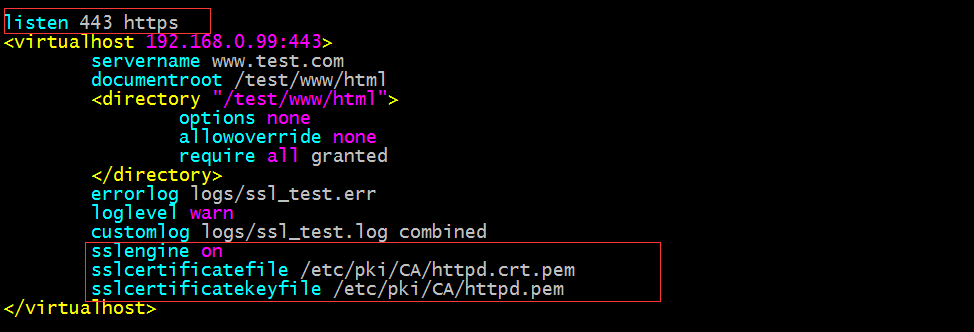
提示:可以看到安装mod_ssl生成了一个ssl.conf的配置文件和00-ssl.conf、mod_ssl.so ,安装这个包后,httpd就支持https了,接下来配置www.test.com虚拟站点支持https访问

提示:我们可以自己新建一个配置文件,或者直接修改ssl.conf文件,把对应的内容修改修改也是可以的;
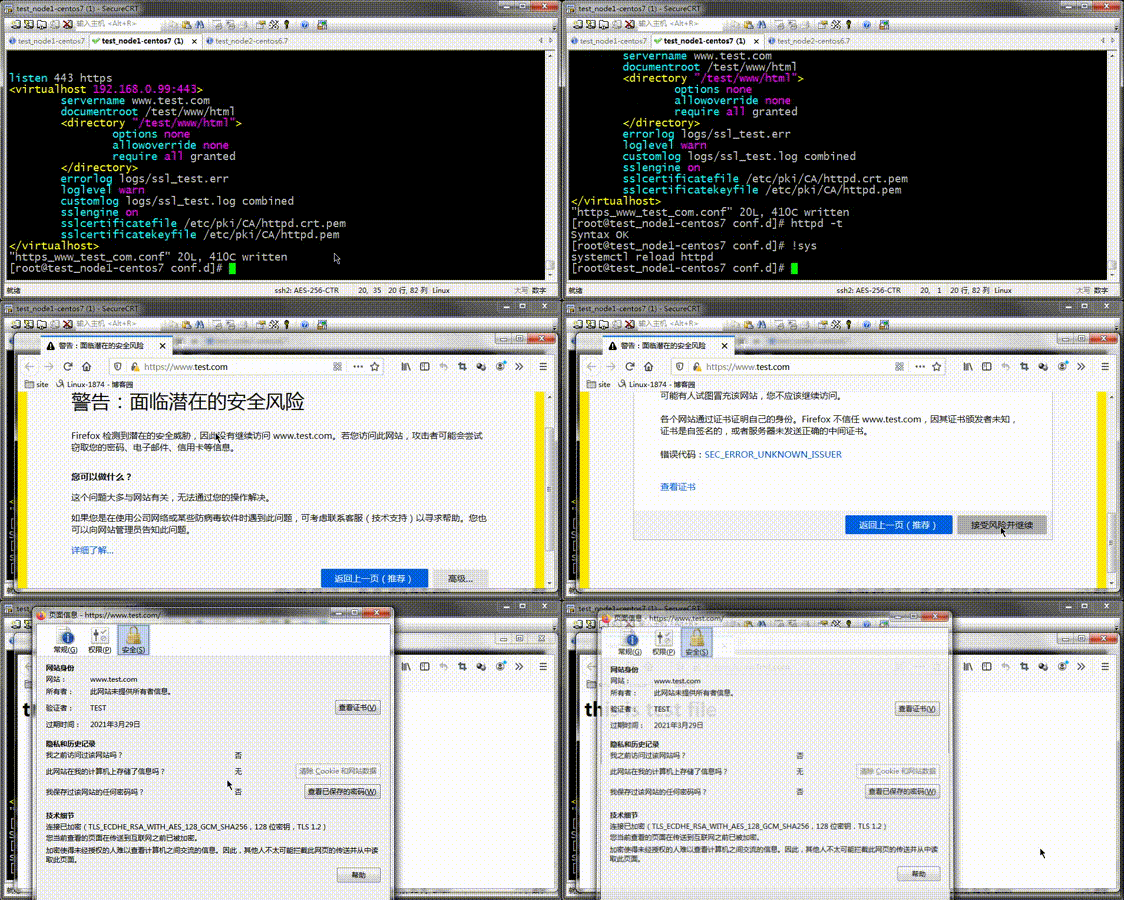
测试,用浏览器访问https://www.test.com,看看是否可以正常访问

提示:通过测试,我们可以正常访问www.test.com虚拟主机提供的主页,这里需要注意,如果我们自己写配置文件,且单独一配置文件,如果自己写的有listen 443 https,那么ssl.conf里的就需要注释,否则重载配置文件httpd服务起不来;


