梳理清楚springAOP,轻松面向切面编程
- 2022 年 8 月 13 日
- 笔记
- springboot
不知道大家有没有这样的感觉,平时经常说aop,但是对aop中的一些概念还是模糊,总感觉很飘渺,今天来梳理下关于aop的知识。
一、概念
我们知道现在开发都是spring,讲的最多的也是springAOP,在说springAOP前,先了解下AOP是什么?
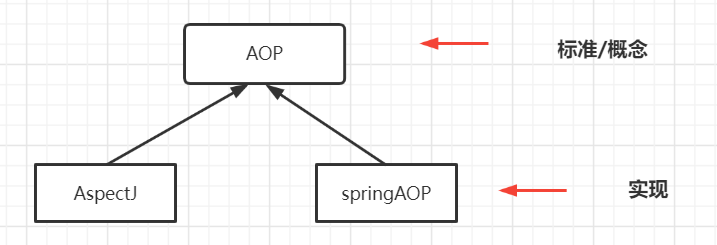
AOP是通过“预编译方式”和“运行期间动态代理”实现程序功能的统一维护的一种技术。AOP是一个概念,其实现技术有AspectJ和springAOP
,现在对AOP有个清楚的了解了,再来看下AOP中的一些概念。
- 切面(aspect),业务层面是程序中的标准代码/功能,不同于实际的业务逻辑,比如日志功能、事务等。代码层面切点+通知构成了一个切面;
- 连接点(joinPoint),程序运行过程中的某个特定点,比如方法执行、字段赋值、方法调用等;
- 切点/切入点(pointCut),一个匹配连接点的正则表达式。 每当任何连接点匹配一个切入点时,就执行与该切入点相关联的通知。可以把切入点看作是符合条件的连接点;
- 通知(advice),在一个连接点中,切面采取的行动,简单点说是对切点做什么事,主要有before、afterReturning、round等通知
- 织入(weaving),连接切面和目标对象来创建一个通知对象的过程,简单点说是把通知应用到连接点的过程;
通过一个图了解下AOP、Aspectj、SpringAOP的关系,

1、AspectJ
AspcetJ作为AOP的一种实现,是基于编译的方式实现的AOP,在程序运行期是不会做任何事情的,因为类和切面是直接编译在一起的。AspectJ 使用了三种不同类型的织入方式,使用的是编译期和类加载时进行织入
- Compile-time weaving:编译期织入。编译器将切面和应用的源代码编译在一个字节码文件中。
- Post-compile weaving:编译后织入。也称为二进制织入。将已有的字节码文件与切面编制在一起。
- Load-time weaving:加载时织入。与编译后织入一样,只是织入时间会推迟到类加载到jvm时。
2、springAOP
springAOP作为AOP的一种实现,基于动态代理的实现AOP,意味着实现目标对象的切面会创建一个代理类,代理类的实现有两种不同的模式,分为两种不同的代理,Spring AOP利用的是运行时织入,在springAOP中连接点是方法的执行。
- JDK动态代理;
- cglib动态代理;
另外,在springAOP的实现中,借用了AspectJ的一些功能,比如@AspceJ、@Before、@PonitCut这些注解,都是AspectJ中的注解。在使用springAOP的时候需要引入AspectJ的依赖,
<!--使用springAOP需要引入该依赖-->
        <dependency>
            <groupId>org.aspectj</groupId>
            <artifactId>aspectjweaver</artifactId>
            <version>1.8.13</version>
        </dependency>
下面在演示过程中会再次提及这块。
springAOP复用了AspectJ中的下面几个通知,这些注解都是AspectJ中的注解,对应这些注解springAOP分别自己的处理类
- 方法执行前,使用MethodBeforeAdvice接口,使用AspectJ中的注解@Before表示
- 方法执行后,使用AfterReturningAdvice接口,使用AspectJ中的注解@After表示
- 方法执行中,使用注解@Around表示
- 方法执行完返回方法返回值,使用注解@AfterReturning表示
- 方法抛出异常,使用注解@AfterThrowing表示
二、springAOP实践
实践出真知,有了上面的理论基础现在开始实践。
有一个service类执行save操作,要在saveUser方法执行的时候织入相应的通知。
UserService.java
package com.my.template.service;

import com.my.template.entity.User;
import org.springframework.stereotype.Service;

/**
 * @date 2022/8/9 15:28
 */
@Service
public class UserService implements Us{
    @Override
    public void saveUser(User user){
        System.out.println("保存user对象到数据库:"+user);
    }
}
该方法的调用是通过一个controller完成的,
UserController.java
package com.my.template.controller;

import com.my.template.entity.User;
import com.my.template.service.Us;
import com.my.template.service.UserService;
import org.springframework.beans.factory.annotation.Autowired;
import org.springframework.web.bind.annotation.RequestMapping;
import org.springframework.web.bind.annotation.RestController;

/**
 * @date 2022/8/9 15:35
 */
@RestController
public class UserController {
    @Autowired
    private Us us;
    @RequestMapping("/saveUser")
    public String saveUser(){

        User user=new User();
        user.setId("1");
        user.setName("张三");
        us.saveUser(user);
        return "success";
    }

}
在不加任何切面及通知前调用该方法的打印结果是,

下面看使用AOP后的结果是什么样子的。
1、使用springAOP的XML方式
前面知道springAOP提供了@Before、@After、@Round等注解的,这些注解是复用AspectJ的,下面看,如何使用XML的方式,定义一个通知类,
Log.java
package com.my.template.aop;

import org.springframework.stereotype.Component;
/**
 * @date 2022/8/10 14:13
 */
@Component
public class Log {

    /**
     * 方法执行前
     */
    public void before(){

        System.out.println("执行方法前");
    }
    /**方法执行后
     */
    public void after(){
        System.out.println("执行方法后");
    }
}
然后使用xml的方式,配置如下,
applicationContext.xml
<?xml version="1.0" encoding="UTF-8"?>
<beans xmlns:xsi="//www.w3.org/2001/XMLSchema-instance"
       xmlns:context="//www.springframework.org/schema/context"
       xmlns:aop="//www.springframework.org/schema/aop"
       xmlns="//www.springframework.org/schema/beans"
       xsi:schemaLocation="//www.springframework.org/schema/beans  //www.springframework.org/schema/beans/spring-beans-4.0.xsd
    //www.springframework.org/schema/context  //www.springframework.org/schema/context/spring-context-4.0.xsd
    //www.springframework.org/schema/aop //www.springframework.org/schema/aop/spring-aop-4.0.xsd"
       default-lazy-init="true">

    <description>Spring公共配置</description>
    <!--AOP配置-->
    <aop:config>
        <!--定义一个切点-->
        <aop:pointcut id="p" expression="execution(* com.my.template.service.UserService.*(..))"/>
        <!--定义一个切面-->
        <aop:aspect id="a" ref="log">
            <!--前置通知-->
            <aop:before method="before" pointcut-ref="p"></aop:before>
            <!--后置通知-->
            <aop:after-returning method="after" pointcut-ref="p"></aop:after-returning>
        </aop:aspect>
    </aop:config>
</beans>
上面使用<aop:config></aop:config>标签进行aop的配置,在该标签内使用<aop:pointcut></aop:ponitcut>声明一个切点,又使用<aop:aspect></aop:aspect>定义了切面,切面中的ref是对通知类的引用,这里使用的是spring容器的中的bean,前面说到前面中包含了通知,所以下面定义了前置和后置通知,分别指定了通知类中的不同方法,下面看具体的测试方法,我这里使用的是springboot环境进行的测试,所以在启动类上加了导入配置文件的,
BootServer.java
package com.my.template;

import org.springframework.boot.SpringApplication;
import org.springframework.boot.autoconfigure.SpringBootApplication;
import org.springframework.context.annotation.EnableAspectJAutoProxy;
import org.springframework.context.annotation.ImportResource;

/**
 * 启动类
 * @date 2022/6/3 21:32
 */
@SpringBootApplication()
@ImportResource(value = {"applicationContext.xml"})
public class BootServer {
    public static void main(String[] args) {
        try {
            SpringApplication.run(BootServer.class);
        }catch (Exception e){
            e.printStackTrace();
        }

    }
}
看下启动结果,
Caused by: org.springframework.beans.factory.BeanCreationException: Error creating bean with name 'org.springframework.aop.aspectj.AspectJPointcutAdvisor#0':
Cannot create inner bean '(inner bean)#14c01636' of type [org.springframework.aop.aspectj.AspectJMethodBeforeAdvice] while setting constructor argument;
nested exception is org.springframework.beans.factory.BeanCreationException: Error creating bean with name '(inner bean)#14c01636':
Lookup method resolution failed; nested exception is java.lang.IllegalStateException:
Failed to introspect Class [org.springframework.aop.aspectj.AbstractAspectJAdvice] from ClassLoader [sun.misc.Launcher$AppClassLoader@18b4aac2]
	at org.springframework.beans.factory.support.BeanDefinitionValueResolver.resolveInnerBean(BeanDefinitionValueResolver.java:389) ~[spring-beans-5.2.8.RELEASE.jar:5.2.8.RELEASE]
	at org.
可以看到启动报错,提示无法创建“org.springframework.aop.aspectj.AspectJMethodBeforeAdvice”,那就是说在applicationContext.xml中配置的,
<aop:aspect id="a" ref="log">
           <!--前置通知-->
            <aop:before method="before" pointcut-ref="p"></aop:before>
            <aop:after-returning method="after" pointcut-ref="p"></aop:after-returning>
        </aop:aspect>
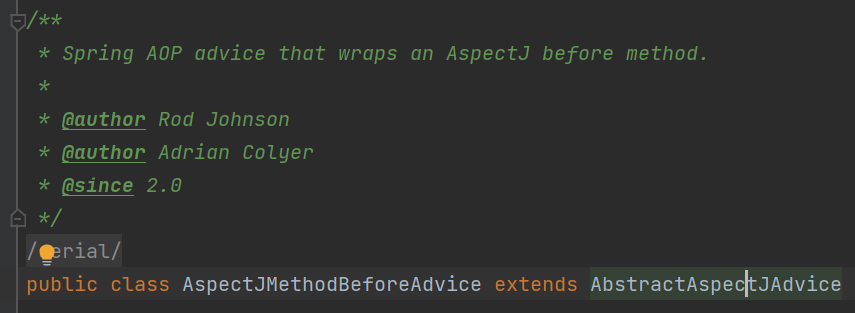
前缀通知失败,也就是说<aop:before>标签会被解析为AspectJ中的某些类,看下AspectJMethodBeforeAdvice

其类上注释有“Spring AOP advice that wraps an AspectJ before method”,也就是说这个类会包裹一个AspectJ的@Before通知的方法,看其父类AbstractAspectJAdvice,在该类中有对Aspect中类的引用,

所以这里需要引入AspectJ的依赖,也就是前边提到的,
<!--使用springAOP需要引入该依赖-->
        <dependency>
            <groupId>org.aspectj</groupId>
            <artifactId>aspectjweaver</artifactId>
            <version>1.8.13</version>
        </dependency>
再次启动项目无报错,测试结果如下,
2022-08-12 20:00:56.293  INFO 20708 --- [nio-9099-exec-1] o.s.web.servlet.DispatcherServlet        : Completed initialization in 4 ms
执行方法前
保存user对象到数据库:User{name='张三', id='1'}
执行方法后也就是说明配置的AOP成功了。有的小伙伴会说,使用springAOP必须要引入AspectJ的依赖吗,不是的。
2、不依赖AspectJ使用springAOP
前边,我们演示了使用XML的方式配置AOP,细心的小伙伴发现了这种方式依赖了AspectJ,那么有没有不使用AspectJ的,有的,springAOP提供了MethodBeforeAdvice、AfterReturningAdvice、MethodInterceptor、ThrowsAdvice可以分别对应@Before、@AfterReturning、@Around、@AfterThrowing,下面看不使用AspectJ怎么使用springAOP,
LogBeforeAdvice.java
package com.my.template.aop;

import org.springframework.aop.BeforeAdvice;
import org.springframework.aop.MethodBeforeAdvice;
import org.springframework.stereotype.Component;

import java.lang.reflect.Method;
/**
 * @date 2022/8/9 15:59
 */
@Component
public class LogBeforeAdvice implements MethodBeforeAdvice {
    @Override public void before(Method method, Object[] objects, Object o) throws Throwable {

        System.out.println("执行:"+o.getClass().getName()+"的"+method.getName()+"方法");
    }
}
另外一个,LogAfterAdvice.java
package com.my.template.aop;

import org.springframework.aop.AfterReturningAdvice;
import org.springframework.stereotype.Component;

import java.lang.reflect.Method;
/**
 * @date 2022/8/9 16:07
 */
@Component
public class LogAfterAdvice implements AfterReturningAdvice {
    @Override public void afterReturning(Object returnValue, Method method, Object[] args, Object target)
        throws Throwable {
        System.out.println("执行结束:"+target.getClass().getName()+"方法"+method.getName());
    }
}
上面定义了两个通知类,下面看具体配置,applicationContext.xml
<?xml version="1.0" encoding="UTF-8"?>
<beans xmlns:xsi="//www.w3.org/2001/XMLSchema-instance"
       xmlns:context="//www.springframework.org/schema/context"
       xmlns:aop="//www.springframework.org/schema/aop"
       xmlns="//www.springframework.org/schema/beans"
       xsi:schemaLocation="//www.springframework.org/schema/beans  //www.springframework.org/schema/beans/spring-beans-4.0.xsd
    //www.springframework.org/schema/context  //www.springframework.org/schema/context/spring-context-4.0.xsd
    //www.springframework.org/schema/aop //www.springframework.org/schema/aop/spring-aop-4.0.xsd"
       default-lazy-init="true">

    <description>Spring公共配置</description>

    <!--springAOP的配置-->
    <aop:config>
    <!--切点-->
        <aop:pointcut id="p" expression="execution(* com.my.template.service.UserService.*(..))"/>
        <!--通知-->
        <aop:advisor advice-ref="logBeforeAdvice" pointcut-ref="p"></aop:advisor>
        <aop:advisor advice-ref="logAfterAdvice" pointcut-ref="p"></aop:advisor>
    </aop:config>
</beans>
看下测试结果,
2022-08-13 14:39:13.124  INFO 25116 --- [nio-9099-exec-1] o.s.web.servlet.DispatcherServlet        : Completed initialization in 18 ms
执行:com.my.template.service.UserService的saveUser方法
保存user对象到数据库:User{name='张三', id='1'}
执行结束:com.my.template.service.UserService方法saveUser
看到上面的测试结果,大家明白了吧,同样可以不依赖AspectJ使用springAOP,但是有个不好的地方,那就是每次都需要实现相应的接口,也就是上面提到的MethodBeforeAdvice、AfterReturningAdvice、MethodInterceptor、ThrowsAdvice,不如使用AspectJ简单。
3、使用AspectJ注解
springAOP利用AspectJ的注解完成了其注解的功能,下面看下怎么使用,先定义一个切面(@Aspect),
LogAspect.java
package com.my.template.aop;

import org.aspectj.lang.JoinPoint;
import org.aspectj.lang.annotation.AfterReturning;
import org.aspectj.lang.annotation.Aspect;
import org.aspectj.lang.annotation.Before;
import org.aspectj.lang.annotation.Pointcut;
import org.springframework.stereotype.Component;

/**
 * @date 2022/8/11 14:12
 @Component注解不要忘,该注解的意思是将该切面交给spring管理
 */
@Component
@Aspect
public class LogAspect {
    /**切点
    */
    @Pointcut("execution(* com.my.template.service.UserService.*(..))")
    public void pointCut(){

    }
    /**前置通知
    */
    @Before(value = "pointCut()")
    public void before(JoinPoint joinPoint){
        System.out.println("方法执行前11");
    }
    /**后置通知
    */
    @AfterReturning(value = "pointCut()")
    public void after(JoinPoint joinPoint){
        System.out.println("方法执行后");
    }
}
上面是一个切面,看下怎么使用,如果是使用XML的方式,记得要在XML中配置如下,
applicationContext.xml
    <!-- 开启自动切面代理-->
<aop:aspectj-autoproxy/>此配置相当于@EnableAspectJAutoProxy,在springboot的环境中这两个都不需要配置,这是为什么?后边会讲
下面看我的启动类,

启动类上既没有引入applicationContext.xml也没用加@EnableAspectJAutoProxy,但是测试结果是,

从结果来看AOP起作用了。
三、总结
本文主要分享了AOP、springAOP、AspectJ三者的关系,以及springAOP在使用注解的过程中其实是借用了AspectJ的注解。另外还存有一个问题,springboot下需要使用@EnableAspectJAutoProxy注解吗,下期分享,敬请期待!


