使用Magisk+riru实现全局改机
前言
提到全局改机,我们想到修改的不是修改Android源码就是利用Xposed改机,前者成本太高,后者只能修改Java层的数据不够彻底。magisk是Android平台上功能强大的工具,利用它可以随心所欲的修改系统。它或许帮我们在不修改系统源码的情况实现相对完美的改机。那么,riru是什么?它和magisk有什么关系?它又和我们的模块有什么关系?简而言之,riru是magisk的模块,本文写的模块也是magisk模块,但是它又依赖于riru。那riru模块提供了什么功能呢?riru模块能够感知App的启动,并且能够给App注入一些代码,依赖riru模块的模块也能拥有这个能力。我们实现改机,其实就是需要尽早的感知App启动的,这样我们才能尽早hook一些函数,使App启动的时候获取到的数据是我们修改后的数据。了解了相关知识,我们就可以开始编写模块了。
准备
riru模块的作者写了riru模块的模板,我们在这个项目的基础上改就行,首先将模块克隆下来并使用Android Studio打开:
git clone //github.com/RikkaApps/Riru-ModuleTemplate
因为改机不仅要改Java层的数据,还要改Native层的数据,所以我们要用Native层的Hook框架,这里用的Hook框架是Dobby。作者编译了静态链接文件,我们去下载下来用即可://github.com/jmpews/Dobby/releases/tag/latest
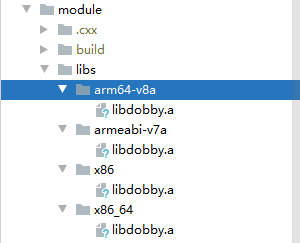
下载好后解压,将android目录里的子目录全部放入Riru-ModuleTemplate项目的module模块下的libs目录下(没有则创建),然后将文件夹重命名:
- arm64 -> arm64-v8a
- armv7 -> armeabi-v7a
修改后的目录结构应如下:
同时在module/src/main/cpp目录下创建一个dobby目录,然后去下载dobby.h文件,来放入该目录下。下载地址://github.com/jmpews/Dobby/blob/master/include/dobby.h
修改cmake文件,使编译的时候,把dobby的静态链接库也链接上。修改module/src/main/cpp/CMakeLists.txt
include_directories(
        dobby
)

add_library(local_dobby STATIC IMPORTED)

set_target_properties(local_dobby PROPERTIES IMPORTED_LOCATION ${CMAKE_CURRENT_SOURCE_DIR}/../../../libs/${ANDROID_ABI}/libdobby.a)

add_library(${MODULE_NAME} SHARED main.cpp ${CMAKE_CURRENT_BINARY_DIR}/config.cpp)
target_link_libraries(${MODULE_NAME} local_dobby log riru::riru)
准备工作完成,就可以开始编写代码了
编写代码
转到module/src/main/cpp/main.cpp文件,这是模块的核心代码文件,里面定义一些不太丰满的函数,等着我们去填补。
static void forkAndSpecializePost(JNIEnv *env, jclass clazz, jint res) {
    // Called "after" com_android_internal_os_Zygote_nativeForkAndSpecialize in frameworks/base/core/jni/com_android_internal_os_Zygote.cpp
    // "res" is the return value of com_android_internal_os_Zygote_nativeForkAndSpecialize

    if (res == 0) {
        // In app process

        // When unload allowed is true, the module will be unloaded (dlclose) by Riru
        // If this modules has hooks installed, DONOT set it to true, or there will be SIGSEGV
        // This value will be automatically reset to false before the "pre" function is called
        riru_set_unload_allowed(true);
    } else {
        // In zygote process
    }
}

static void specializeAppProcessPre(
        JNIEnv *env, jclass clazz, jint *uid, jint *gid, jintArray *gids, jint *runtimeFlags,
        jobjectArray *rlimits, jint *mountExternal, jstring *seInfo, jstring *niceName,
        jboolean *startChildZygote, jstring *instructionSet, jstring *appDataDir,
        jboolean *isTopApp, jobjectArray *pkgDataInfoList, jobjectArray *whitelistedDataInfoList,
        jboolean *bindMountAppDataDirs, jboolean *bindMountAppStorageDirs) {
    // Called "before" com_android_internal_os_Zygote_nativeSpecializeAppProcess in frameworks/base/core/jni/com_android_internal_os_Zygote.cpp
    // Parameters are pointers, you can change the value of them if you want
    // Some parameters are not exist is older Android versions, in this case, they are null or 0
}

static void specializeAppProcessPost(
        JNIEnv *env, jclass clazz) {
    // Called "after" com_android_internal_os_Zygote_nativeSpecializeAppProcess in frameworks/base/core/jni/com_android_internal_os_Zygote.cpp

    // When unload allowed is true, the module will be unloaded (dlclose) by Riru
    // If this modules has hooks installed, DONOT set it to true, or there will be SIGSEGV
    // This value will be automatically reset to false before the "pre" function is called
    riru_set_unload_allowed(true);
}

static void forkSystemServerPre(
        JNIEnv *env, jclass clazz, uid_t *uid, gid_t *gid, jintArray *gids, jint *runtimeFlags,
        jobjectArray *rlimits, jlong *permittedCapabilities, jlong *effectiveCapabilities) {
    // Called "before" com_android_internal_os_Zygote_forkSystemServer in frameworks/base/core/jni/com_android_internal_os_Zygote.cpp
    // Parameters are pointers, you can change the value of them if you want
    // Some parameters are not exist is older Android versions, in this case, they are null or 0
}

static void forkSystemServerPost(JNIEnv *env, jclass clazz, jint res) {
    // Called "after" com_android_internal_os_Zygote_forkSystemServer in frameworks/base/core/jni/com_android_internal_os_Zygote.cpp

    if (res == 0) {
        // In system server process
    } else {
        // In zygote process
    }
}

static void onModuleLoaded() {
    // Called when this library is loaded and "hidden" by Riru (see Riru's hide.cpp)

    // If you want to use threads, start them here rather than the constructors
    // __attribute__((constructor)) or constructors of static variables,
    // or the "hide" will cause SIGSEGV
}
函数名和注释都非常清晰,虽然函数很多,但是我们只需要在forkAndSpecializePost函数中编写hook代码就可以。因为我们要hook代码运行在App进程中
if (res == 0) {
// In app process

// When unload allowed is true, the module will be unloaded (dlclose) by Riru
// If this modules has hooks installed, DONOT set it to true, or there will be SIGSEGV
// This value will be automatically reset to false before the "pre" function is called
riru_set_unload_allowed(true);
}
当我们编写Native层代码的时候,想要获取当前手机的机型信息,最好的方式是通过调用__system_property_get来获取,那么我们可以hook这个函数。但在这之前,我们需要知道要修改哪个字段,这些字段又分别赋予什么值。那这些信息通过读取文件来得到好了,由模块使用者来定义,编写一个读取配置的函数:
void readPropFile(const char* filename,std::map<std::string,std::string> &map){
    FILE *fp = fopen(filename,"r");
    if(fp == NULL){
        return;
    }
    char buf[256];

    while(fgets(buf,256,fp) != NULL){
        char *sep = strchr(buf,'=');
        *sep = '\0';
        std::string key(buf);
        std::string value(sep + 1);
        map[key] = value;
    }
    fclose(fp);
}
readPropFile函数读取一个文件,然后将每一行等号前面的内容作为key,等号后面的内容作为value放入传进来的map,假设一个文件内容如下:
MODEL=Mi5
那么它读到的key是MODEL,value是Mi5
知道要修改成什么,就可以hook __system_property_get函数,下面是hook代码
static int my__system_property_get(const char* name, char* value){
    if(NULL == name || NULL == value){
        return origin__system_property_get(name,value);
    }
    auto ret = propMap.find(name);
    if(ret != propMap.end()){

        const char* valueChs = ret->second.c_str();
        strcpy(value,valueChs);
        return strlen(valueChs);
    }
    return origin__system_property_get(name,value);
}

void initDobby(){
    void* sym = DobbySymbolResolver(NULL,"__system_property_get");
    if(NULL != sym) {
        DobbyHook(sym, (void *) my__system_property_get, (void **) &origin__system_property_get);
    }
}
其中:
- DobbySymbolResolver 是寻找函数符号地址
- DobbyHook 是启用hook的函数
- my__system_property_get 是跳板函数,就是原函数被调用时会调用的函数
- origin__system_property_get 是原函数的地址
Hook代码编写完成后,在forkAndSpecializePost函数中调用initDobby函数开始我们的hook
static void forkAndSpecializePost(JNIEnv *env, jclass clazz, jint res) {
    // Called "after" com_android_internal_os_Zygote_nativeForkAndSpecialize in frameworks/base/core/jni/com_android_internal_os_Zygote.cpp
    // "res" is the return value of com_android_internal_os_Zygote_nativeForkAndSpecialize
        LOGE("forkAndSpecializePost");

    if (res == 0) {
        // In app process
        readPropFile(PROP_CONF_PATH,propMap);
        initDobby();
        // When unload allowed is true, the module will be unloaded (dlclose) by Riru
        // If this modules has hooks installed, DONOT set it to true, or there will be SIGSEGV
        // This value will be automatically reset to false before the "pre" function is called
        riru_set_unload_allowed(false);
    } else {
        // In zygote process
    }
}
注意:riru_set_unload_allowed(false);这一行,注释明确写道如果要进行hook必须设为false,不然会崩溃,事实也确实如此。
hook了native层的函数,实现修改层的机型数据,还需要修改Java层的数据,Java层的机型信息我们只要修改android.os.Build类的字段。而这些字段不用Hook,直接设置即可。
static void setBuild(JNIEnv* env){
    jclass BuildClass = env->FindClass("android/os/Build");
    std::map<std::string,std::string>::iterator it;
    for(it = buildMap.begin();it != buildMap.end();it++){
        jstring key = env->NewStringUTF(it->first.c_str());
        jstring value = env->NewStringUTF(it->second.c_str());
        jfieldID buildField = env->GetStaticFieldID(BuildClass,it->first.c_str(),"Ljava/lang/String;");
        if(env->ExceptionCheck()){
            env->ExceptionClear();
            continue;
        }
        env->SetStaticObjectField(BuildClass,buildField,value);
        if(env->ExceptionCheck()){
            env->ExceptionClear();
        }
    }
}
注意:在编写代码时要十分注意,如果代码崩溃,会导致手机无法开机。
这样我们的代码基本写完了
配置模块信息
上文我们提到过,我们编写的模块虽然是依赖riru模块,但是它本质也是Magisk模块。那么它也会有它的名字,版本,说明,作者信息等,然而这些是由我们开发者去配置的
这些配置信息可以在Riru-ModuleTemplate项目的module.gradle中配置,这个文件的模板在module.example.gradle,可以将module.example.gradle重命名为module.gradle然后进一步修改
ext {
    /*
       This name will be used in the name of the so file ("lib${moduleLibraryName}.so").
    */
    moduleLibraryName = "template"

    /* Minimal supported Riru API version, used in the version check of riru.sh */
    moduleMinRiruApiVersion = 24

    /* The version name of minimal supported Riru, used in the version check of riru.sh */
    moduleMinRiruVersionName = "v24.0.0"

    /* Maximum supported Riru API version, used in the version check of riru.sh */
    moduleRiruApiVersion = 26

    /*
       Magisk module ID
       Since Magisk use it to distinguish different modules, you should never change it.

       Note, the older version of the template uses '-' instead of '_', if your are upgrading from
       the older version, please pay attention.
    */
    magiskModuleId = "riru_template"

    moduleName = "Template"
    moduleAuthor = "Template"
    moduleDescription = "Riru module template. Requires Riru $moduleMinRiruVersionName or above."
    moduleVersion = "v26.0.0"
    moduleVersionCode = 26
}
编译
Riru-ModuleTemplate项目编译需要Jdk11以上,装好后在项目的根目录执行:
gradlew :module:assembleRelease
如果没有错误,就会在项目的out目录生成一个zip文件,这个就是我们编译好的magisk模块
刷入模块
在手机上,安装Magisk和riru模块,安装后,将编译好的模块zip文件推入手机,在MagiskManager中安装我们的模块:

效果
安装后,重启手机。打开MagiskManager看到我们的模块已正常启用:
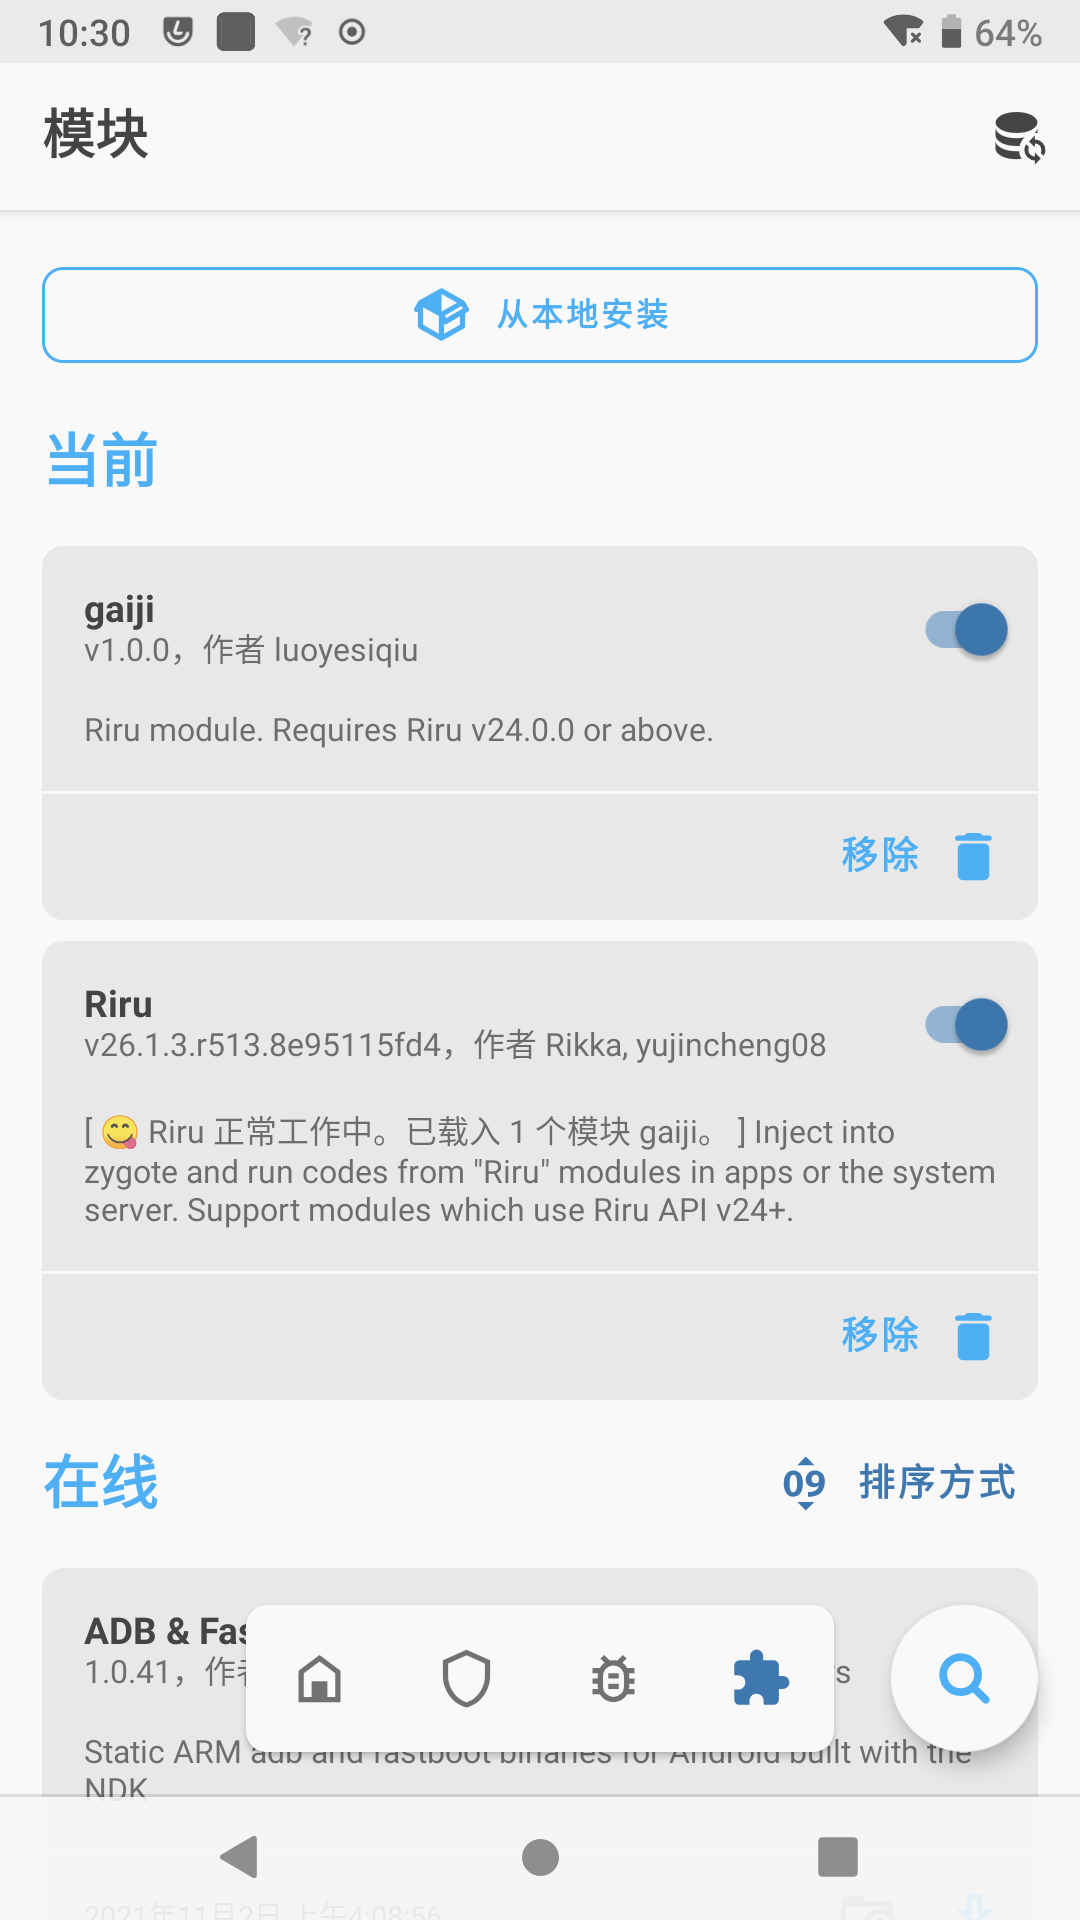
去AIDA看看效果:
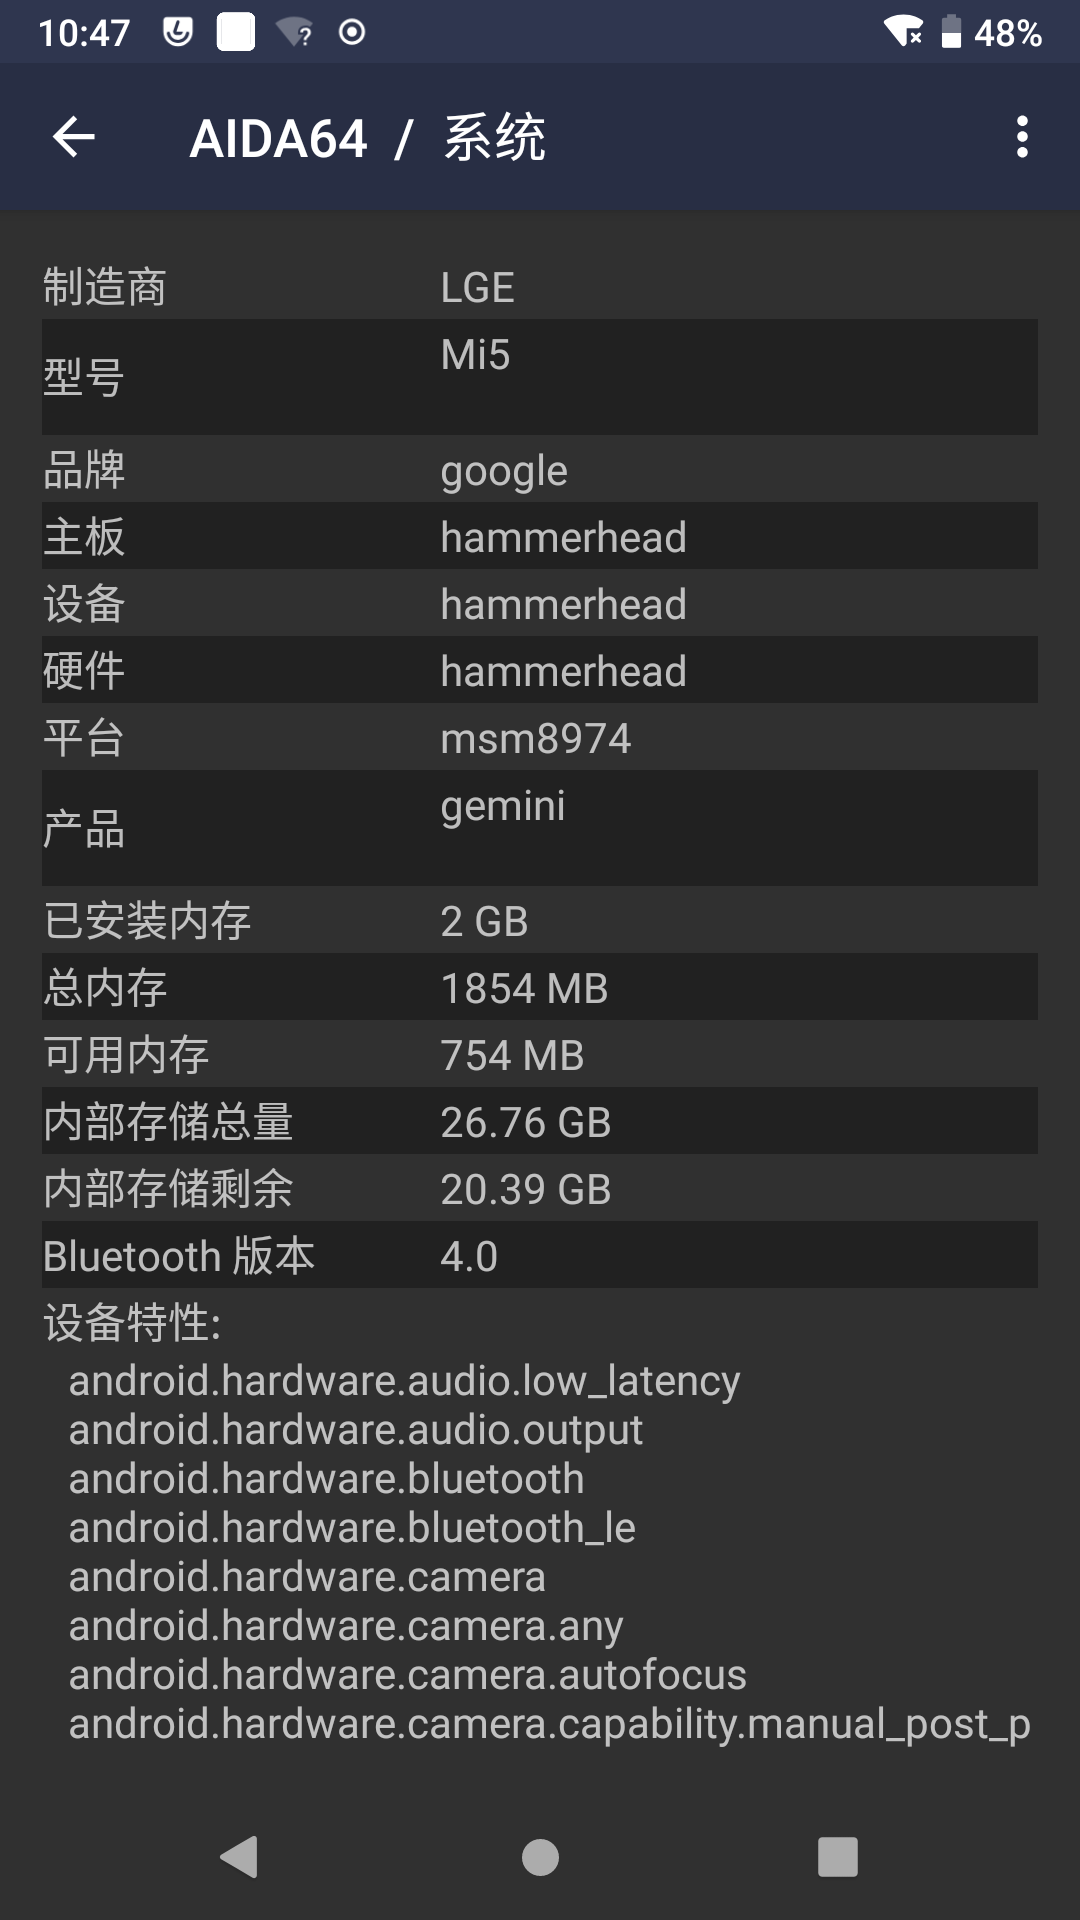
机型已经被我们修改,说明改机生效了。最后附上我写的改机模块://github.com/luoyesiqiu/Riru-gaiji


