yolo3各部分代码详解(超详细)
- 2020 年 3 月 13 日
- 筆記
0.摘要
最近一段时间在学习yolo3,看了很多博客,理解了一些理论知识,但是学起来还是有些吃力,之后看了源码,才有了更进一步的理解。在这里,我不在赘述网络方面的代码,网络方面的代码比较容易理解,下面将给出整个yolo3代码的详解解析,整个源码中函数的作用以及调用关系见下图:

1.model.py
1.1 yolo_head()
yolo_head()函数的输入是Darknet53的最后输出的三个特征图feats,anchors,num_class,input_shpe,此函数的功能是将特征图的进行解码,这一步极为重要,如其中一个特征图的shape是(13,13,255),其实质就是对应着(13,13,3,85),分别对应着13*13个网格,每个网格3个anchors,85=(x,y,w,h,confident),此时box的xy是相对于网格的偏移量,所以还需要经过一些列的处理,处理方式见下图:
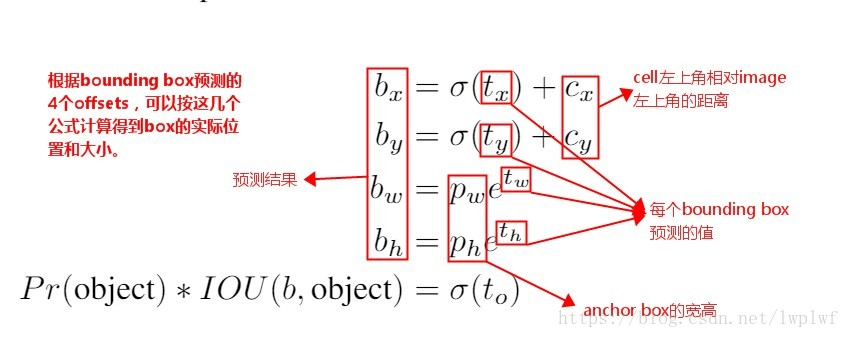
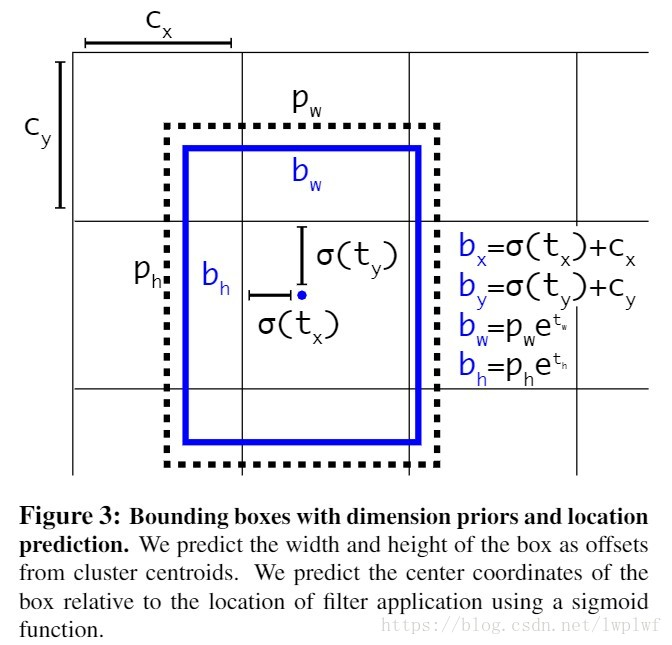
def yolo_head(feats, anchors, num_classes, input_shape, calc_loss=False): """Convert final layer features to bounding box parameters.""" num_anchors = len(anchors)#num_anchors=3 # Reshape to batch, height, width, num_anchors, box_params. anchors_tensor = K.reshape(K.constant(anchors), [1, 1, 1, num_anchors, 2]) #anchors=anchors[anchors_mask[1]]=anchors[[6,7,8]]= [116,90], [156,198], [373,326] """#通过arange、reshape、tile的组合,根据grid_shape(13x13、26x26或52x52)创建y轴的0~N-1的组合grid_y,再创建x轴的0~N-1的组合grid_x,将两者拼接concatenate,形成NxN的grid(13x13、26x26或52x52)""" grid_shape = K.shape(feats)[1:3] # height, width,#13x13或26x26或52x52 grid_y = K.tile(K.reshape(K.arange(0, stop=grid_shape[0]), [-1, 1, 1, 1]), [1, grid_shape[1], 1, 1]) grid_x = K.tile(K.reshape(K.arange(0, stop=grid_shape[1]), [1, -1, 1, 1]), [grid_shape[0], 1, 1, 1]) grid = K.concatenate([grid_x, grid_y]) grid = K.cast(grid, K.dtype(feats)) #cast函数用法:cast(x, dtype, name=None),x:待转换的张量,type:需要转换成什么类型 """grid形式:(0,0),(0,1),(0,2)......(1,0),(1,1).....(12,12)""" feats = K.reshape( feats, [-1, grid_shape[0], grid_shape[1], num_anchors, num_classes + 5]) """(batch_size,13,13,3,85)""" "此时的xy为中心坐标,相对于左上角的中心坐标" # Adjust preditions to each spatial grid point and anchor size. """将预测值调整为真实值""" "将中心点相对于网格的坐标转换成在整张图片中的坐标,相对于13/26/52的相对坐标" "将wh转换成预测框的wh,并处以416归一化" box_xy = (K.sigmoid(feats[..., :2]) + grid) / K.cast(grid_shape[::-1], K.dtype(feats))#实际上就是除以13或26或52 #box_xy = (K.sigmoid(feats[:,:,:,:2]) + grid) / K.cast(grid_shape[::-1], K.dtype(feats)) # ...操作符,在Python中,“...”(ellipsis)操作符,表示其他维度不变,只操作最前或最后1维; box_wh = K.exp(feats[..., 2:4]) * anchors_tensor / K.cast(input_shape[::-1], K.dtype(feats)) box_confidence = K.sigmoid(feats[..., 4:5]) box_class_probs = K.sigmoid(feats[..., 5:]) #切片省略号的用法,省略前面左右的冒号,参考博客:https://blog.csdn.net/z13653662052/article/details/78010654?depth_1-utm_source=distribute.pc_relevant.none-task&utm_source=distribute.pc_relevant.none-task if calc_loss == True: return grid, feats, box_xy, box_wh return box_xy, box_wh, box_confidence, box_class_probs #预测框相对于整张图片中心点的坐标与预测框的wh
1.2 yolo_correct_box()
此函数的功能是将yolo_head()输出,也即是box相对于整张图片的中心坐标转换成box的左上角右下角的坐标
1 def yolo_correct_boxes(box_xy, box_wh, input_shape, image_shape): 2 '''Get corrected boxes''' 3 '''对上面函数输出的预测的坐标进行修正 4 比如 5 image_shape 6 为[600,800],input_shape 7 为[300, 500],那么 8 new_shape 9 为[300, 400] 10 11 offset 12 为[0, 0.125] 13 scales 14 为[0.5, 0.625]''' 15 16 17 # 将box_xy, box_wh转换为输入图片上的真实坐标,输出boxes是框的左下、右上两个坐标(y_min, x_min, y_max, x_max) 18 # ...操作符,在Python中,“...”(ellipsis)操作符,表示其他维度不变,只操作最前或最后1维; 19 # np.array[i:j:s],当s<0时,i缺省时,默认为-1;j缺省时,默认为-len(a)-1;所以array[::-1]相当于array[-1:-len(a)-1:-1],也就是从最后一个元素到第一个元素复制一遍,即倒序 20 box_yx = box_xy[..., ::-1]#将xy坐标进行交换,反序(y,x) 21 box_hw = box_wh[..., ::-1] 22 input_shape = K.cast(input_shape, K.dtype(box_yx)) 23 image_shape = K.cast(image_shape, K.dtype(box_yx)) 24 new_shape = K.round(image_shape * K.min(input_shape/image_shape)) 25 #.round用于取近似值,保留几位小数,第一个参数是一个浮点数,第二个参数是保留的小数位数,可选,如果不写的话默认保留到整数 26 offset = (input_shape-new_shape)/2./input_shape 27 scale = input_shape/new_shape 28 box_yx = (box_yx - offset) * scale 29 box_hw *= scale 30 """获得预测框的左上角与右下角的坐标""" 31 box_mins = box_yx - (box_hw / 2.) 32 box_maxes = box_yx + (box_hw / 2.) 33 boxes = K.concatenate([ 34 box_mins[..., 0:1], # y_min 35 box_mins[..., 1:2], # x_min 36 box_maxes[..., 0:1], # y_max 37 box_maxes[..., 1:2] # x_max 38 ])#...操作符,在Python中,“...”(ellipsis)操作符,表示其他维度不变,只操作最前或最后1维; 39 40 # Scale boxes back to original image shape. 41 boxes *= K.concatenate([image_shape, image_shape]) 42 return boxes#得到预测框的左下角坐标与右上角坐标
1.3 yolo_box_and_score
获得box与得分
1 def yolo_boxes_and_scores(feats, anchors, num_classes, input_shape, image_shape): 2 '''Process Conv layer output''' 3 box_xy, box_wh, box_confidence, box_class_probs = yolo_head(feats, 4 anchors, num_classes, input_shape) 5 boxes = yolo_correct_boxes(box_xy, box_wh, input_shape, image_shape) 6 boxes = K.reshape(boxes, [-1, 4])#reshape,将不同网格的值转换为框的列表。即(?,13,13,3,4)->(?,4) ?:框的数目 7 box_scores = box_confidence * box_class_probs 8 box_scores = K.reshape(box_scores, [-1, num_classes])#reshape,将框的得分展平,变为(?,80); ?:框的数目 9 return boxes, box_scores#返回预测框的左下角与右上角的坐标与得分
1.4 yolo_eval()
此函数的作用是删除冗余框,保留最优框,用到非极大值抑制算法
1 def yolo_eval(yolo_outputs, 2 anchors, 3 num_classes, 4 image_shape, 5 max_boxes=20, 6 score_threshold=.6, 7 iou_threshold=.5): 8 """Evaluate YOLO model on given input and return filtered boxes.""" 9 """ yolo_outputs #模型输出,格式如下【(?,13,13,255)(?,26,26,255)(?,52,52,255)】 ?:bitch size; 13-26-52:多尺度预测; 255:预测值(3*(80+5)) 10 anchors, #[(10,13), (16,30), (33,23), (30,61), (62,45), (59,119), (116,90), (156,198),(373,326)] 11 num_classes, # 类别个数,coco集80类 12 image_shape, #placeholder类型的TF参数,默认(416, 416); 13 max_boxes=20, #每张图每类最多检测到20个框同类别框的IoU阈值,大于阈值的重叠框被删除,重叠物体较多,则调高阈值,重叠物体较少,则调低阈值 14 score_threshold=.6, #框置信度阈值,小于阈值的框被删除,需要的框较多,则调低阈值,需要的框较少,则调高阈值; 15 iou_threshold=.5): #同类别框的IoU阈值,大于阈值的重叠框被删除,重叠物体较多,则调高阈值,重叠物体较少,则调低阈值""" 16 num_layers = len(yolo_outputs)# #yolo的输出层数;num_layers = 3 -> 13-26-52 17 anchor_mask = [[6,7,8], [3,4,5], [0,1,2]] if num_layers==3 else [[3,4,5], [1,2,3]] # default setting 18 # 每层分配3个anchor box.如13*13分配到[6,7,8]即[(116,90)(156,198)(373,326)] 19 input_shape = K.shape(yolo_outputs[0])[1:3] * 32 20 # 输入shape(?,13,13,255);即第一维和第二维分别*32 ->13*32=416; input_shape:(416,416) 21 #yolo_outputs=[(batch_size,13,13,255),(batch_size,26,26,255),(batch_size,52,52,255)] 22 #input_shape=416*416 23 boxes = [] 24 box_scores = [] 25 for l in range(num_layers): 26 _boxes, _box_scores = yolo_boxes_and_scores(yolo_outputs[l], 27 anchors[anchor_mask[l]], num_classes, input_shape, image_shape) 28 boxes.append(_boxes) 29 box_scores.append(_box_scores) 30 boxes = K.concatenate(boxes, axis=0) 31 box_scores = K.concatenate(box_scores, axis=0) #K.concatenate:将数据展平 ->(?,4) 32 33 #可能会产生很多个预选框,需要经过(1)阈值的删选,(2)非极大值抑制的删选 34 mask = box_scores >= score_threshold#得分大于置信度为True,否则为Flase 35 max_boxes_tensor = K.constant(max_boxes, dtype='int32') 36 boxes_ = [] 37 scores_ = [] 38 classes_ = [] 39 """ 40 # ---------------------------------------# 41 # 1、取出每一类得分大于score_threshold 42 # 的框和得分 43 # 2、对得分进行非极大抑制 44 # ---------------------------------------# 45 # 对每一个类进行判断""" 46 for c in range(num_classes): 47 # TODO: use keras backend instead of tf. 48 class_boxes = tf.boolean_mask(boxes, mask[:, c])#将输入的数组挑出想要的数据输出,将得分大于阈值的坐标挑选出来 49 #将第c类中得分大于阈值的坐标挑选出来 50 class_box_scores = tf.boolean_mask(box_scores[:, c], mask[:, c]) 51 # 将第c类中得分大于阈值的框挑选出来 52 """非极大值抑制部分""" 53 # 非极大抑制,去掉box重合程度高的那一些 54 """原理:(1)从最大概率矩形框F开始,分别判断A~E与F的重叠度IOU是否大于某个设定的阈值; 55 56 (2)假设B、D与F的重叠度超过阈值,那么就扔掉B、D;并标记第一个矩形框F,是我们保留下来的。 57 58 (3)从剩下的矩形框A、C、E中,选择概率最大的E,然后判断E与A、C的重叠度,重叠度大于一定的阈值,那么就扔掉;并标记E是我们保留下来的第二个矩形框。 59 60 就这样一直重复,找到所有被保留下来的矩形框。""" 61 nms_index = tf.image.non_max_suppression( 62 class_boxes, class_box_scores, max_boxes_tensor, iou_threshold=iou_threshold) 63 class_boxes = K.gather(class_boxes, nms_index) 64 class_box_scores = K.gather(class_box_scores, nms_index) 65 classes = K.ones_like(class_box_scores, 'int32') * c#将class_box_scores中的数变成1 66 boxes_.append(class_boxes) 67 scores_.append(class_box_scores) 68 classes_.append(classes) 69 boxes_ = K.concatenate(boxes_, axis=0) 70 scores_ = K.concatenate(scores_, axis=0) 71 classes_ = K.concatenate(classes_, axis=0) 72 #return 经过非极大值抑制保留下来的一个框 73 74 return boxes_, scores_, classes_
1.5 preprocess_true_box()
1 def preprocess_true_boxes(true_boxes, input_shape, anchors, num_classes): 2 ''' 3 在preprocess_true_boxes中,输入: 4 5 true_boxes:检测框,批次数16,最大框数20,每个框5个值,4个边界点和1个类别序号,如(16, 20, 5); 6 input_shape:图片尺寸,如(416, 416); 7 anchors:anchor box列表; 8 num_classes:类别的数量; 9 Preprocess true boxes to training input format 10 11 Parameters 12 ---------- 13 true_boxes: array, shape=(m, T, 5) 14 Absolute x_min, y_min, x_max, y_max, class_id relative to input_shape. 15 input_shape: array-like, hw, multiples of 32 16 anchors: array, shape=(N, 2), wh 17 num_classes: integer 18 19 Returns 20 ------- 21 y_true: list of array, shape like yolo_outputs, xywh are reletive value 22 23 ''' 24 # 检查有无异常数据 即txt提供的box id 是否存在大于 num_class的情况 25 # true_boxes.shape = (图片张数,每张图片box个数,5)(5是左上右下点坐标加上类别下标) 26 assert (true_boxes[..., 4]<num_classes).all(), 'class id must be less than num_classes' 27 num_layers = len(anchors)//3 # default setting 28 anchor_mask = [[6,7,8], [3,4,5], [0,1,2]] if num_layers==3 else [[3,4,5], [1,2,3]] 29 30 true_boxes = np.array(true_boxes, dtype='float32') 31 input_shape = np.array(input_shape, dtype='int32') # [416 416] shape(2,) 32 # 将每个box的左上点和右下点坐标相加除2,即取中点! 33 """计算true_boxes: 34 35 true_boxes:真值框,左上和右下2个坐标值和1个类别,如[184, 299, 191, 310, 0.0],结构是(16, 20, 5),16是批次数,20是框的最大数,5是框的5个值; 36 boxes_xy:xy是box的中心点,结构是(16, 20, 2); 37 boxes_wh:wh是box的宽和高,结构也是(16, 20, 2); 38 input_shape:输入尺寸416x416; 39 true_boxes:第0和1位设置为xy,除以416,归一化,第2和3位设置为wh,除以416,归一化,如[0.449, 0.730, 0.016, 0.026, 0.0]。""" 40 boxes_xy = (true_boxes[..., 0:2] + true_boxes[..., 2:4]) // 2 41 # 得到box宽高 42 boxes_wh = true_boxes[..., 2:4] - true_boxes[..., 0:2] 43 # 中心坐标 和 宽高 都变成 相对于input_shape的比例 44 true_boxes[..., 0:2] = boxes_xy/input_shape[::-1] 45 true_boxes[..., 2:4] = boxes_wh/input_shape[::-1] 46 # 这个m应该是batch的大小 即是输入图片的数量 47 m = true_boxes.shape[0] 48 # grid_shape [13,13 ] [26,26] [52,52] 49 grid_shapes = [input_shape//{0:32, 1:16, 2:8}[l] for l in range(num_layers)] 50 #y_true是全0矩阵(np.zeros)列表,即[(16,13,13,3,6), (16,26,26,3,6), (16,52,52,3,6)] 51 y_true = [np.zeros((m,grid_shapes[l][0],grid_shapes[l][1],len(anchor_mask[l]),5+num_classes), 52 dtype='float32') for l in range(num_layers)] 53 # y_true m*13*13*3*(5+num_clasess) 54 # m*26*26*3*(5+num_classes) 55 # m*52*52*3*(5+num_classes) 56 # Expand dim to apply broadcasting. 57 58 # Expand dim to apply broadcasting. 59 #在原先axis出添加一个维度,由(9,2)转为(1,9,2) 60 anchors = np.expand_dims(anchors, 0) 61 # 网格中心为原点(即网格中心坐标为 (0,0) ), 计算出anchor 右下角坐标 62 anchor_maxes = anchors / 2. 63 #计算出左上标 64 anchor_mins = -anchor_maxes 65 # 去掉异常数据 66 valid_mask = boxes_wh[..., 0]>0 67 68 for b in range(m): 69 # Discard zero rows. 70 wh = boxes_wh[b, valid_mask[b]] 71 if len(wh)==0: continue 72 # Expand dim to apply broadcasting. 73 wh = np.expand_dims(wh, -2) 74 box_maxes = wh / 2. 75 box_mins = -box_maxes 76 # # 假设 bouding box 的中心也位于网格的中心 77 78 """计算标注框box与anchor box的iou值,计算方式很巧妙: 79 80 box_mins的shape是(7,1,2),anchor_mins的shape是(1,9,2),intersect_mins的shape是(7,9,2),即两两组合的值; 81 intersect_area的shape是(7,9); 82 box_area的shape是(7,1); 83 anchor_area的shape是(1,9); 84 iou的shape是(7,9); 85 IoU数据,即anchor box与检测框box,两两匹配的iou值""" 86 intersect_mins = np.maximum(box_mins, anchor_mins)#逐位比较 87 intersect_maxes = np.minimum(box_maxes, anchor_maxes) 88 intersect_wh = np.maximum(intersect_maxes - intersect_mins, 0.) 89 intersect_area = intersect_wh[..., 0] * intersect_wh[..., 1]#宽*高 90 box_area = wh[..., 0] * wh[..., 1] 91 anchor_area = anchors[..., 0] * anchors[..., 1] 92 iou = intersect_area / (box_area + anchor_area - intersect_area) 93 94 # Find best anchor for each true box 95 best_anchor = np.argmax(iou, axis=-1) 96 97 """设置y_true的值: 98 99 t是box的序号;n是最优anchor的序号;l是层号; 100 如果最优anchor在层l中,则设置其中的值,否则默认为0; 101 true_boxes是(16, 20, 5),即批次、box数、框值; 102 true_boxes[b, t, 0],其中b是批次序号、t是box序号,第0位是x,第1位是y; 103 grid_shapes是3个检测图的尺寸,将归一化的值,与框长宽相乘,恢复为具体值; 104 k是在anchor box中的序号; 105 c是类别,true_boxes的第4位; 106 将xy和wh放入y_true中,将y_true的第4位框的置信度设为1,将y_true第5~n位的类别设为1;""" 107 for t, n in enumerate(best_anchor): 108 # 遍历anchor 尺寸 3个尺寸 109 # 因为此时box 已经和一个anchor box匹配上,看这个anchor box属于那一层,小,中,大,然后将其box分配到那一层 110 for l in range(num_layers): 111 if n in anchor_mask[l]: 112 #因为grid_shape格式是hw所以是x*grid_shapes[l][1]=x*w,求出对应所在网格的横坐标,这里的x是相对于整张图片的相对坐标, 113 # 是在原先坐标上除以了w,所以现在要乘以w 114 i = np.floor(true_boxes[b,t,0]*grid_shapes[l][1]).astype('int32') 115 #np.around 四舍五入 116 #np.floor向下取整 117 #np.ceil向上取整 118 #np.where条件选取 119 # np.floor 返回不大于输入参数的最大整数。 即对于输入值 x ,将返回最大的整数 i ,使得 i <= x。 120 # true_boxes x,y,w,h, 此时x y w h都是相对于整张图像的 121 # 第b个图像 第 t个 bounding box的 x 乘以 第l个grid shap的x(grid shape 格式是hw, 122 # 因为input_shape格式是hw) 123 # 找到这个bounding box落在哪个cell的中心 124 #i,j是所在网格的位置 125 j = np.floor(true_boxes[b,t,1]*grid_shapes[l][0]).astype('int32') 126 # 找到n 在 anchor_box的索引位置 127 k = anchor_mask[l].index(n) 128 # 得到box的id 129 c = true_boxes[b,t, 4].astype('int32') 130 # 第b个图像 第j行 i列 第k个anchor x,y,w,h,confindence,类别概率 131 y_true[l][b, j, i, k, 0:4] = true_boxes[b,t, 0:4] 132 y_true[l][b, j, i, k, 4] = 1 133 # 置信度是1 因为含有目标 134 y_true[l][b, j, i, k, 5+c] = 1 135 # 类别的one-hot编码 136 137 return y_true
1.6 yolo_loss
此函数定义损失函数,损失函数包括三个部分,坐标损失,置信度损失,类别损失:
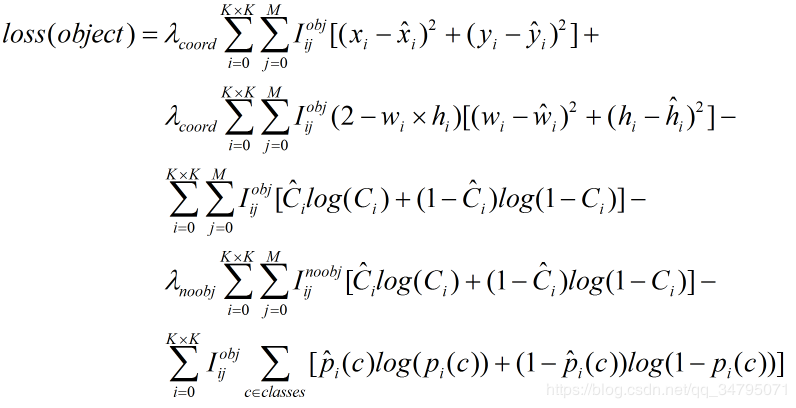
1 def yolo_loss(args, anchors, num_classes, ignore_thresh=.5, print_loss=False): 2 """true_boxes : 实际框的位置和类别,我们的输入。三个维度: 3 第一个维度:图片张数 4 第二个维度:一张图片中有几个实际框 5 第三个维度: [x, y, w, h, class],x,y 是实际框的中心点坐标,w,h 是框的宽度和高度。x,y,w,h 均是除以图片分辨率得到的[0,1]范围的值。 6 anchors : 实际anchor boxes 的值,论文中使用了五个。[w,h],都是相对于gird cell 长宽的比值。二个维度: 7 第一个维度:anchor boxes的数量,这里是5 8 第二个维度:[w,h],w,h,都是相对于gird cell 长宽的比值。 9 """ 10 '''Return yolo_loss tensor 11 12 Parameters 13 ---------- 14 yolo_outputs: list of tensor, the output of yolo_body or tiny_yolo_body 15 y_true: list of array, the output of preprocess_true_boxes 16 anchors: array, shape=(N, 2), wh 17 num_classes: integer 18 ignore_thresh: float, the iou threshold whether to ignore object confidence loss 19 20 Returns 21 ------- 22 loss: tensor, shape=(1,) 23 24 ''' 25 num_layers = len(anchors)//3 # default setting 26 yolo_outputs = args[:num_layers] 27 y_true = args[num_layers:] 28 anchor_mask = [[6,7,8], [3,4,5], [0,1,2]] if num_layers==3 else [[3,4,5], [1,2,3]] 29 input_shape = K.cast(K.shape(yolo_outputs[0])[1:3] * 32, K.dtype(y_true[0])) 30 grid_shapes = [K.cast(K.shape(yolo_outputs[l])[1:3], K.dtype(y_true[0])) for l in range(num_layers)] 31 loss = 0 32 m = K.shape(yolo_outputs[0])[0] # batch size, tensor 33 mf = K.cast(m, K.dtype(yolo_outputs[0])) 34 35 for l in range(num_layers): 36 object_mask = y_true[l][..., 4:5]#置信度 37 true_class_probs = y_true[l][..., 5:]#类别 38 39 grid, raw_pred, pred_xy, pred_wh = yolo_head(yolo_outputs[l], 40 anchors[anchor_mask[l]], num_classes, input_shape, calc_loss=True) 41 pred_box = K.concatenate([pred_xy, pred_wh]) 42 43 # Darknet raw box to calculate loss. 44 # 这是对x,y,w,b转换公式的反变换 45 raw_true_xy = y_true[l][..., :2]*grid_shapes[l][::-1] - grid 46 raw_true_wh = K.log(y_true[l][..., 2:4] / anchors[anchor_mask[l]] * input_shape[::-1]) 47 # 这部操作是避免出现log(0) = 负无穷,故当object_mask置信率接近0是返回全0结果 48 # K.switch(条件函数,返回值1,返回值2)其中1,2要等shape 49 raw_true_wh = K.switch(object_mask, raw_true_wh, K.zeros_like(raw_true_wh)) # avoid log(0)=-inf 50 #提升针对小物体的小技巧:针对 YOLOv3来说,regression损失会乘一个(2-w*h)的比例系数, 51 # w 和 h 分别是ground truth 的宽和高。如果不减去 w*h,AP 会有一个明显下降。如果继续往上加,如 (2-w*h)*1.5,总体的 AP 还会涨一个点左右(包括验证集和测试集),大概是因为 COCO 中小物体实在太多的原因。 52 53 box_loss_scale = 2 - y_true[l][...,2:3]*y_true[l][...,3:4] 54 55 # Find ignore mask, iterate over each of batch. 56 ignore_mask = tf.TensorArray(K.dtype(y_true[0]), size=1, dynamic_size=True) 57 object_mask_bool = K.cast(object_mask, 'bool') 58 ##将真实标定的数据置信率转换为T or F的掩膜 59 60 def loop_body(b, ignore_mask): 61 true_box = tf.boolean_mask(y_true[l][b,...,0:4], object_mask_bool[b,...,0])#挑选出置信度大于0的框的相应的坐标,truebox形式为中心坐标xy与hw 62 63 iou = box_iou(pred_box[b], true_box)#计算iou,pre_box是通过yolo_head解码之后的xywh 64 best_iou = K.max(iou, axis=-1)#选取最大iou的 65 ignore_mask = ignore_mask.write(b, K.cast(best_iou<ignore_thresh, K.dtype(true_box))) 66 return b+1, ignore_mask 67 _, ignore_mask = K.control_flow_ops.while_loop(lambda b,*args: b<m, loop_body, [0, ignore_mask]) 68 ignore_mask = ignore_mask.stack()#将一个列表中维度数目为R的张量堆积起来形成维度为R+1的新张量 69 ignore_mask = K.expand_dims(ignore_mask, -1) 70 71 # K.binary_crossentropy is helpful to avoid exp overflow. 72 xy_loss = object_mask * box_loss_scale * K.binary_crossentropy(raw_true_xy, raw_pred[...,0:2], from_logits=True) 73 wh_loss = object_mask * box_loss_scale * 0.5 * K.square(raw_true_wh-raw_pred[...,2:4]) 74 confidence_loss = object_mask * K.binary_crossentropy(object_mask, raw_pred[...,4:5], from_logits=True)+ 75 (1-object_mask) * K.binary_crossentropy(object_mask, raw_pred[...,4:5], from_logits=True) * ignore_mask 76 class_loss = object_mask * K.binary_crossentropy(true_class_probs, raw_pred[...,5:], from_logits=True) 77 78 xy_loss = K.sum(xy_loss) / mf 79 wh_loss = K.sum(wh_loss) / mf 80 confidence_loss = K.sum(confidence_loss) / mf 81 class_loss = K.sum(class_loss) / mf 82 loss += xy_loss + wh_loss + confidence_loss + class_loss 83 if print_loss: 84 loss = tf.Print(loss, [loss, xy_loss, wh_loss, confidence_loss, class_loss, K.sum(ignore_mask)], message='loss: ') 85 return loss
2.train.py
整个训练分为两个阶段,第一个阶段为0~50epoch,训练最后的loss层,前面的层被冻结,第二个阶段为50~100个epoch训练前面的层
1 def _main(): 2 annotation_path = '2007_train.txt' 3 log_dir = 'logs/000/' 4 classes_path = 'model_data/voc_classes.txt' 5 anchors_path = 'model_data/yolo_anchors.txt' 6 class_names = get_classes(classes_path) 7 num_classes = len(class_names) 8 anchors = get_anchors(anchors_path) 9 10 input_shape = (416,416) # multiple of 32, hw 11 12 is_tiny_version = len(anchors)==6 # default setting 13 if is_tiny_version: 14 model = create_tiny_model(input_shape, anchors, num_classes, 15 freeze_body=2, weights_path='model_data/tiny_yolo_weights.h5') 16 else: 17 model = create_model(input_shape, anchors, num_classes, 18 freeze_body=2, weights_path='model_data/yolo_weights.h5') # make sure you know what you freeze 19 20 logging = TensorBoard(log_dir=log_dir) 21 checkpoint = ModelCheckpoint(log_dir + 'ep{epoch:03d}-loss{loss:.3f}-val_loss{val_loss:.3f}.h5', 22 monitor='val_loss', save_weights_only=True, save_best_only=True, period=3) 23 reduce_lr = ReduceLROnPlateau(monitor='val_loss', factor=0.1, patience=3, verbose=1) 24 """monitor:被监测的量 25 factor:每次减少学习率的因子,学习率将以lr = lr*factor的形式被减少 26 patience:当patience个epoch过去而模型性能不提升时,学习率减少的动作会被触发 27 mode:‘auto’,‘min’,‘max’之一,在min模式下,如果检测值触发学习率减少。在max模式下,当检测值不再上升则触发学习率减少。 28 epsilon:阈值,用来确定是否进入检测值的“平原区” 29 cooldown:学习率减少后,会经过cooldown个epoch才重新进行正常操作 30 min_lr:学习率的下限""" 31 early_stopping = EarlyStopping(monitor='val_loss', min_delta=0, patience=10, verbose=1) 32 """monitor: 被监测的数据。 33 min_delta: 在被监测的数据中被认为是提升的最小变化, 例如,小于 min_delta 的绝对变化会被认为没有提升。 34 patience: 没有进步的训练轮数,在这之后训练就会被停止。 35 verbose: 详细信息模式。 36 mode: {auto, min, max} 其中之一。 在 min 模式中, 当被监测的数据停止下降,训练就会停止;在 max 模式中,当被监测的数据停止上升,训练就会停止;在 auto 模式中,方向会自动从被监测的数据的名字中判断出来。 37 baseline: 要监控的数量的基准值。 如果模型没有显示基准的改善,训练将停止。 38 restore_best_weights: 是否从具有监测数量的最佳值的时期恢复模型权重。 如果为 False,则使用在训练的最后一步获得的模型权重""" 39 40 val_split = 0.1 41 with open(annotation_path) as f: 42 lines = f.readlines() 43 np.random.seed(10101) 44 np.random.shuffle(lines) 45 np.random.seed(None) 46 num_val = int(len(lines)*val_split) 47 num_train = len(lines) - num_val 48 49 # Train with frozen layers first, to get a stable loss. 50 # Adjust num epochs to your dataset. This step is enough to obtain a not bad model. 51 if True: 52 model.compile(optimizer=Adam(lr=1e-3), loss={ 53 # use custom yolo_loss Lambda layer. 54 # # 使用定制的 yolo_loss Lambda层 55 'yolo_loss': lambda y_true, y_pred: y_pred}) 56 #解释:模型compile时传递的是自定义的loss,而把loss写成一个层融合到model里面后, 57 # y_pred就是loss。自定义损失函数规定要以y_true, y_pred为参数 58 59 batch_size = 32 60 print('Train on {} samples, val on {} samples, with batch size {}.'.format(num_train, num_val, batch_size)) 61 model.fit_generator(data_generator_wrapper(lines[:num_train], batch_size, input_shape, anchors, num_classes), 62 steps_per_epoch=max(1, num_train//batch_size), 63 validation_data=data_generator_wrapper(lines[num_train:], batch_size, input_shape, anchors, num_classes), 64 validation_steps=max(1, num_val//batch_size), 65 epochs=50, 66 initial_epoch=0, 67 callbacks=[logging, checkpoint]) 68 model.save_weights(log_dir + 'trained_weights_stage_1.h5') 69 70 # Unfreeze and continue training, to fine-tune. 71 # Train longer if the result is not good. 72 if True: 73 for i in range(len(model.layers)): 74 model.layers[i].trainable = True 75 model.compile(optimizer=Adam(lr=1e-4), loss={'yolo_loss': lambda y_true, y_pred: y_pred}) # recompile to apply the change 76 print('Unfreeze all of the layers.') 77 78 batch_size = 32 # note that more GPU memory is required after unfreezing the body 79 print('Train on {} samples, val on {} samples, with batch size {}.'.format(num_train, num_val, batch_size)) 80 model.fit_generator(data_generator_wrapper(lines[:num_train], batch_size, input_shape, anchors, num_classes), 81 steps_per_epoch=max(1, num_train//batch_size), 82 validation_data=data_generator_wrapper(lines[num_train:], batch_size, input_shape, anchors, num_classes), 83 validation_steps=max(1, num_val//batch_size), 84 epochs=100, 85 initial_epoch=50, 86 callbacks=[logging, checkpoint, reduce_lr, early_stopping]) 87 model.save_weights(log_dir + 'trained_weights_final.h5') 88 89 # Further training if needed. 90 91 92 def get_classes(classes_path): 93 '''loads the classes''' 94 with open(classes_path) as f: 95 class_names = f.readlines() 96 class_names = [c.strip() for c in class_names] 97 return class_names 98 99 def get_anchors(anchors_path): 100 '''loads the anchors from a file''' 101 with open(anchors_path) as f: 102 anchors = f.readline() 103 anchors = [float(x) for x in anchors.split(',')] 104 return np.array(anchors).reshape(-1, 2) 105 106 107 def create_model(input_shape, anchors, num_classes, load_pretrained=True, freeze_body=2, 108 weights_path='model_data/yolo_weights.h5'): 109 '''create the training model''' 110 K.clear_session() # get a new session 111 image_input = Input(shape=(None, None, 3)) 112 h, w = input_shape 113 num_anchors = len(anchors) 114 115 y_true = [Input(shape=(h//{0:32, 1:16, 2:8}[l], w//{0:32, 1:16, 2:8}[l], 116 num_anchors//3, num_classes+5)) for l in range(3)] 117 118 model_body = yolo_body(image_input, num_anchors//3, num_classes) 119 print('Create YOLOv3 model with {} anchors and {} classes.'.format(num_anchors, num_classes)) 120 121 if load_pretrained: 122 model_body.load_weights(weights_path, by_name=True, skip_mismatch=True) 123 print('Load weights {}.'.format(weights_path)) 124 """根据预训练权重的地址weights_path,加载权重文件,设置参数为,按名称对应by_name, 125 略过不匹配skip_mismatch; 126 127 选择冻结模式:模式1是冻结185层,模式2是保留最底部3层,其余全部冻结。 128 整个模型共有252层;将所冻结的层,设置为不可训练,trainable=False;""" 129 if freeze_body in [1, 2]: 130 # Freeze darknet53 body or freeze all but 3 output layers. 131 num = (185, len(model_body.layers)-3)[freeze_body-1] 132 for i in range(num): model_body.layers[i].trainable = False 133 print('Freeze the first {} layers of total {} layers.'.format(num, len(model_body.layers))) 134 """Lambda是Keras的自定义层,输入为model_body.output和y_true,输出output_shape是(1,),即一个损失值; 135 136 自定义Lambda层的名字name为yolo_loss; 137 138 层的参数是锚框列表anchors、类别数num_classes和IoU阈值ignore_thresh。 139 其中,ignore_thresh用于在物体置信度损失中过滤IoU较小的框; 140 141 yolo_loss是损失函数的核心逻辑。""" 142 model_loss = Lambda(yolo_loss, output_shape=(1,), name='yolo_loss', 143 arguments={'anchors': anchors, 'num_classes': num_classes, 'ignore_thresh': 0.5})( 144 [*model_body.output, *y_true]) 145 """把loss写成一个层,作为最后的输出,搭建模型的时候,就只需要将模型的output定义为loss 146 ,而compile的时候,直接将loss设置为y_pred(因为模型的输出就是loss,所以y_pred就是loss), 147 无视y_true,训练的时候,y_true随便扔一个符合形状的数组进去就行了""" 148 #keras.layer.Lambda将任意表达式封装为 Layer 对象 149 #keras.layers.Lambda(function, output_shape=None, mask=None, arguments=None) 150 #function: 需要封装的函数。 将输入张量作为第一个参数。 151 # output_shape: 预期的函数输出尺寸。可以是元组或者函数。 如果是元组,它只指定第一个维度; 152 # arguments: 可选的。传递给函数function的关键字参数。 153 154 model = Model([model_body.input, *y_true], model_loss) 155 #构建了以图片数据和图片标签(y_true)为输入, 156 # 模型损失(model_loss)为输出(y_pred)的模型 model。 157 158 return model 159 160 def create_tiny_model(input_shape, anchors, num_classes, load_pretrained=True, freeze_body=2, 161 weights_path='model_data/tiny_yolo_weights.h5'): 162 '''create the training model, for Tiny YOLOv3''' 163 K.clear_session() # get a new session 164 image_input = Input(shape=(None, None, 3)) 165 h, w = input_shape 166 num_anchors = len(anchors) 167 168 y_true = [Input(shape=(h//{0:32, 1:16}[l], w//{0:32, 1:16}[l], 169 num_anchors//2, num_classes+5)) for l in range(2)] 170 171 model_body = tiny_yolo_body(image_input, num_anchors//2, num_classes) 172 print('Create Tiny YOLOv3 model with {} anchors and {} classes.'.format(num_anchors, num_classes)) 173 174 if load_pretrained: 175 model_body.load_weights(weights_path, by_name=True, skip_mismatch=True) 176 print('Load weights {}.'.format(weights_path)) 177 if freeze_body in [1, 2]: 178 # Freeze the darknet body or freeze all but 2 output layers. 179 num = (20, len(model_body.layers)-2)[freeze_body-1] 180 for i in range(num): model_body.layers[i].trainable = False 181 print('Freeze the first {} layers of total {} layers.'.format(num, len(model_body.layers))) 182 183 model_loss = Lambda(yolo_loss, output_shape=(1,), name='yolo_loss', 184 arguments={'anchors': anchors, 'num_classes': num_classes, 'ignore_thresh': 0.7})( 185 [*model_body.output, *y_true]) 186 model = Model([model_body.input, *y_true], model_loss) 187 188 return model 189 190 def data_generator(annotation_lines, batch_size, input_shape, anchors, num_classes): 191 192 '''data generator for fit_generator 193 annotation_lines:标注数据的行,每行数据包含图片路径,和框的位置信息,种类 194 batch_size:每批图片的大小 195 input_shape: 图片的输入尺寸 196 anchors: 大小 197 num_classes: 类别数 198 ''' 199 200 n = len(annotation_lines) 201 i = 0 202 while True: 203 image_data = [] 204 box_data = [] 205 for b in range(batch_size): 206 if i==0: 207 np.random.shuffle(annotation_lines) 208 image, box = get_random_data(annotation_lines[i], input_shape, random=True)#从标记的样本分离image与box,得到样本图片与样本label 209 image_data.append(image) 210 box_data.append(box) 211 i = (i+1) % n 212 image_data = np.array(image_data) 213 box_data = np.array(box_data) 214 y_true = preprocess_true_boxes(box_data, input_shape, anchors, num_classes) 215 yield [image_data, *y_true], np.zeros(batch_size) 216 217 def data_generator_wrapper(annotation_lines, batch_size, input_shape, anchors, num_classes): 218 n = len(annotation_lines) 219 if n==0 or batch_size<=0: return None 220 return data_generator(annotation_lines, batch_size, input_shape, anchors, num_classes) 221 222 if __name__ == '__main__': 223 _main()
3.utils.py
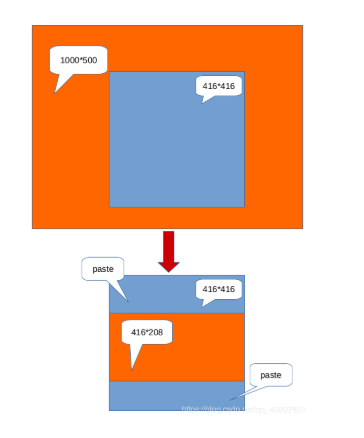
3.1 letter_image_box(),此函数的作用主要是将输入的图片进行等比例缩小,并在空余地方填成灰色
1 def letterbox_image(image, size): 2 '''resize image with unchanged aspect ratio using padding''' 3 iw, ih = image.size#图像初始的大小,任意值 以(1000,500)为例 4 w, h = size #模型要求的(416,416) 5 scale = min(w/iw, h/ih)#416/1000 0.416<0.832 ,416/500 6 nw = int(iw*scale) #416/1000*1000=416 7 nh = int(ih*scale)#416/1000*400=208 8 9 image = image.resize((nw,nh), Image.BICUBIC) 10 new_image = Image.new('RGB', size, (128,128,128))#new : 这个函数创建一幅给定模式(mode)和尺寸(size)的图片。如果省略 color 参数,则创建的图片被黑色填充满, 11 # 如果 color 参数是 None 值,则图片还没初始化 12 new_image.paste(image, ((w-nw)//2, (h-nh)//2)) #w-nw=0,(h-nh)//2=(416-208)//2=108 13 return new_image
它的作用如下:
3.2 get_random_data()
此函数的功能主要是进行数据增强与输入图像预处理(同letter_image_box)
1 def get_random_data(annotation_line, input_shape, random=True, max_boxes=20, jitter=.3, hue=.1, sat=1.5, val=1.5, proc_img=True): 2 '''random preprocessing for real-time data augmentation 3 annotation_lines:标注数据的行,每行数据包含图片路径,和框的位置信息,种类 4 return:imagedata是经过resize并填充的样本图片,resize成(416,416),并填充灰度 5 boxdata是每张image中做的标记label,shpe,对应着truebox,批次数16,最大框数20,每个框5个值,4个边界点和1个类别序号,如(16, 20, 5) 6 为(,batchsize,maxbox,5),每张图片最多的有maxbox个类,5为左上右下的坐标''' 7 line = annotation_line.split()#删除空格 8 image = Image.open(line[0]) 9 iw, ih = image.size 10 h, w = input_shape#(416,416) 11 box = np.array([np.array(list(map(int,box.split(',')))) for box in line[1:]]) 12 13 if not random: 14 # resize image 15 #将图片等比例转换为416x416的图片,其余用灰色填充, 16 # 即(128, 128, 128),同时颜色值转换为0~1之间,即每个颜色值除以255; 17 18 19 scale = min(w/iw, h/ih) 20 nw = int(iw*scale) 21 nh = int(ih*scale) 22 dx = (w-nw)//2 23 dy = (h-nh)//2 24 image_data=0 25 if proc_img: 26 image = image.resize((nw,nh), Image.BICUBIC) 27 new_image = Image.new('RGB', (w,h), (128,128,128)) 28 new_image.paste(image, (dx, dy)) 29 image_data = np.array(new_image)/255. 30 # 上面的作用和letter_box一致,加了一个把rgb范围变成0-1 31 # correct boxes max_boxes=20 32 33 # correct boxes 34 # 将边界框box等比例缩小,再加上填充的偏移量dx和dy,因为新的图片部分用灰色填充,影 35 # 响box的坐标系,box最多有max_boxes个,即20个 36 box_data = np.zeros((max_boxes,5))#shap->(20,5) 37 if len(box)>0: 38 np.random.shuffle(box) 39 if len(box)>max_boxes: box = box[:max_boxes] 40 box[:, [0,2]] = box[:, [0,2]]*scale + dx 41 box[:, [1,3]] = box[:, [1,3]]*scale + dy 42 box_data[:len(box)] = box 43 44 return image_data, box_data 45 46 # resize image 47 #通过jitter参数,随机计算new_ar和scale,生成新的nh和nw, 48 # 将原始图像随机转换为nw和nh尺寸的图像,即非等比例变换图像。 49 #也即是数据增强 50 new_ar = w/h * rand(1-jitter,1+jitter)/rand(1-jitter,1+jitter) 51 scale = rand(.25, 2) 52 if new_ar < 1: 53 nh = int(scale*h) 54 nw = int(nh*new_ar) 55 else: 56 nw = int(scale*w) 57 nh = int(nw/new_ar) 58 image = image.resize((nw,nh), Image.BICUBIC) 59 60 # place image 61 dx = int(rand(0, w-nw)) 62 dy = int(rand(0, h-nh)) 63 new_image = Image.new('RGB', (w,h), (128,128,128)) 64 new_image.paste(image, (dx, dy)) 65 image = new_image 66 67 # flip image or not 68 #根据随机数flip,随机左右翻转FLIP_LEFT_RIGHT图片 69 flip = rand()<.5 70 if flip: image = image.transpose(Image.FLIP_LEFT_RIGHT) 71 72 # distort image 73 #在HSV坐标域中,改变图片的颜色范围,hue值相加,sat和vat相乘, 74 # 先由RGB转为HSV,再由HSV转为RGB,添加若干错误判断,避免范围过大 75 hue = rand(-hue, hue) 76 sat = rand(1, sat) if rand()<.5 else 1/rand(1, sat) 77 val = rand(1, val) if rand()<.5 else 1/rand(1, val) 78 x = rgb_to_hsv(np.array(image)/255.) 79 x[..., 0] += hue 80 x[..., 0][x[..., 0]>1] -= 1 81 x[..., 0][x[..., 0]<0] += 1 82 x[..., 1] *= sat 83 x[..., 2] *= val 84 x[x>1] = 1 85 x[x<0] = 0 86 image_data = hsv_to_rgb(x) # numpy array, 0 to 1 87 88 # correct boxes 89 #将所有的图片变换,增加至检测框中,并且包含若干异常处理,避免变换之后的值过大或过小,去除异常的box 90 box_data = np.zeros((max_boxes,5)) 91 if len(box)>0: 92 np.random.shuffle(box) 93 box[:, [0,2]] = box[:, [0,2]]*nw/iw + dx 94 box[:, [1,3]] = box[:, [1,3]]*nh/ih + dy 95 if flip: box[:, [0,2]] = w - box[:, [2,0]] 96 box[:, 0:2][box[:, 0:2]<0] = 0 97 box[:, 2][box[:, 2]>w] = w 98 box[:, 3][box[:, 3]>h] = h 99 box_w = box[:, 2] - box[:, 0] 100 box_h = box[:, 3] - box[:, 1] 101 box = box[np.logical_and(box_w>1, box_h>1)] # discard invalid box 102 if len(box)>max_boxes: box = box[:max_boxes] 103 box_data[:len(box)] = box 104 105 return image_data, box_data
4.yolo.py()
此函数主要用于检测图片或者视频
1 def generate(self): 2 """①加载权重参数文件,生成检测框,得分,以及对应类别 3 4 ②利用model.py中的yolo_eval函数生成检测框,得分,所属类别 5 6 ③初始化时调用generate函数生成图片的检测框,得分,所属类别(self.boxes, self.scores, self.classes)""" 7 model_path = os.path.expanduser(self.model_path) 8 assert model_path.endswith('.h5'), 'Keras model or weights must be a .h5 file.' 9 10 # Load model, or construct model and load weights. 11 num_anchors = len(self.anchors) 12 num_classes = len(self.class_names) 13 is_tiny_version = num_anchors==6 # default setting 14 try: 15 self.yolo_model = load_model(model_path, compile=False) 16 except: 17 self.yolo_model = tiny_yolo_body(Input(shape=(None,None,3)), num_anchors//2, num_classes) 18 if is_tiny_version else yolo_body(Input(shape=(None,None,3)), num_anchors//3, num_classes) 19 self.yolo_model.load_weights(self.model_path) # make sure model, anchors and classes match 20 else: 21 ##[-1]:网络最后一层输出。 output_shape[-1]:输出维度的最后一维。 -> (?,13,13,255) 22 # 255 = 9/3*(80+5). 9/3:每层特征图对应3个anchor box 80:80个类别 5:4+1,框的4个值+1个置信度 23 24 assert self.yolo_model.layers[-1].output_shape[-1] == 25 num_anchors/len(self.yolo_model.output) * (num_classes + 5), 26 'Mismatch between model and given anchor and class sizes' 27 #Python assert(断言)用于判断一个表达式,在表达式条件为 false 的时候触发异常。 28 29 #断言可以在条件不满足程序运行的情况下直接返回错误,而不必等待程序运行后出现崩溃的情况 30 31 print('{} model, anchors, and classes loaded.'.format(model_path)) 32 33 # Generate colors for drawing bounding boxes. 34 # Generate colors for drawing bounding boxes. 35 # 生成绘制边框的颜色。 36 # h(色调):x/len(self.class_names) s(饱和度):1.0 v(明亮):1.0 37 38 # 对于80种coco目标,确定每一种目标框的绘制颜色,即:将(x/80, 1.0, 1.0)的颜色转换为RGB格式,并随机调整颜色以便于肉眼识别, 39 # 其中:一个1.0表示饱和度,一个1.0表示亮度 40 41 hsv_tuples = [(x / len(self.class_names), 1., 1.) 42 for x in range(len(self.class_names))] 43 self.colors = list(map(lambda x: colorsys.hsv_to_rgb(*x), hsv_tuples)) #hsv转换为rgb 44 # hsv取值范围在【0,1】,而RBG取值范围在【0,255】,所以乘上255 45 self.colors = list( 46 map(lambda x: (int(x[0] * 255), int(x[1] * 255), int(x[2] * 255)), 47 self.colors)) 48 np.random.seed(10101) # Fixed seed for consistent colors across runs. 49 np.random.shuffle(self.colors) # Shuffle colors to decorrelate adjacent classes. 50 np.random.seed(None) # Reset seed to default. 51 52 # Generate output tensor targets for filtered bounding boxes. 53 #为过滤的边界框生成输出张量目标 54 self.input_image_shape = K.placeholder(shape=(2, )) 55 if self.gpu_num>=2: 56 self.yolo_model = multi_gpu_model(self.yolo_model, gpus=self.gpu_num) 57 boxes, scores, classes = yolo_eval(self.yolo_model.output, self.anchors, 58 len(self.class_names), self.input_image_shape, 59 score_threshold=self.score, iou_threshold=self.iou) 60 return boxes, scores, classes 61 62 def detect_image(self, image): 63 """开始计时->①调用letterbox_image函数,即:先生成一个用“绝对灰”R128-G128-B128填充的416×416新图片,然后用按比例缩放(采样方式:BICUBIC)后的输入图片粘贴,粘贴不到的部分保留为灰色。②model_image_size定义的宽和高必须是32的倍数;若没有定义model_image_size,将输入的尺寸调整为32的倍数,并调用letterbox_image函数进行缩放。③将缩放后的图片数值除以255,做归一化。④将(416,416,3)数组调整为(1,416,416,3)元祖,满足网络输入的张量格式:image_data。 64 65 ->①运行self.sess.run()输入参数:输入图片416×416,学习模式0测试/1训练。 66 self.yolo_model.input: image_data,self.input_image_shape: [image.size[1], image.size[0]], 67 K.learning_phase(): 0。②self.generate(),读取:model路径、anchor box、coco类别、加载模型yolo.h5.,对于80中coco目标,确定每一种目标框的绘制颜色,即:将(x/80,1.0,1.0)的颜色转换为RGB格式,并随机调整颜色一遍肉眼识别,其中:一个1.0表示饱和度,一个1.0表示亮度。③若GPU>2调用multi_gpu_model() 68 69 ->①yolo_eval(self.yolo_model.output),max_boxes=20,每张图没类最多检测20个框。 70 ②将anchor_box分为3组,分别分配给三个尺度,yolo_model输出的feature map 71 ③特征图越小,感受野越大,对大目标越敏感,选大的anchor box-> 72 分别对三个feature map运行out_boxes, out_scores, out_classes,返回boxes、scores、classes。 73 """ 74 start = timer() 75 # # 调用letterbox_image()函数,即:先生成一个用“绝对灰”R128-G128-B128“填充的416x416新图片, 76 # 然后用按比例缩放(采样方法:BICUBIC)后的输入图片粘贴,粘贴不到的部分保留为灰色 77 78 if self.model_image_size != (None, None): #判断图片是否存在 79 assert self.model_image_size[0]%32 == 0, 'Multiples of 32 required' 80 assert self.model_image_size[1]%32 == 0, 'Multiples of 32 required' 81 # assert断言语句的语法格式 model_image_size[0][1]指图像的w和h,且必须是32的整数倍 82 boxed_image = letterbox_image(image, tuple(reversed(self.model_image_size))) 83 # #letterbox_image对图像调整成输入尺寸(w,h) 84 else: 85 new_image_size = (image.width - (image.width % 32), 86 image.height - (image.height % 32)) 87 boxed_image = letterbox_image(image, new_image_size) 88 image_data = np.array(boxed_image, dtype='float32') 89 90 print(image_data.shape)#(416,416,3) 91 image_data /= 255.#将缩放后图片的数值除以255,做归一化 92 image_data = np.expand_dims(image_data, 0) # Add batch dimension. 93 # 批量添加一维 -> (1,416,416,3) 为了符合网络的输入格式 -> (bitch, w, h, c) 94 95 out_boxes, out_scores, out_classes = self.sess.run( 96 [self.boxes, self.scores, self.classes], 97 feed_dict={ 98 self.yolo_model.input: image_data,#图像数据 99 self.input_image_shape: [image.size[1], image.size[0]],#图像尺寸416x416 100 K.learning_phase(): 0#学习模式 0:测试模型。 1:训练模式 101 })#目的为了求boxes,scores,classes,具体计算方式定义在generate()函数内。在yolo.py第61行 102 103 print('Found {} boxes for {}'.format(len(out_boxes), 'img')) 104 # 绘制边框,自动设置边框宽度,绘制边框和类别文字,使用Pillow绘图库(PIL,头有声明) 105 # 设置字体 106 107 108 font = ImageFont.truetype(font='font/FiraMono-Medium.otf', 109 size=np.floor(3e-2 * image.size[1] + 0.5).astype('int32')) 110 # 设置目标框线条的宽度 111 thickness = (image.size[0] + image.size[1]) // 300#厚度 112 ## 对于c个目标类别中的每个目标框i,调用Pillow画图 113 114 for i, c in reversed(list(enumerate(out_classes))): 115 predicted_class = self.class_names[c] #类别 #目标类别的名字 116 box = out_boxes[i]#框 117 score = out_scores[i]#置信度 118 119 label = '{} {:.2f}'.format(predicted_class, score) 120 draw = ImageDraw.Draw(image)#创建一个可以在给定图像上绘图的对象 121 label_size = draw.textsize(label, font)##标签文字 #返回label的宽和高(多少个pixels) 122 #返回给定字符串的大小,以像素为单位。 123 top, left, bottom, right = box 124 # 目标框的上、左两个坐标小数点后一位四舍五入 125 """防止检测框溢出""" 126 top = max(0, np.floor(top + 0.5).astype('int32')) 127 128 left = max(0, np.floor(left + 0.5).astype('int32')) 129 # 目标框的下、右两个坐标小数点后一位四舍五入,与图片的尺寸相比,取最小值 130 # 防止边框溢出 131 bottom = min(image.size[1], np.floor(bottom + 0.5).astype('int32')) 132 right = min(image.size[0], np.floor(right + 0.5).astype('int32')) 133 print(label, (left, top), (right, bottom)) 134 # 确定标签(label)起始点位置:标签的左、下 135 if top - label_size[1] >= 0: 136 text_origin = np.array([left, top - label_size[1]]) 137 else: 138 text_origin = np.array([left, top + 1]) 139 140 # My kingdom for a good redistributable image drawing library. 141 # 画目标框,线条宽度为thickness 142 for i in range(thickness):#画框 143 draw.rectangle( 144 [left + i, top + i, right - i, bottom - i], 145 outline=self.colors[c]) 146 # 画标签框 147 draw.rectangle( #文字背景 148 [tuple(text_origin), tuple(text_origin + label_size)], 149 fill=self.colors[c]) 150 # 填写标签内容 151 draw.text(text_origin, label, fill=(0, 0, 0), font=font)#文案 152 del draw 153 154 end = timer() 155 print(end - start) 156 return image 157 158 def close_session(self): 159 self.sess.close()
以上即是主要yolo3的主要部分,下面将会对模型进行测试
5.测试
在理解完原理与上述代码之后,下面进行测试(当然也可以不用理解源码也可以直接测试)
(1) 首先需要下载yolo3.weights,下载地址:
https://pjreddie.com/media/files/yolov3.weights(2) 在pycharm的终端中输入python convert.py yolov3.cfg yolov3.weights model_data/yolo_weights.h5作用是将yolo3.weights文件转换成Keras可以处理的.h5权值文件,
(3)随便在网上下载一张图片进行测试,比如笔者用一张飞机的照片
(4)在源码中,不能直接运行yolo.py,因为在此代码中没有if__name__=='__main__':
所以需要自己添加:
1 if __name__ == '__main__': 2 """测试图片""" 3 yolo = YOLO() 4 path = r'F:chorme_downloadkeras-yolo3-master微信图片_20200313132254.jpg' 5 try: 6 image = Image.open(path) 7 except: 8 print('Open Error! Try again!') 9 else: 10 r_image = yolo.detect_image(image) 11 r_image.show() 12 13 yolo.close_session() 14 """测试视频,将detect_video中的path置0即调用自己电脑的摄像头""" 15 yolo=YOLO() 16 detect_video(yolo,0)
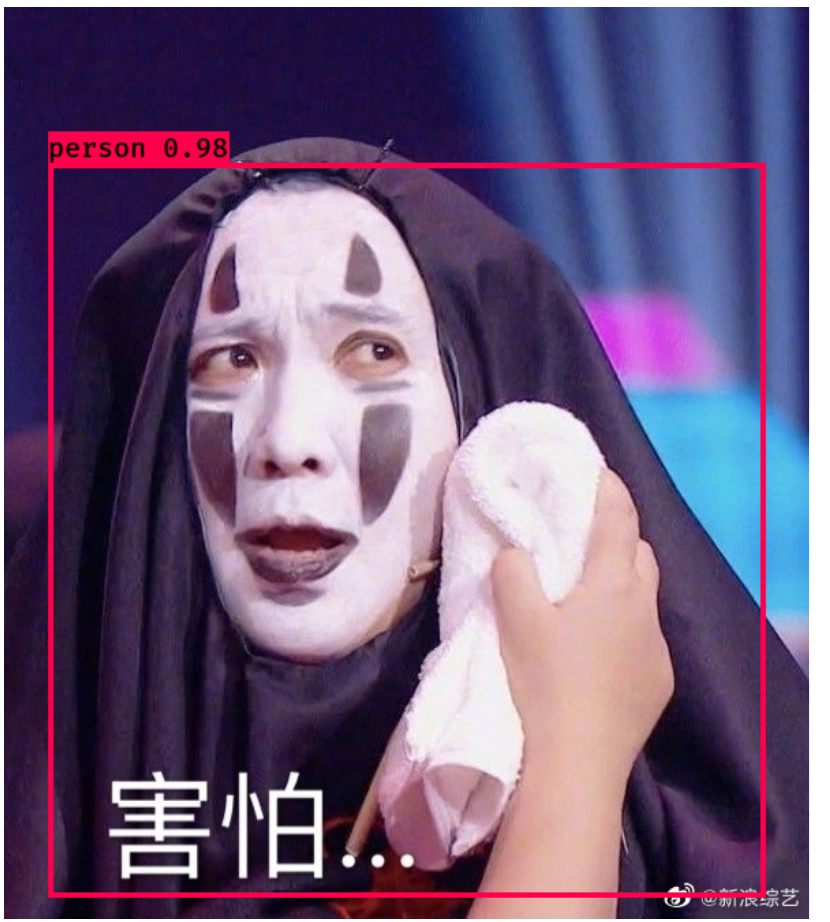
6.结果
本文为原创,制作不易,转载请标明出处,谢谢!!!