Flutter 拖拽控件Draggable看这一篇就够了
- 2020 年 3 月 10 日
- 筆記

注意:无特殊说明,Flutter版本及Dart版本如下:
- Flutter版本: 1.12.13+hotfix.5
- Dart版本: 2.7.0
Draggable系列组件可以让我们拖动组件。
Draggable
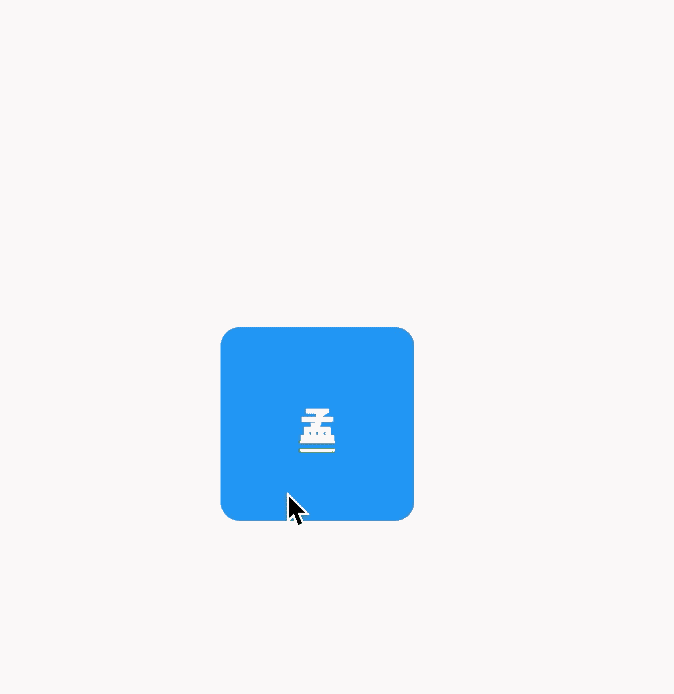
Draggable组件有2个必须填写的参数,child参数是子控件,feedback参数是拖动时跟随移动的组件,用法如下:
Draggable( child: Container( height: 100, width: 100, alignment: Alignment.center, decoration: BoxDecoration( color: Colors.red, borderRadius: BorderRadius.circular(10) ), child: Text('孟',style: TextStyle(color: Colors.white,fontSize: 18),), ), feedback: Container( height: 100, width: 100, alignment: Alignment.center, decoration: BoxDecoration( color: Colors.blue, borderRadius: BorderRadius.circular(10) ), child: Text('孟',style: TextStyle(color: Colors.white,fontSize: 18),), ), )效果如下:

蓝色的组件是feedback,如果想在拖动的时候子组件显示其他样式可以使用childWhenDragging参数,用法如下:
Draggable( childWhenDragging: Container( height: 100, width: 100, alignment: Alignment.center, decoration: BoxDecoration( color: Colors.grey, borderRadius: BorderRadius.circular(10)), child: Text( '孟', style: TextStyle(color: Colors.white, fontSize: 18), ), ), ... )效果如下:
我们还可以控制拖动的方向,比如只允许垂直方向移动,代码如下:
Draggable( axis: Axis.vertical, ... )Draggable组件为我们提供了4中拖动过程中的回调事件,用法如下:
Draggable( onDragStarted: (){ print('onDragStarted'); }, onDragEnd: (DraggableDetails details){ print('onDragEnd:$details'); }, onDraggableCanceled: (Velocity velocity, Offset offset){ print('onDraggableCanceled velocity:$velocity,offset:$offset'); }, onDragCompleted: (){ print('onDragCompleted'); }, ... )说明如下:
- onDragStarted:开始拖动时回调。
- onDragEnd:拖动结束时回调。
- onDraggableCanceled:未拖动到DragTarget控件上时回调。
- onDragCompleted:拖动到DragTarget控件上时回调。
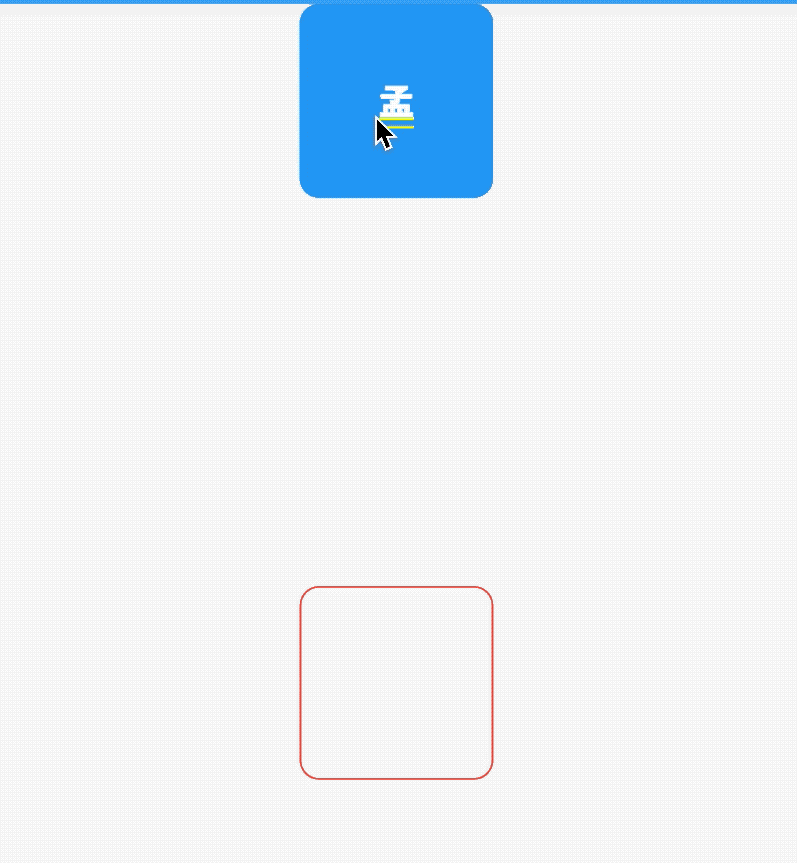
Draggable有一个data参数,这个参数是和DragTarget配合使用的,当用户将控件拖动到DragTarget时此数据会传递给DragTarget。
DragTarget
DragTarget就像他的名字一样,指定一个目的地,Draggable组件可以拖动到此控件,用法如下:
DragTarget( builder: (BuildContext context, List<dynamic> candidateData, List<dynamic> rejectedData) { ... } )当onWillAccept返回true时, candidateData参数的数据是Draggable的data数据。
当onWillAccept返回false时, rejectedData参数的数据是Draggable的data数据,
DragTarget有3个回调,说明如下:
- onWillAccept:拖到该控件上时调用,需要返回true或者false,返回true,松手后会回调onAccept,否则回调onLeave。
- onAccept:onWillAccept返回true时,用户松手后调用。
- onLeave:onWillAccept返回false时,用户松手后调用。
用法如下:
var _dragData; @override Widget build(BuildContext context) { return Center( child: Column( children: <Widget>[ _buildDraggable(), SizedBox( height: 200, ), DragTarget<Color>( builder: (BuildContext context, List<Color> candidateData, List<dynamic> rejectedData) { print('candidateData:$candidateData,rejectedData:$rejectedData'); return _dragData == null ? Container( height: 100, width: 100, alignment: Alignment.center, decoration: BoxDecoration( borderRadius: BorderRadius.circular(10), border: Border.all(color: Colors.red)), ) : Container( height: 100, width: 100, alignment: Alignment.center, decoration: BoxDecoration( color: Colors.red, borderRadius: BorderRadius.circular(10)), child: Text( '孟', style: TextStyle(color: Colors.white, fontSize: 18), ), ); }, onWillAccept: (Color color) { print('onWillAccept:$color'); return true; }, onAccept: (Color color) { setState(() { _dragData = color; }); print('onAccept:$color'); }, onLeave: (Color color) { print('onLeave:$color'); }, ), ], ), ); } _buildDraggable() { return Draggable( data: Color(0x000000FF), child: Container( height: 100, width: 100, alignment: Alignment.center, decoration: BoxDecoration( color: Colors.red, borderRadius: BorderRadius.circular(10)), child: Text( '孟', style: TextStyle(color: Colors.white, fontSize: 18), ), ), feedback: Container( height: 100, width: 100, alignment: Alignment.center, decoration: BoxDecoration( color: Colors.blue, borderRadius: BorderRadius.circular(10)), child: DefaultTextStyle.merge( style: TextStyle(color: Colors.white, fontSize: 18), child: Text( '孟', ), ), ), ); }效果如下:
LongPressDraggable
LongPressDraggable继承自Draggable,因此用法和Draggable完全一样,唯一的区别就是LongPressDraggable触发拖动的方式是长按,而Draggable触发拖动的方式是按下。
今天的文章对大家是否有帮助?如果有,请在文章底部留言和点赞,以表示对我的支持,你们的留言、点赞和转发关注是我持续更新的动力!
我创建了一个关于Flutter的微信交流群,欢迎您的加入,让我们一起学习,一起进步,开始我们的故事,生活不止眼前的苟且,还有诗和《远方》。
==微信:mqd_zzy==
当然我也非常希望您关注我个人的公众号,里面有各种福利等着大家哦。