【自制操作系统12】熟悉而陌生的多线程
- 2020 年 3 月 4 日
- 筆記
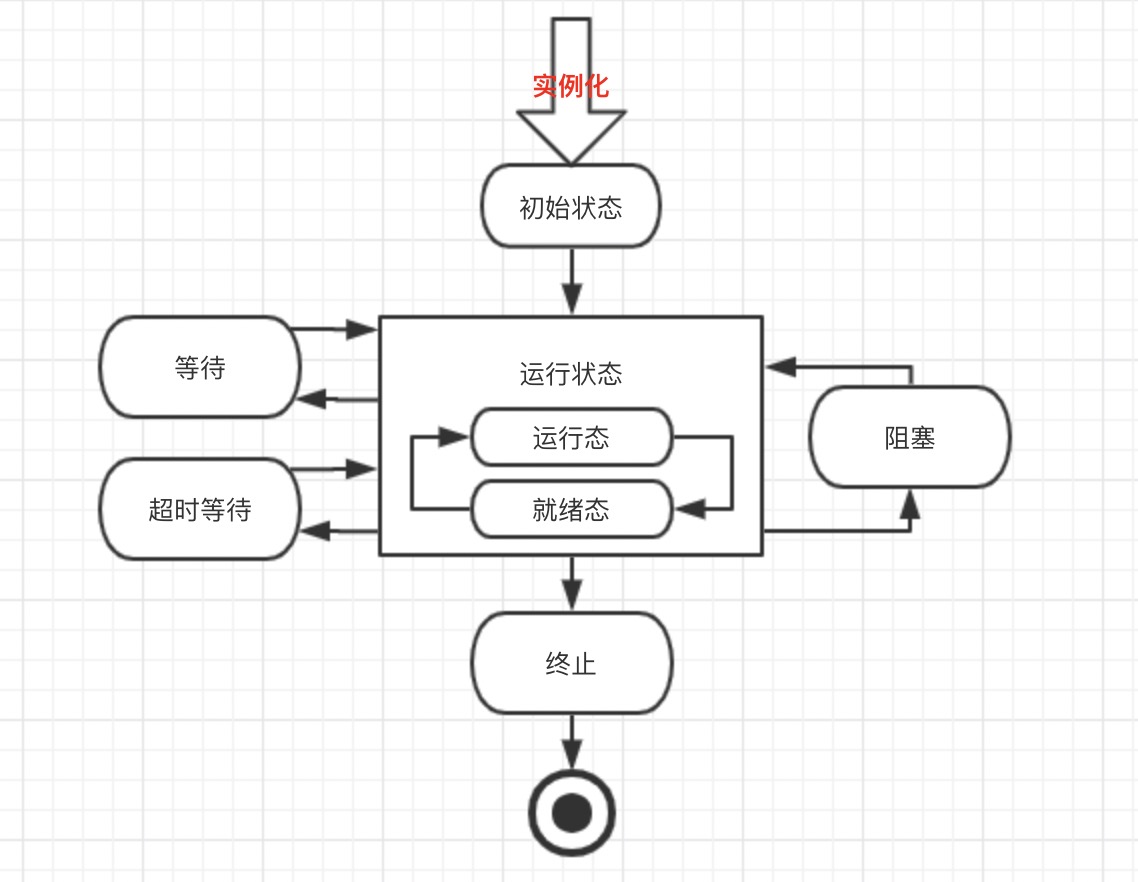
一、到目前为止的程序流程图
为了让大家清楚目前的程序进度,画了到目前为止的程序流程图,如下。红色部分是我们今天要实现的

二、进程与线程简述
相信看这篇文章的人,肯定不是对基本概念感兴趣,这也不是我的主要目的。所以这里真的是简述一下
进程和线程都是 独立的程序执行流,只不过进程有自己独立的内存空间,同一个进程里的线程共享内存空间,具体体现在 pcb 表中一个字段上,指向页表的地址值。
线程分 用户线程 和 内核线程,用户线程可以理解为就是没有线程,只是用户程序中写了一个线程调度器程序在假装切换,操作系统根本无感知。
三、实现一个简单的单线程
我们分三步实现最终的多线程机制,其实就对应着下面三节的内容
- 第一步实现 多线程数据结构,并装模做样地把一个线程的函数跑起来
- 第二步实现 中断信号不断递减线程的时间,达到线程被换下 cpu 的条件
- 第三步实现 任务切换,即是第二步的条件达到时,真正的切换任务的函数实现
那么本节先实现第一步,先看代码
代码鸟瞰


1 #include "print.h" 2 #include "init.h" 3 #include "thread.h" 4 5 void k_thread_a(void*); 6 7 int main(void){ 8 put_str("I am kerneln"); 9 init_all(); 10 thread_start("k_thread_a", 31, k_thread_a, "argA "); 11 while(1); 12 return 0; 13 } 14 15 void k_thread_a(void* arg) { 16 char* para = arg; 17 while(1) { 18 put_str(para); 19 } 20 }
main.c
1 #include "thread.h" 2 #include "stdint.h" 3 #include "string.h" 4 #include "global.h" 5 #include "memory.h" 6 7 #define PG_SIZE 4096 8 9 // 由 kernel_thread 去执行 function(func_arg) 10 static void kernel_thread(thread_func* function, void* func_arg) { 11 function(func_arg); 12 } 13 14 // 初始化线程栈 thread_stack 15 void thread_create(struct task_struct* pthread, thread_func function, void* func_arg) { 16 // 先预留中断使用栈的空间 17 pthread->self_kstack -= sizeof(struct intr_stack); 18 19 // 再留出线程栈空间 20 pthread->self_kstack -= sizeof(struct thread_stack); 21 struct thread_stack* kthread_stack = (struct thread_stack*)pthread->self_kstack; 22 kthread_stack->eip = kernel_thread; 23 kthread_stack->function = function; 24 kthread_stack->func_arg = func_arg; 25 kthread_stack->ebp = kthread_stack->ebx = kthread_stack->esi = kthread_stack->edi = 0; 26 } 27 28 // 初始化线程基本信息 29 void init_thread(struct task_struct* pthread, char* name, int prio) { 30 memset(pthread, 0, sizeof(*pthread)); 31 strcpy(pthread->name, name); 32 pthread->status = TASK_RUNNING; 33 pthread->priority = prio; 34 // 线程自己在内核态下使用的栈顶地址 35 pthread->self_kstack = (uint32_t*)((uint32_t)pthread + PG_SIZE); 36 pthread->stack_magic = 0x19870916; // 自定义魔数 37 } 38 39 // 创建一优先级为 prio 的线程,线程名为 name,线程所执行的函数为 function 40 struct task_struct* thread_start(char* name, int prio, thread_func function, void* func_arg) { 41 // pcb 都位于内核空间,包括用户进程的 pcb 也是在内核空间 42 struct task_struct* thread = get_kernel_pages(1); 43 44 init_thread(thread, name, prio); 45 thread_create(thread, function, func_arg); 46 47 asm volatile("mov %0, %%esp; pop %%ebp; pop %%ebx; pop %%edi; pop %%esi; ret ": : "g" (thread->self_kstack) : "memory"); 48 return thread; 49 }
thread.c
1 #ifndef __THREAD_THREAD_H 2 #define __THREAD_THREAD_H 3 #include "stdint.h" 4 5 // 自定义通用函数类型,它将在很多线程函数中作为形式参数类型 6 typedef void thread_func(void*); 7 8 // 进程或线程的状态 9 enum task_status { 10 TASK_RUNNING, 11 TASK_READY, 12 TASK_BLOCKED, 13 TASK_WAITING, 14 TASK_HANGING, 15 TASK_DIED 16 }; 17 18 /*********** 中断栈intr_stack *********** 19 * 此结构用于中断发生时保护程序(线程或进程)的上下文环境: 20 * 进程或线程被外部中断或软中断打断时,会按照此结构压入上下文 21 * 寄存器, intr_exit中的出栈操作是此结构的逆操作 22 * 此栈在线程自己的内核栈中位置固定,所在页的最顶端 23 ********************************************/ 24 struct intr_stack { 25 uint32_t vec_no; // 压入的中断号 26 uint32_t edi; 27 uint32_t esi; 28 uint32_t ebp; 29 uint32_t esp_dummy; 30 uint32_t ebx; 31 uint32_t edx; 32 uint32_t ecx; 33 uint32_t eax; 34 uint32_t gs; 35 uint32_t fs; 36 uint32_t es; 37 uint32_t ds; 38 39 // 以下由 cpu 从低特权级进入高特权级时压入 40 uint32_t err_code; 41 void (*eip) (void); 42 uint32_t cs; 43 uint32_t eflags; 44 void* esp; 45 uint32_t ss; 46 }; 47 48 /*********** 线程栈thread_stack *********** 49 * 线程自己的栈,用于存储线程中待执行的函数 50 * 此结构在线程自己的内核栈中位置不固定, 51 * 用在switch_to时保存线程环境。 52 * 实际位置取决于实际运行情况。 53 ******************************************/ 54 struct thread_stack { 55 uint32_t ebp; 56 uint32_t ebx; 57 uint32_t edi; 58 uint32_t esi; 59 60 61 // 线程第一次执行时,eip指向待调用的函数kernel_thread 其它时候,eip是指向switch_to的返回地址 62 void (*eip) (thread_func* func, void* func_arg); 63 64 /***** 以下仅供第一次被调度上cpu时使用 ****/ 65 66 // 参数unused_ret只为占位置充数为返回地址 67 void (*unused_retaddr); 68 thread_func* function; // 由kernel_thread所调用的函数名 69 void* func_arg; // 由kernel_thread所调用的函数所需的参数 70 }; 71 72 // 进程或线程的 pcb 程序控制块 73 struct task_struct { 74 uint32_t* self_kstack; // 各内核线程都用自己的内核栈 75 enum task_status status; 76 uint8_t priority; // 线程优先级 77 char name[16]; 78 uint32_t stack_magic; // 栈的边界标记,用于检测栈溢出 79 }; 80 81 #endif
thread.h
代码解读
写代码的顺序是先写定义,再写实现,最后再调用它。但看代码我还是喜欢正着看,这样知道正向的调用逻辑
- main 方法:main 方法里调用了一个 thread_start 函数,将线程名、优先级、线程函数的地址、参数传了进去
1 int main(void){ 2 put_str("I am kerneln"); 3 init_all(); 4 thread_start("k_thread_a", 31, k_thread_a, "argA "); 5 while(1); 6 return 0; 7 } 8 9 void k_thread_a(void* arg) { 10 char* para = arg; 11 while(1) { 12 put_str(para); 13 } 14 }
- thread_start 函数:thread_start 函数首先申请了一块内存用于存储 task_struct 结构的 thread 变量,然后作为参数分别调用了 init_thread 和 thread_create,最后一句汇编语句结束。显然最后的汇编语句是函数被执行起来的直接原因,我们先放一放。
1 struct task_struct* thread_start(char* name, int prio, thread_func function, void* func_arg) { 2 // 申请内核空间的一片内存 3 struct task_struct* thread = get_kernel_pages(1); 4 // pcb结构赋值 5 init_thread(thread, name, prio); 6 thread_create(thread, function, func_arg); 7 // 暂时用一句汇编把函数跑起来 8 asm volatile("mov %0, %%esp; pop %%ebp; pop %%ebx; pop %%edi; pop %%esi; ret ": : "g" (thread->self_kstack) : "memory"); 9 return thread; 10 }
- task_struct 结构:记住这个结构,我们看看后面的函数为其赋值为什么了
1 struct task_struct { 2 uint32_t* self_kstack; // 各内核线程都用自己的内核栈 3 enum task_status status; // 线程状态 4 uint8_t priority; // 线程优先级 5 char name[16]; // 线程名字 6 uint32_t stack_magic; // 栈的边界标记,用于检测栈溢出 7 };
- init_thread 函数:该函数首先将 task_struct 结构的 pthread 全部赋值为 0,之后五行刚好分别给 task_struct 结构的五个变量附上值。其中线程的状态被写死赋值为 TASK_RUNNING,自己独有的内核栈被赋值为 pthread 变量所在的内存页的末尾。
1 void init_thread(struct task_struct* pthread, char* name, int prio) { 2 memset(pthread, 0, sizeof(*pthread)); 3 strcpy(pthread->name, name); 4 pthread->status = TASK_RUNNING; 5 pthread->priority = prio; 6 // 线程自己在内核态下使用的栈顶地址 7 pthread->self_kstack = (uint32_t*)((uint32_t)pthread + PG_SIZE); 8 pthread->stack_magic = 0x19870916; // 自定义魔数 9 }
- thread_create 函数:该函数就是为 pthread 中的 self_kstack 赋值,我们看赋值之后的结构,我下面画了个图
1 void thread_create(struct task_struct* pthread, thread_func function, void* func_arg) { 2 // 先预留中断使用栈的空间 3 pthread->self_kstack -= sizeof(struct intr_stack); 4 // 再留出线程栈空间 5 pthread->self_kstack -= sizeof(struct thread_stack); 6 struct thread_stack* kthread_stack = (struct thread_stack*)pthread->self_kstack; 7 kthread_stack->eip = kernel_thread; 8 kthread_stack->function = function; 9 kthread_stack->func_arg = func_arg; 10 kthread_stack->ebp = kthread_stack->ebx = kthread_stack->esi = kthread_stack->edi = 0; 11 } 12 13 static void kernel_thread(thread_func* function, void* func_arg) { 14 function(func_arg); 15 }

- 最后的汇编语句:这句汇编有点难理解,先简单看第一个语句,作用就是把 thread->self_kstack 地址作为栈顶,如上图所示。经过四个 pop 动作后,指向了 *eip,也就是栈顶此时为 kernel_thread 函数,通过 ret 语句便成功执行了这个函数,至于为什么用 ret 之后再说。该函数的作用,就是将我们最开始传过去的 function 函数执行了一下。函数运行的直接原因这个谜题终于暂时解开了。
asm volatile("mov %0, %%esp; pop %%ebp; pop %%ebx; pop %%edi; pop %%esi; ret ": : "g" (thread->self_kstack) : "memory");
总结起来一句话:这么多代码实现的,就仅仅给申请的一页内核的内存空间附上值(按照task_struct结构来赋值),而已,为后续工作做准备。
运行
执行 make brun 后,运行效果如下,自然是 main 方法中的函数所写的那样,不断打印 argA 字符串

四、通过中断信号让线程的时间片递减
代码鸟瞰
1 #include "timer.h" 2 #include "io.h" 3 #include "print.h" 4 #include "thread.h" 5 6 #define IRQ0_FREQUENCY 100 7 #define INPUT_FREQUENCY 1193180 8 #define COUNTER0_VALUE INPUT_FREQUENCY / IRQ0_FREQUENCY 9 #define CONTRER0_PORT 0x40 10 #define COUNTER0_NO 0 11 #define COUNTER_MODE 2 12 #define READ_WRITE_LATCH 3 13 #define PIT_CONTROL_PORT 0x43 14 15 uint32_t ticks; // ticks是内核自中断开启以来总共的嘀嗒数 16 17 /* 把操作的计数器 counter_no? 读写锁属性 rwl? 计数器模式 counter_mode 写入模式控制寄存器并赋予初始值 counter_value */ 18 static void frequency_set(uint8_t counter_port, uint8_t counter_no, uint8_t rwl, uint8_t counter_mode, uint16_t counter_value) { 19 /* 往控制字寄存器端口 0x43 中写入控制字 */ 20 outb(PIT_CONTROL_PORT, (uint8_t)(counter_no << 6 | rwl << 4 | counter_mode << 1)); 21 /* 先写入 counter_value 的低 8 位 */ 22 outb(counter_port, (uint8_t)counter_value); 23 /* 再写入 counter_value 的高 8 位 */ 24 outb(counter_port, (uint8_t)counter_value >> 8); 25 } 26 27 // 时钟的中断处理函数 28 static void intr_timer_handler(void) { 29 struct task_struct* cur_thread = running_thread(); 30 cur_thread->elapsed_ticks++; 31 ticks++; 32 33 if (cur_thread->ticks == 0) { 34 //schedule(); 35 } else { 36 cur_thread->ticks--; 37 } 38 39 } 40 41 /* 初始化 PIT8253 */ 42 void timer_init() { 43 put_str("timer_init startn"); 44 /* 设置 8253 的定时周期,也就是发中断的周期 */ 45 frequency_set(CONTRER0_PORT, COUNTER0_NO, READ_WRITE_LATCH, COUNTER_MODE, COUNTER0_VALUE); 46 register_handler(0x20, intr_timer_handler); 47 put_str("timer_init donen"); 48 }
device/timer.c
1 #include "interrupt.h" 2 #include "stdint.h" 3 #include "global.h" 4 #include "io.h" 5 #include "print.h" 6 7 #define PIC_M_CTRL 0x20 // 这里用的可编程中断控制器是8259A,主片的控制端口是0x20 8 #define PIC_M_DATA 0x21 // 主片的数据端口是0x21 9 #define PIC_S_CTRL 0xa0 // 从片的控制端口是0xa0 10 #define PIC_S_DATA 0xa1 // 从片的数据端口是0xa1 11 12 #define IDT_DESC_CNT 0x81 // 目前总共支持的中断数 13 14 #define EFLAGS_IF 0x00000200 // eflags寄存器中的if位为1 15 #define GET_EFLAGS(EFLAG_VAR) asm volatile("pushfl; popl %0" : "=g" (EFLAG_VAR)) 16 17 // 中断门描述符结构体 18 struct gate_desc{ 19 uint16_t func_offset_low_word; 20 uint16_t selector; 21 uint8_t dcount; 22 uint8_t attribute; 23 uint16_t func_offset_high_word; 24 }; 25 26 // 静态函数声明,非必须 27 static void make_idt_desc(struct gate_desc* p_gdesc, uint8_t attr, intr_handler function); 28 // 中断门描述符表的数组 29 static struct gate_desc idt[IDT_DESC_CNT]; 30 // 用于保存异常名 31 char* intr_name[IDT_DESC_CNT]; 32 // 定义中断处理程序数组,在kernel.asm中定义的intrXXentry。只是中断处理程序的入口,最终调用idt_table中的处理程序 33 intr_handler idt_table[IDT_DESC_CNT]; 34 // 声明引用定义在kernel.asm中的中断处理函数入口数组 35 extern intr_handler intr_entry_table[IDT_DESC_CNT]; 36 // 初始化可编程中断控制器 8259A 37 static void pic_init(void) { 38 39 /*初始化主片 */ 40 outb (PIC_M_CTRL, 0x11); // ICW1: 边沿触发,级联8259, 需要ICW4 41 outb (PIC_M_DATA, 0x20); // ICW2: 起始中断向量号为0x20, 也就是IR[0-7] 为 0x20 ~ 0x27 42 outb (PIC_M_DATA, 0x04); // ICW3: IR2 接从片 43 outb (PIC_M_DATA, 0x01); // ICW4: 8086 模式, 正常EOI 44 45 /*初始化从片 */ 46 outb (PIC_S_CTRL, 0x11); // ICW1: 边沿触发,级联8259, 需要ICW4 47 outb (PIC_S_DATA, 0x28); // ICW2: 起始中断向量号为0x28, 也就是IR[8-15]为0x28 ~ 0x2F 48 outb (PIC_S_DATA, 0x02); // ICW3: 设置从片连接到主片的IR2 引脚 49 outb (PIC_S_DATA, 0x01); // ICW4: 8086 模式, 正常EOI 50 51 /*打开主片上IR0,也就是目前只接受时钟产生的中断 */ 52 outb (PIC_M_DATA, 0xfe); 53 outb (PIC_S_DATA, 0xff); 54 55 put_str(" pic_init donen"); 56 } 57 58 //创建中断门描述符 59 static void make_idt_desc(struct gate_desc* p_gdesc, uint8_t attr, intr_handler function) { 60 p_gdesc->func_offset_low_word = (uint32_t)function & 0x0000FFFF; 61 p_gdesc->selector = SELECTOR_K_CODE; 62 p_gdesc->dcount = 0; 63 p_gdesc->attribute = attr; 64 p_gdesc->func_offset_high_word = ((uint32_t)function & 0xFFFF0000) >> 16; 65 } 66 67 // 初始化中断描述符表 68 static void idt_desc_init(void) { 69 int i; 70 for(i = 0; i < IDT_DESC_CNT; i++) { 71 make_idt_desc(&idt[i], IDT_DESC_ATTR_DPL0, intr_entry_table[i]); 72 } 73 put_str(" idt_desc_init donen"); 74 } 75 76 // 通用的中断处理函数,一般用在异常出现时的处理 77 static void general_intr_handler(uint8_t vec_nr) { 78 if(vec_nr == 0x27 || vec_nr == 0x2f) { 79 return; 80 } 81 set_cursor(0); 82 int cursor_pos = 0; 83 while(cursor_pos < 320) { 84 put_char(' '); 85 cursor_pos++; 86 } 87 88 set_cursor(0); 89 put_str("!!!!!! exception message begin !!!!!!n"); 90 set_cursor(88); 91 put_str(intr_name[vec_nr]); 92 if (vec_nr == 14) { // PageFault 93 int page_fault_vaddr = 0; 94 asm ("movl %%cr2, %0" : "=r" (page_fault_vaddr)); 95 put_str("npage fault addr is "); 96 put_int(page_fault_vaddr); 97 } 98 put_str("n!!!!!!! exception message end !!!!!!n"); 99 while(1); 100 } 101 102 // 完成一般中断处理函数注册及异常名称注册 103 static void exception_init(void) { 104 int i; 105 for(i = 0; i < IDT_DESC_CNT; i++) { 106 // 默认为这个,以后会由 register_handler 来注册具体处理函数 107 idt_table[i] = general_intr_handler; 108 intr_name[i] = "unknown"; 109 } 110 intr_name[0] = "#DE Divide Error"; 111 intr_name[1] = "#DB Debug Exception"; 112 intr_name[2] = "NMI Interrupt"; 113 intr_name[3] = "#BP Breakpoint Exception"; 114 intr_name[4] = "#OF Overflow Exception"; 115 intr_name[5] = "#BR BOUND Range Exceeded Exception"; 116 intr_name[6] = "#UD Invalid Opcode Exception"; 117 intr_name[7] = "#NM Device Not Available Exception"; 118 intr_name[8] = "#DF Double Fault Exception"; 119 intr_name[9] = "Coprocessor Segment Overrun"; 120 intr_name[10] = "#TS Invalid TSS Exception"; 121 intr_name[11] = "#NP Segment Not Present"; 122 intr_name[12] = "#SS Stack Fault Exception"; 123 intr_name[13] = "#GP General Protection Exception"; 124 intr_name[14] = "#PF Page-Fault Exception"; 125 // intr_name[15] 第 15 项是 intel 保留项,未使用 126 intr_name[16] = "#MF x87 FPU Floating-Point Error"; 127 intr_name[17] = "#AC Alignment Check Exception"; 128 intr_name[18] = "#MC Machine-Check Exception"; 129 intr_name[19] = "#XF SIMD Floating-Point Exception"; 130 } 131 132 /* 开中断并返回开中断前的状态*/ 133 enum intr_status intr_enable() { 134 enum intr_status old_status; 135 if (INTR_ON == intr_get_status()) { 136 old_status = INTR_ON; 137 return old_status; 138 } else { 139 old_status = INTR_OFF; 140 asm volatile("sti"); // 开中断,sti指令将IF位置1 141 return old_status; 142 } 143 } 144 145 /* 关中断,并且返回关中断前的状态 */ 146 enum intr_status intr_disable() { 147 enum intr_status old_status; 148 if (INTR_ON == intr_get_status()) { 149 old_status = INTR_ON; 150 asm volatile("cli" : : : "memory"); // 关中断,cli指令将IF位置0 151 return old_status; 152 } else { 153 old_status = INTR_OFF; 154 return old_status; 155 } 156 } 157 158 /* 将中断状态设置为status */ 159 enum intr_status intr_set_status(enum intr_status status) { 160 return status & INTR_ON ? intr_enable() : intr_disable(); 161 } 162 163 /* 获取当前中断状态 */ 164 enum intr_status intr_get_status() { 165 uint32_t eflags = 0; 166 GET_EFLAGS(eflags); 167 return (EFLAGS_IF & eflags) ? INTR_ON : INTR_OFF; 168 } 169 170 // 完成有关中断到所有初始化工作 171 void idt_init() { 172 put_str("idt_init startn"); 173 idt_desc_init(); // 初始化中断描述符表 174 exception_init(); // 初始化通用中断处理函数 175 pic_init(); // 初始化8259A 176 177 // 加载idt 178 uint64_t idt_operand = ((sizeof(idt) - 1) | ((uint64_t)((uint32_t)idt << 16))); 179 asm volatile("lidt %0" : : "m" (idt_operand)); 180 put_str("idt_init donen"); 181 } 182 183 // 注册中断处理函数 184 void register_handler(uint8_t vector_no, intr_handler function) { 185 idt_table[vector_no] = function; 186 }
interrupt.c
1 #include "thread.h" 2 #include "stdint.h" 3 #include "string.h" 4 #include "global.h" 5 #include "memory.h" 6 #include "list.h" 7 8 #define PG_SIZE 4096 9 10 struct task_struct* main_thread; // 主线程 PCB 11 struct list thread_ready_list; // 就绪队列 12 struct list thread_all_list; // 所有任务队列 13 static struct list_elem* thread_tag; // 用于保存队列中的线程结点 14 15 extern void switch_to(struct task_struct* cur, struct task_struct* next); 16 17 struct task_struct* running_thread() { 18 uint32_t esp; 19 asm ("mov %%esp, %0" : "=g" (esp)); 20 // 返回esp整数部分,即pcb起始地址 21 return (struct task_struct*)(esp & 0xfffff000); 22 } 23 24 // 由 kernel_thread 去执行 function(func_arg) 25 static void kernel_thread(thread_func* function, void* func_arg) { 26 intr_enable(); 27 function(func_arg); 28 } 29 30 // 初始化线程栈 thread_stack 31 void thread_create(struct task_struct* pthread, thread_func function, void* func_arg) { 32 // 先预留中断使用栈的空间 33 pthread->self_kstack -= sizeof(struct intr_stack); 34 35 // 再留出线程栈空间 36 pthread->self_kstack -= sizeof(struct thread_stack); 37 struct thread_stack* kthread_stack = (struct thread_stack*)pthread->self_kstack; 38 kthread_stack->eip = kernel_thread; 39 kthread_stack->function = function; 40 kthread_stack->func_arg = func_arg; 41 kthread_stack->ebp = kthread_stack->ebx = kthread_stack->esi = kthread_stack->edi = 0; 42 } 43 44 // 初始化线程基本信息 45 void init_thread(struct task_struct* pthread, char* name, int prio) { 46 memset(pthread, 0, sizeof(*pthread)); 47 strcpy(pthread->name, name); 48 49 if (pthread == main_thread) { 50 pthread->status = TASK_RUNNING; 51 } else { 52 pthread->status = TASK_READY; 53 } 54 pthread->priority = prio; 55 // 线程自己在内核态下使用的栈顶地址 56 pthread->self_kstack = (uint32_t*)((uint32_t)pthread + PG_SIZE); 57 pthread->ticks = prio; 58 pthread->elapsed_ticks = 0; 59 pthread->pgdir = NULL; 60 pthread->stack_magic = 0x19870916; // 自定义魔数 61 } 62 63 // 创建一优先级为 prio 的线程,线程名为 name,线程所执行的函数为 function_start 64 struct task_struct* thread_start(char* name, int prio, thread_func function, void* func_arg) { 65 // pcb 都位于内核空间,包括用户进程的 pcb 也是在内核空间 66 struct task_struct* thread = get_kernel_pages(1); 67 68 init_thread(thread, name, prio); 69 thread_create(thread, function, func_arg); 70 71 list_append(&thread_ready_list, &thread->general_tag); 72 list_append(&thread_all_list, &thread->all_list_tag); 73 74 return thread; 75 } 76 77 static void make_main_thread(void) { 78 main_thread = running_thread(); 79 init_thread(main_thread, "main", 31); 80 list_append(&thread_all_list, &main_thread->all_list_tag); 81 }
thread.c
代码解读
上节我们通过 main 函数调用
thread_start("k_thread_a", 31, k_thread_a, "argA ")
仅仅使得一个线程的结构,也就是 PCB 被附上了值。并且假装让它跑了起来,但跑起来就停不下来了。本节目的就是通过加入中断,在中断代码处用一些手段来改变这个现状。
1 // 时钟的中断处理函数 2 static void intr_timer_handler(void) { 3 struct task_struct* cur_thread = running_thread(); 4 cur_thread->elapsed_ticks++; 5 ticks++; 6 if (cur_thread->ticks == 0) { 7 //schedule(); 8 } else { 9 cur_thread->ticks--; 10 } 11 } 12 13 /* 初始化 PIT8253 */ 14 void timer_init() { 15 frequency_set(CONTRER0_PORT, COUNTER0_NO, READ_WRITE_LATCH, COUNTER_MODE, COUNTER0_VALUE); 16 register_handler(0x20, intr_timer_handler); 17 }
首先从最顶层的 timer.c 看,时钟中断处理函数被注册到了中断向量表里,这样当中断来临时就会执行。每次时钟中断一来,就 获取一下当前的线程,并判断当前线程的 ticks 是否到 0 了,如果到了则执行函数 schedule(),也就是我们下一节要实现的 任务切换,如果没到 0,就递减。这段代码顺理成章,很好理解。下面我们深入细节,也就是 ticks 是什么意思呢?
首先我们看 task_struct 这个结构的变化,增加了一些参数
1 struct task_struct { 2 uint32_t* self_kstack; 3 pid_t pid; 4 enum task_status status; 5 char name[TASK_NAME_LEN]; 6 uint8_t priority; 7 uint8_t ticks; // 每次在处理器上执行的时间嘀嗒数 8 uint32_t elapsed_ticks; // 此任务自上cpu运行后至今占用了多少cpu嘀嗒数 9 struct list_elem general_tag; // 线程在一般的队列中的结点 10 struct list_elem all_list_tag; // 线程队列thread_all_list中的结点 11 uint32_t* pgdir; // 进程自己页表的虚拟地址 12 struct virtual_addr userprog_vaddr; // 用户进程的虚拟地址 13 struct mem_block_desc u_block_desc[DESC_CNT]; // 用户进程内存块描述符 14 int32_t fd_table[MAX_FILES_OPEN_PER_PROC]; // 已打开文件数组 15 uint32_t cwd_inode_nr; // 进程所在的工作目录的inode编号 16 pid_t parent_pid // 父进程pid 17 int8_t exit_status; // 进程结束时自己调用exit传入的参数 18 uint32_t stack_magic; // 用这串数字做栈的边界标记,用于检测栈的溢出 19 };
有些多,因为我把很久之后需要的也加上了,只看黄色部分即可。
前两个就是时间,一个是 剩余时间,一个是 流逝时间,很显然是留给后面时钟中断去 递减 和 递增 的,毫无神秘感。
后面两个 list 结构里面的节点的变量,分别是指向两个重要队列的节点,队列后面再说
下面看这些新增的结构,是怎么被 thread.c 赋值并且利用的
1 .... 2 3 struct task_struct* main_thread; // 主线程 PCB 4 struct list thread_ready_list; // 就绪队列 5 struct list thread_all_list; // 所有任务队列 6 static struct list_elem* thread_tag; // 用于保存队列中的线程结点 7 8 ... 9 10 struct task_struct* running_thread() { 11 uint32_t esp; 12 asm ("mov %%esp, %0" : "=g" (esp)); 13 // 返回esp整数部分,即pcb起始地址 14 return (struct task_struct*)(esp & 0xfffff000); 15 } 16 17 ... 18 19 // 初始化线程基本信息 20 void init_thread(struct task_struct* pthread, char* name, int prio) { 21 memset(pthread, 0, sizeof(*pthread)); 22 strcpy(pthread->name, name); 23 if (pthread == main_thread) { 24 pthread->status = TASK_RUNNING; 25 } else { 26 pthread->status = TASK_READY; 27 } 28 pthread->priority = prio; 29 // 线程自己在内核态下使用的栈顶地址 30 pthread->self_kstack = (uint32_t*)((uint32_t)pthread + PG_SIZE); 31 pthread->ticks = prio; 32 pthread->elapsed_ticks = 0; 33 pthread->pgdir = NULL; 34 pthread->stack_magic = 0x19870916; // 自定义魔数 35 } 36 37 struct task_struct* thread_start(char* name, int prio, thread_func function, void* func_arg) { 38 struct task_struct* thread = get_kernel_pages(1); 39 init_thread(thread, name, prio); 40 thread_create(thread, function, func_arg); 41 list_append(&thread_ready_list, &thread->general_tag); 42 list_append(&thread_all_list, &thread->all_list_tag); 43 return thread; 44 } 45 46 static void make_main_thread(void) { 47 main_thread = running_thread(); 48 init_thread(main_thread, "main", 31); 49 list_append(&thread_all_list, &main_thread->all_list_tag); 50 }
代码只需要看我们重要的变化部分,也就是黄色部分即可。
首先我们增加了两个队列(这个是个新数据结构,也是我们定义的,这个细节就不再讲解了,相信队列大家都知道)
- thread_ready_list:就绪队列
- thread_all_list:所有队列
接下来我们提供了一个可以获取到当前线程的 task_struct 结构体的 running_thread 方法,其实就是取 esp 的整数页的开头部分
接下来我们把 init_thread 的方法,为 ticks 和 elapsed_ticks 赋值,ticks 简单地等于 prio,说明优先级与分的时间片呈简单的线性关系(相等)
最后 thread_start 不再假装地直接运行了,而是把线程加入到队列中,由另一段代码不断从队列中取出然后运行
现在我们的线程,终于开始有点模样了。
五、实现线程切换
线程的结构,以及通过时钟改变关键的变量,都已经万事俱备了,这部分主要就是实现还未实现的 schedule 函数,也就是线程切换
代码解读
shedule 函数很简单,就是把当前线程放到队列中,再从队列中取出一个线程开始运行,通过 c 和汇编的组合来实现
1 // 实现任务调度 2 void schedule() { 3 struct task_struct* cur = running_thread(); 4 if (cur->status == TASK_RUNNING) { 5 // 只是时间片到了,加入就绪队列队尾 6 list_append(&thread_ready_list, &cur->general_tag); 7 cur->ticks = cur->priority; 8 cur->status = TASK_READY; 9 } else { 10 // 需要等某事件发生后才能继续上 cpu,不加入就绪队列 11 } 12 13 thread_tag = NULL; 14 // 就绪队列取第一个,准备上cpu 15 thread_tag = list_pop(&thread_ready_list); 16 struct task_struct* next = elem2entry(struct task_struct, general_tag, thread_tag); 17 next->status = TASK_RUNNING; 18 switch_to(cur, next); 19 }
1 [bits 32] 2 section .text 3 global switch_to 4 switch_to: 5 ;栈中此处时返回地址 6 push esi 7 push edi 8 push ebx 9 push ebp 10 mov eax,[esp+20] ;得到栈中的参数cur 11 mov [eax],esp ;保存栈顶指针esp,task_struct的self_kstack字段 12 13 mov eax,[esp+24] ;得到栈中的参数next 14 mov esp,[eax] 15 pop ebp 16 pop ebx 17 pop edi 18 pop esi 19 ret
该函数是任务切换的关键,但代码十分清晰,大家自己品味一下
还有一个问题没有解决,就是我们每次开一个线程,都是将他加到队列里,那必然就得有第一个默认被运行的且加到了队列里的线程,不然一切无法开始呀
1 // 初始化线程环境 2 void thread_init(void) { 3 put_str("thread_init_startn"); 4 list_init(&thread_ready_list); 5 list_init(&thread_all_list); 6 make_main_thread(); 7 put_str("thread_init donen"); 8 }
就是这段代码,把我们 main 方法首先创建成了一个线程,这就是 一切的开始,之后的操作系统,便开启了 中断驱动的死循环 生涯。
最后 main 方法创建两个线程看看效果
1 #include "print.h" 2 #include "init.h" 3 #include "thread.h" 4 5 void k_thread_a(void*); 6 void k_thread_b(void*); 7 8 int main(void){ 9 put_str("I am kerneln"); 10 init_all(); 11 thread_start("k_thread_a", 31, k_thread_a, "argA "); 12 thread_start("k_thread_b", 8, k_thread_b, "argB "); 13 intr_enable(); 14 while(1) { 15 put_str("Main "); 16 } 17 return 0; 18 } 19 20 void k_thread_a(void* arg) { 21 char* para = arg; 22 while(1) { 23 put_str(para); 24 } 25 } 26 27 void k_thread_b(void* arg) { 28 char* para = arg; 29 while(1) { 30 put_str(para); 31 } 32 }
运行
还算符合预期,不过留了两个坑,你发现了么?哈哈我们得下讲才能解决

写在最后:开源项目和课程规划
如果你对自制一个操作系统感兴趣,不妨跟随这个系列课程看下去,甚至加入我们(下方有公众号和小助手微信),一起来开发。
参考书籍
《操作系统真相还原》这本书真的赞!强烈推荐
项目开源
当你看到该文章时,代码可能已经比文章中的又多写了一些部分了。你可以通过提交记录历史来查看历史的代码,我会慢慢梳理提交历史以及项目说明文档,争取给每一课都准备一个可执行的代码。当然文章中的代码也是全的,采用复制粘贴的方式也是完全可以的。
如果你有兴趣加入这个自制操作系统的大军,也可以在留言区留下您的联系方式,或者在 gitee 私信我您的联系方式。
课程规划
本课程打算出系列课程,我写到哪觉得可以写成一篇文章了就写出来分享给大家,最终会完成一个功能全面的操作系统,我觉得这是最好的学习操作系统的方式了。所以中间遇到的各种坎也会写进去,如果你能持续跟进,跟着我一块写,必然会有很好的收货。即使没有,交个朋友也是好的哈哈。
目前的系列包括
- 【自制操作系统01】硬核讲解计算机的启动过程
- 【自制操作系统02】环境准备与启动区实现
- 【自制操作系统03】读取硬盘中的数据
- 【自制操作系统04】从实模式到保护模式
- 【自制操作系统05】开启内存分页机制
- 【自制操作系统06】终于开始用 C 语言了,第一行内核代码!
- 【自制操作系统07】深入浅出特权级
- 【自制操作系统08】中断
- 【自制操作系统09】中断的代码实现
- 【自制操作系统10】内存管理系统
- 【自制操作系统11】中场休息之细节是魔鬼
微信公众号
我要去阿里(woyaoquali)
小助手微信号
Angel(angel19980323)