Spring入门(十三):Spring MVC常用注解讲解
- 2019 年 10 月 3 日
- 筆記
在使用Spring MVC开发Web应用程序时,控制器Controller的开发非常重要,虽然说视图(JSP或者是Thymeleaf)也很重要,因为它才是直接呈现给用户的,不过由于现在前端越来越重要,很多公司都开始采用前后端分离的开发模式,所以我们暂时可以将精力放在开发控制器上。
使用Spring MVC开发控制器主要使用以下7个注解:
- @Controller
- @RequestMapping
- @ResponseBody
- @RequestParam
- @PathVariable
- @RequestBody
- @RestController
接下来,我们依次讲解每个注解的使用方法。
1. @Controller
先回顾下上篇博客中新建的简单控制器HelloController:
package chapter05.controller; import org.springframework.stereotype.Controller; import org.springframework.web.bind.annotation.RequestMapping; import org.springframework.web.bind.annotation.RequestMethod; @Controller public class HelloController { @RequestMapping(value = "index", method = RequestMethod.GET) public String hello() { // 这里返回的逻辑视图名 return "index"; } }这里@Controller注解的作用是用来声明控制器,它的源码如下所示:
package org.springframework.stereotype; import java.lang.annotation.Documented; import java.lang.annotation.ElementType; import java.lang.annotation.Retention; import java.lang.annotation.RetentionPolicy; import java.lang.annotation.Target; @Target({ElementType.TYPE}) @Retention(RetentionPolicy.RUNTIME) @Documented @Component public @interface Controller { String value() default ""; }这里值得注意的是,@Controller注解使用了@Component注解,而@Component注解我们并不陌生,它用来声明一个Bean。
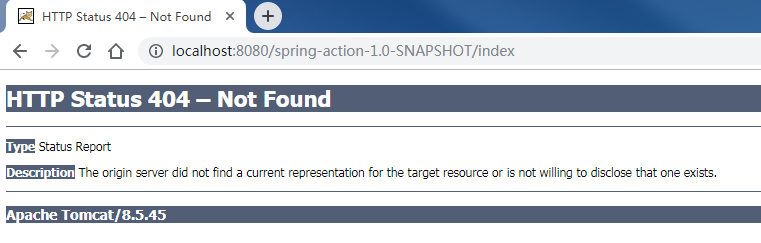
虽然有些书中说可以把@Controller注解替换为@Component注解,运行没有差别,只是表意性差一点,但是如果你将上面代码中的@Controller注解修改为@Component注解,然后重新打包发布到Tomcat,会发现访问地址http://localhost:8080/spring-action-1.0-SNAPSHOT/index时,报如下所示的404错误:
将@Component注解还原为@Controller注解,然后重新打包发布到Tomcat,再次访问地址http://localhost:8080/spring-action-1.0-SNAPSHOT/index时,访问正常:

所以,在Spring MVC中声明控制器时,推荐使用@Controller注解。
注意事项:程序员在阅读技术书籍时,要多思考,多尝试,因为书籍中讲解的,很可能是错的。
2. @RequestMapping
@RequestMapping注解用来映射Web请求,它有2种使用形式:
- 应用在方法级别,如上面的代码中展示的那样。
- 应用在类级别,当控制器在类级别上添加
@RequestMapping注解时,这个注解会应用到控制器的所有处理器方法上,处理器方法上的@RequestMapping注解会对类级别上的@RequestMapping注解的声明进行补充。
@RequestMapping注解常用的3个参数如下所示:
- value:指定映射的URL地址,如index
- method:指定映射的请求类型,如GET请求、POST请求等
- produces:指定返回的response的媒体类型和字符集,如application/json;charset=UTF-8。
指定method值时使用org.springframework.web.bind.annotation.RequestMethod枚举:
package org.springframework.web.bind.annotation; public enum RequestMethod { GET, HEAD, POST, PUT, PATCH, DELETE, OPTIONS, TRACE; private RequestMethod() { } }指定produces值时一般使用org.springframework.http.MediaType类下的常量:
public static final String APPLICATION_JSON_VALUE = "application/json"; public static final MediaType APPLICATION_JSON_UTF8 = valueOf("application/json;charset=UTF-8"); public static final String APPLICATION_JSON_UTF8_VALUE = "application/json;charset=UTF-8";为了更好的理解,我们在HelloController类上添加如下代码:
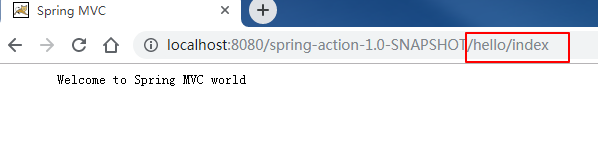
package chapter05.controller; import org.springframework.stereotype.Controller; import org.springframework.web.bind.annotation.RequestMapping; import org.springframework.web.bind.annotation.RequestMethod; @Controller @RequestMapping("/hello") public class HelloController { @RequestMapping(value = "index", method = RequestMethod.GET) public String hello() { // 这里返回的逻辑视图名 return "index"; } }重新打包并部署到Tomcat中,此时的访问地址从之前的http://localhost:8080/spring-action-1.0-SNAPSHOT/index变成了http://localhost:8080/spring-action-1.0-SNAPSHOT/hello/index,如下所示:
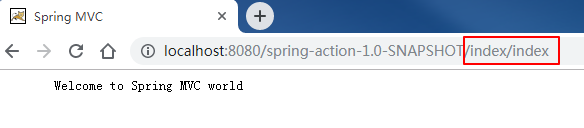
@RequestMapping注解的value属性还支持接受一个String类型的数组,如下所示:
@RequestMapping({"/hello", "/index"}) public class HelloController { // 省略其它代码 }此时也可以通过地址http://localhost:8080/spring-action-1.0-SNAPSHOT/index/index进行访问:
3. @ResponseBody
在上面的代码中,我们的方法是返回逻辑视图名index,然后由视图解析器最终找到运行时的/WEB-INF/classes/views/index.jsp视图,但有时我们不需要返回一个页面,而是直接返回数据给到前端。
此时我们可以使用@ResponseBody注解,该注解可以放在返回值前或者方法上,用于将返回值放在response体内,而不是返回一个页面。
为了更好的理解,我们新建个DemoAnnoController控制器如下所示:
package chapter05.controller; import org.springframework.http.MediaType; import org.springframework.stereotype.Controller; import org.springframework.web.bind.annotation.RequestMapping; import org.springframework.web.bind.annotation.RequestMethod; import org.springframework.web.bind.annotation.ResponseBody; import javax.servlet.http.HttpServletRequest; @Controller @RequestMapping("/anno") public class DemoAnnoController { @RequestMapping(value = "/index", method = RequestMethod.GET, produces = MediaType.TEXT_PLAIN_VALUE) public @ResponseBody String index(HttpServletRequest request) { return "url:" + request.getRequestURI() + " can access"; } }重新打包并部署到Tomcat中,访问地址http://localhost:8080/spring-action-1.0-SNAPSHOT/anno/index,效果如下所示:

也可以将@ResponseBody注解放在方法上,如下所示:
@RequestMapping(value = "/index", method = RequestMethod.GET, produces = MediaType.TEXT_PLAIN_VALUE) @ResponseBody public String index(HttpServletRequest request) { return "url:" + request.getRequestURI() + " can access"; }4. @RequestParam
@RequestParam注解用于接收URL中的参数信息。
为了更好的理解 ,我们在DemoAnnoController控制器中添加如下方法:
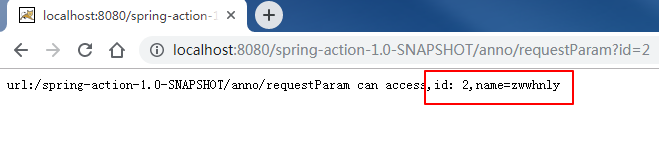
@RequestMapping(value = "/requestParam", method = RequestMethod.GET, produces = "text/plain;charset=UTF-8") @ResponseBody public String passRequestParam(@RequestParam("id") Long id, @RequestParam("name") String name, HttpServletRequest request) { return "url:" + request.getRequestURI() + " can access,id: " + id + ",name=" + name; }重新打包并部署到Tomcat中,访问地址http://localhost:8080/spring-action-1.0-SNAPSHOT/anno/requestParam?id=1&name=zwwhnly ,效果如下所示:

注意事项:上面示例中,Url中的参数名称和方法中的变量名称完全一致,所以可以省略掉
@RequestParam注解,不过为了代码的易读性,建议保留@RequestParam注解。
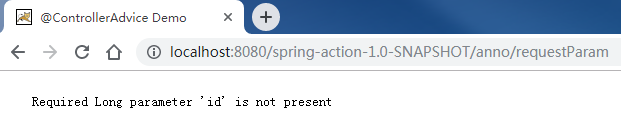
如果不传递参数,访问地址http://localhost:8080/spring-action-1.0-SNAPSHOT/anno/requestParam,则会提示如下信息:
或者只传递其中1个参数,访问地址http://localhost:8080/spring-action-1.0-SNAPSHOT/anno/requestParam?id=1,则会提示如下信息:

由此也说明,使用了
@RequestParam注解的参数,在Url中必须传递。
不过,@RequestParam注解提供了defaultValue属性,可以给参数指定默认值,比如我们给参数id设置默认值1,给参数name设置默认值zwwhnly,然后访问地址http://localhost:8080/spring-action-1.0-SNAPSHOT/anno/requestParam,效果如下所示:

或者访问地址http://localhost:8080/spring-action-1.0-SNAPSHOT/anno/requestParam?id=2,效果如下所示:
不过,还是有一个异常场景需要注意,就是Url中传递的参数和方法中定义的参数类型不匹配,比如我们将id的值传错,访问地址http://localhost:8080/spring-action-1.0-SNAPSHOT/anno/requestParam?id=zwwhnly&name=zwwhnly,会看到如下报错信息:

5. @PathVariable
@PathVariable注解也是用于接收URL中的参数信息,不过和@RequestParam注解稍有不同。
@PathVariable注解用于解析Url中的路径参数,如https://www.cnblogs.com/zwwhnly/中的zwwhnly部分,而@RequestParam注解用于解析Url中的查询参数,如https://i.cnblogs.com/posts?page=2中的page部分。
为了更好的理解 ,我们在DemoAnnoController控制器中添加如下方法:
@RequestMapping(value = "/pathvar/{str}", produces = "text/plain;charset=UTF-8") public @ResponseBody String demoPathVar(@PathVariable("str") String str, HttpServletRequest request) { return "url:" + request.getRequestURI() + " can access,str: " + str; }重新打包并部署到Tomcat中,访问地址http://localhost:8080/spring-action-1.0-SNAPSHOT/anno/pathvar/zwwhnly ,效果如下所示:

注意事项:如果
@PathVariable注解中指定value属性的话,它会假设占位符的名称与方法的参数名相同。
因为这里方法的参数名正好与占位符的名称相同,所以我们可以去掉@PathVariable注解的value属性:
@RequestMapping(value = "/pathvar/{str}", produces = "text/plain;charset=UTF-8") public @ResponseBody String demoPathVar(@PathVariable String str, HttpServletRequest request) { return "url:" + request.getRequestURI() + " can access,str: " + str; }6. @RequestBody
@RequestBody注解允许request的参数在request体中,而不是直接链接在地址后面,该注解放在参数前。
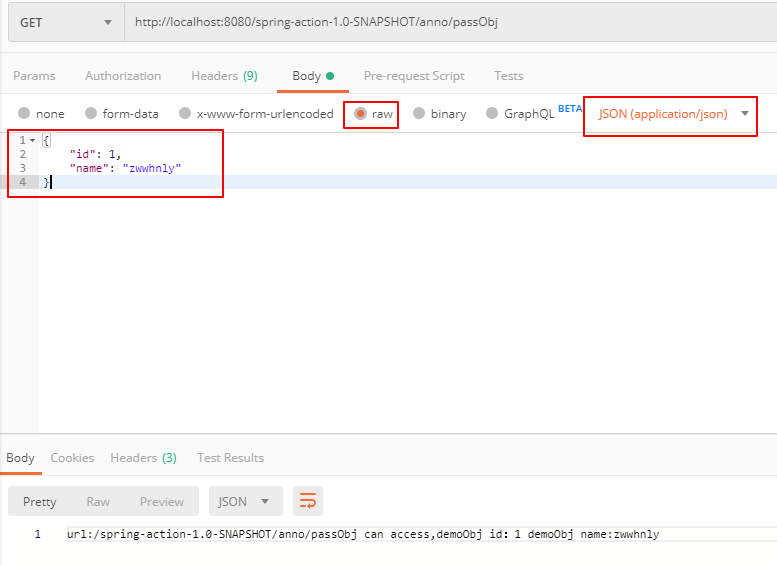
为了更好的理解 ,我们在DemoAnnoController控制器中添加如下方法:
@RequestMapping(value = "/obj", produces = MediaType.APPLICATION_JSON_UTF8_VALUE) @ResponseBody public String passObj(@RequestBody DemoObj demoObj, HttpServletRequest request) { return "url:" + request.getRequestURI() + " can access,demoObj id:" + demoObj.getId() + " demoObj name:" + demoObj.getName(); }重新打包并部署到Tomcat中,然后使用Postman工具调用接口http://localhost:8080/spring-action-1.0-SNAPSHOT/anno/passObj,效果如下所示:
7. @RestController
@RestController是一个组合注解,它组合了@Controller注解和@ResponseBody注解,源码如下所示:
package org.springframework.web.bind.annotation; import java.lang.annotation.Documented; import java.lang.annotation.ElementType; import java.lang.annotation.Retention; import java.lang.annotation.RetentionPolicy; import java.lang.annotation.Target; import org.springframework.stereotype.Controller; @Target({ElementType.TYPE}) @Retention(RetentionPolicy.RUNTIME) @Documented @Controller @ResponseBody public @interface RestController { String value() default ""; }因此,如果某个控制器中所有的方法都只是返回数据而不是页面的话,就可以使用@RestController注解。
为了更好的理解 ,我们举个具体的示例。
首先,在pom.xml中添加如下依赖,用于对象和json之间的转换:
<dependency> <groupId>com.fasterxml.jackson.core</groupId> <artifactId>jackson-databind</artifactId> <version>2.9.9</version> </dependency>然后新建控制器DemoRestController如下所示:
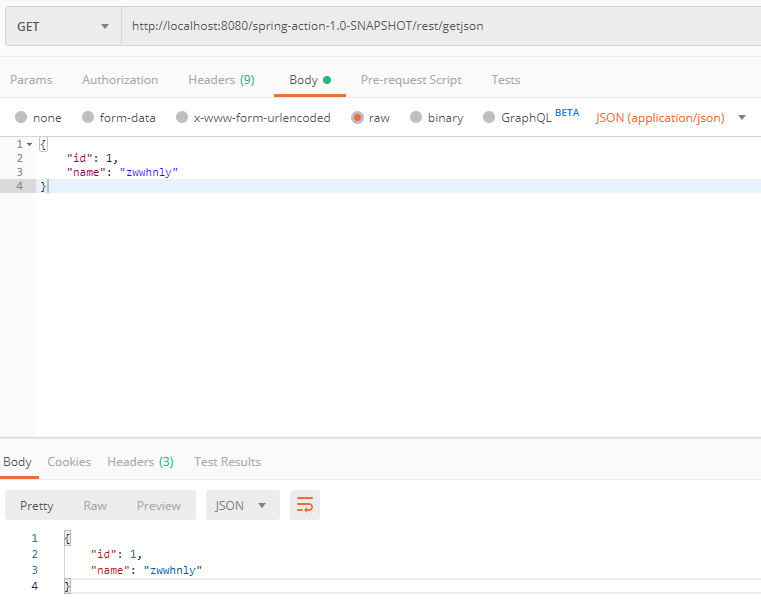
package chapter05.controller; import chapter05.model.DemoObj; import org.springframework.http.MediaType; import org.springframework.web.bind.annotation.RequestBody; import org.springframework.web.bind.annotation.RequestMapping; import org.springframework.web.bind.annotation.RequestMethod; import org.springframework.web.bind.annotation.RestController; @RestController @RequestMapping("/rest") public class DemoRestController { @RequestMapping(value = "/getjson", method = RequestMethod.GET, produces = MediaType.APPLICATION_JSON_UTF8_VALUE) public DemoObj getjson(@RequestBody DemoObj demoObj) { return new DemoObj(demoObj.getId(), demoObj.getName()); } }因为使用@RestController注解,相当于同时使用了@Controller注解和@ResponseBody注解,所以上面的代码等价于下面的代码:
package chapter05.controller; import chapter05.model.DemoObj; import org.springframework.http.MediaType; import org.springframework.stereotype.Controller; import org.springframework.web.bind.annotation.*; @Controller @ResponseBody @RequestMapping("/rest") public class DemoRestController { @RequestMapping(value = "/getjson", method = RequestMethod.GET, produces = MediaType.APPLICATION_JSON_UTF8_VALUE) public DemoObj getjson(@RequestBody DemoObj demoObj) { return new DemoObj(demoObj.getId(), demoObj.getName()); } }重新打包并部署到Tomcat中,然后使用Postman工具调用接口http://localhost:8080/spring-action-1.0-SNAPSHOT/rest/getjson,效果如下所示:
8. 源码及参考
源码地址:https://github.com/zwwhnly/spring-action.git,欢迎下载。
Craig Walls 《Spring实战(第4版)》
汪云飞《Java EE开发的颠覆者:Spring Boot实战》
9. 最后
欢迎扫码关注微信公众号:「申城异乡人」,定期分享Java技术干货,让我们一起进步。

