深度学习中常用的图像数据增强方法-纯干货
- 2019 年 11 月 13 日
- 筆記
微信公众号:OpenCV学堂
图像数据增强方法概述
图像数据准备对神经网络与卷积神经网络模型训练有重要影响,当样本空间不够或者样本数量不足的时候会严重影响训练或者导致训练出来的模型泛化程度不够,识别率与准确率不高!本文将会带你学会如何对已有的图像数据进行数据增强,获取样本的多样性与数据的多样性从而为训练模型打下良好基础。通读全文你将get到如何几个技能:
- 使用标准化对图像进行图像增强
- 使用几何变换(平移、翻转、旋转)对图像进行数据增强
- 使用随机调整亮度对图像进行增强
- 使用随机调整对比度对图像进行增强
演示基于mnist数据集,使用tensorflow+opencv,随机获取9张28×28的大小的数据图像,然后进行处理,处理之后通过opencv来显示结果。加载mnisnt数据集,获取随机9张图像,显示的代码如下:
from tensorflow.examples.tutorials.mnist import input_data import tensorflow as tf import numpy as np import cv2 as cv mnist = input_data.read_data_sets("MNIST_data/", one_hot=True) batch_xs, batch_ys = mnist.train.next_batch(9) def show_images(images_data, win_name): plot_image = np.zeros(shape=[96, 96], dtype=np.float32) for i in range(0, 9): col = i % 3 row = i // 3 plot_image[row*28:row*28+28, col*28:col*28+28] = images_data[i].reshape(28, 28) # show the plot cv.imshow(win_name, cv.resize(plot_image, (256, 256))) batch_xs = batch_xs.reshape(batch_xs.shape[0], 1, 28, 28) show_images(batch_xs, "batches") sess = tf.Session() print(batch_xs.shape)
选择9张mnist图像

图像标准化
关于图像标准化的原理,可以看本公众号以前的文章即可,点击如下链接即可查看:
标准化的图像增强代码如下:
def standardization(): results = np.copy(batch_xs) for i in range(9): image = sess.run(tf.image.per_image_standardization(batch_xs[i].reshape(28, 28, -1))) results[i, :, :, :] = image.reshape(-1, 28,28) show_images(results, "standardization")
标准化增强如下

翻转、旋转
图像几何变换通常包括图像的平移、翻转、旋转等操作,利用图像几何操作实现图像数据增强。 翻转操作代码如下:
def random_flip(): copy = np.copy(batch_xs) copy = np.squeeze(copy, axis=1) copy = np.expand_dims(copy, axis=3) flip_results = sess.run(tf.image.flip_left_right(copy)) flip_results = np.squeeze(flip_results, axis=3) flip_results = np.expand_dims(flip_results, axis=1) print(flip_results.shape) show_images(flip_results, "flip_left_right")
翻转增强之后显示

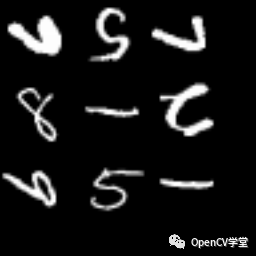
旋转操作代码如下:
def random_rotate(): results = np.copy(batch_xs) for i in range(9): image = sess.run(tf.image.rot90(batch_xs[i].reshape(28, 28, -1), i%4+1)) results[i, :, :, :] = image.reshape(-1, 28,28) show_images(results, "random_rotate")
随机90度旋转操作增强之后
随机亮度
随机亮度通过调整图像像素值改变图像亮度,这种方式对图像进行数据增强的代码如下:
def random_brightness(): results = np.copy(batch_xs) for i in range(9): image = sess.run(tf.image.random_brightness(batch_xs[i].reshape(28, 28), 0.9)) results[i, :, :, :] = image.reshape(-1, 28,28) show_images(results,"random_brightness")
随机亮度增强之后显示

随机对比度
随机对比度,通过调整图像对比度来对图像进行数据增强,代码实现如下:
def random_contrast(): results = np.copy(batch_xs) for i in range(9): image = sess.run(tf.image.random_contrast(batch_xs[i].reshape(28, 28, -1), 0.85, 1.5)) results[i, :, :, :] = image.reshape(-1, 28,28) show_images(results, "random_contrast")
随机对比度增强之后显示

python运行调用
random_flip() random_brightness() random_contrast() random_rotate() standardization() cv.waitKey(0) cv.destroyAllWindows()

