Spring Boot 2.x (一):第一个 Web 应用 Hello Spring Boot 2
- 2019 年 11 月 6 日
- 筆記

一、开发环境
➜ ~ java -version java version "1.8.0_144" Java(TM) SE Runtime Environment (build 1.8.0_144-b01) Java HotSpot(TM) 64-Bit Server VM (build 25.144-b01, mixed mode)
➜ ~ mvn -version Apache Maven 3.6.1
二、Spring Boot 简介
Spring Boot 是由 Pivotal 团队提供的全新框架,其设计目的是用来简化新 Spring 应用的初始搭建以及开发过程。该框架使用了特定的方式来进行配置,从而使开发人员不再需要定义样板化的配置。通过这种方式,Spring Boot致力于在蓬勃发展的快速应用开发领域(Rapid Application Development)成为领导者。
Spring Boot 具有以下特点:
- 可以创建独立的 Spring 应用程序,并且基于 Maven 或 Gradle 插件,可以创建可执行的 JARs 和 WARs;
- 内嵌 Tomcat 或 Jetty 等 Servlet 容器;
- 提供自动配置的 “starter” 项目对象模型(POMS)以简化 Maven 配置;
- 尽可能自动配置 Spring 容器;
- 提供一些常见的功能、如监控、WEB容器,健康,安全等功能;
- 绝对没有代码生成,也不需要 XML 配置。
三、创建 Web 项目
3.1 首先启动 Idea 找到 File -> New -> Project -> Spring Initializr

3.2 选择 Next,填写项目元信息
- Group: 组织 ID,一般分为多个段,第一段为域,第二段为公司名称。域又分为 org、com 或 cn 等等,其中 org 为非营利组织,com 为商业组织。
- Artifact: 唯一标识符,一般是项目名称。

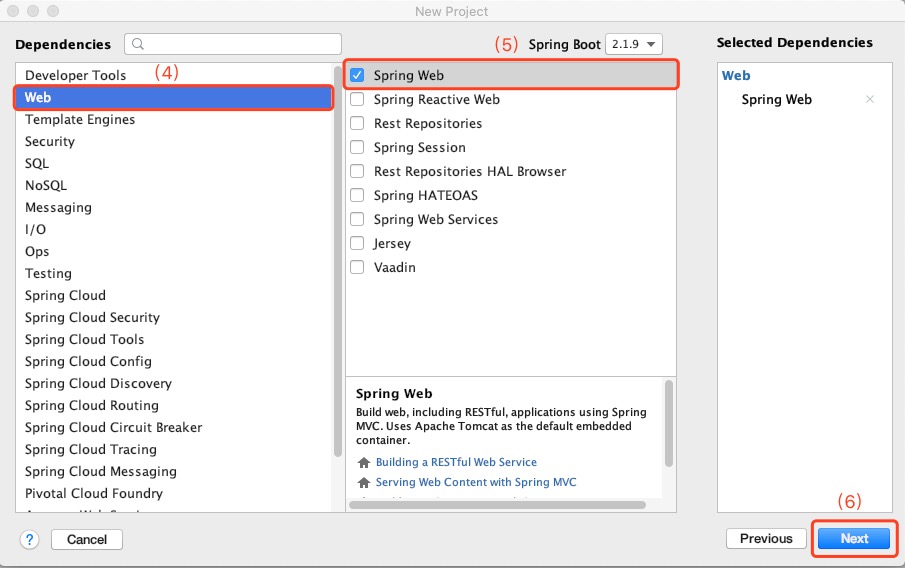
3.3 继续选择 Next,勾选项目依赖,这里选择 Web -> Spring Web
3.4 填写项目名和项目路径

3.5 最后选择 Finish
此时第一个 Web 项目就创建完成了,对应的目录结构如下:
├── HELP.md ├── chapter1.iml ├── mvnw ├── mvnw.cmd ├── pom.xml └── src ├── main │ ├── java │ │ └── com │ │ └── semlinker │ │ └── chapter1 │ │ └── Chapter1Application.java # 项目启动类,包含main函数 │ └── resources │ ├── application.properties # 项目主要的配置文件 │ ├── static │ └── templates └── test └── java └── com └── semlinker └── chapter1 └── Chapter1ApplicationTests.java
此外在根目录下还存在一个 pom.xml 文件,POM(Project Object Model,项目对象模型)是 Maven 工程的基本工作单元,是一个 XML 文件,包含了项目的基本信息,用于描述项目如何构建,声明项目依赖,等等。
执行任务或目标时,Maven 会在当前目录中查找 POM。它读取 POM,获取所需的配置信息,然后执行目标。
POM 中可以指定以下配置:
- 项目依赖
- 插件
- 执行目标
- 项目构建 profile
- 项目版本
- 项目开发者列表
- 相关邮件列表信息
了解完 pom 相关的基础知识,我们来一睹它的真容。打开项目中的 pom.xml 文件,该文件的具体内容如下:
<?xml version="1.0" encoding="UTF-8"?> <project xmlns="http://maven.apache.org/POM/4.0.0" xmlns:xsi="http://www.w3.org/2001/XMLSchema-instance" xsi:schemaLocation="http://maven.apache.org/POM/4.0.0 https://maven.apache.org/xsd/maven-4.0.0.xsd"> <modelVersion>4.0.0</modelVersion> <parent> <groupId>org.springframework.boot</groupId> <artifactId>spring-boot-starter-parent</artifactId> <version>2.1.9.RELEASE</version> <relativePath/> <!-- lookup parent from repository --> </parent> <groupId>com.semlinker</groupId> <artifactId>chapter1</artifactId> <version>0.0.1-SNAPSHOT</version> <name>chapter1</name> <description>Demo project for Spring Boot</description> <properties> <java.version>1.8</java.version> </properties> <!-- 项目依赖 --> <dependencies> <!-- 默认内嵌Tomcat容器 --> <dependency> <groupId>org.springframework.boot</groupId> <artifactId>spring-boot-starter-web</artifactId> </dependency> <!-- 测试依赖包,执行mvn package的时候,该包并不会被打入,因为它的生命周期只在test之内--> <dependency> <groupId>org.springframework.boot</groupId> <artifactId>spring-boot-starter-test</artifactId> <scope>test</scope> </dependency> </dependencies> <build> <plugins> <plugin> <groupId>org.springframework.boot</groupId> <artifactId>spring-boot-maven-plugin</artifactId> </plugin> </plugins> </build> </project>
说了那么多,有些小伙伴估计已经按捺不住了,我们赶紧来启动一下我们的第一个 Web 应用。

在运行 Chapter1Application 应用后,我们将在控制台看到 Spring Boot 的启动信息:
. ____ _ __ _ _ /\ / ___'_ __ _ _(_)_ __ __ _ ( ( )___ | '_ | '_| | '_ / _` | \/ ___)| |_)| | | | | || (_| | ) ) ) ) ' |____| .__|_| |_|_| |___, | / / / / =========|_|==============|___/=/_/_/_/ :: Spring Boot :: (v2.1.9.RELEASE) ... ... --- [main] o.s.b.w.embedded.tomcat.TomcatWebServer: Tomcat started on port(s): 8080 (http) with context path '' --- [main] c.s.chapter1.Chapter1Application: Started Chapter1Application in 1.532 seconds (JVM running for 2.045)
通过观察启动信息,我们可知 Spring Boot 默认使用 Tomcat 作为 Servlet 容器,且使用 8080 作为默认端口。小伙伴们是不是觉得入门 So easy,但当你在浏览器中访问 http://localhost:8080/ 地址,你将会看到以下不忍直视的画面:
Whitelabel Error Page This application has no explicit mapping for /error, so you are seeing this as a fallback. Sat Oct 12 12:16:49 CST 2019 There was an unexpected error (type=Not Found, status=404). No message available
从 This application has no explicit mapping for /error 错误信息中,可知是由于我们未设置 映射信息导致的,下面我们来着手解决这个问题。要解决这个问题,我们需要新建一个 HelloController 类,在该类下定义请求映射信息,具体如下:
package com.semlinker.chapter1.controller; import org.springframework.web.bind.annotation.RequestMapping; import org.springframework.web.bind.annotation.RestController; @RestController public class HelloController { @RequestMapping("/") public String greet() { return "Hello Spring boot 2.x"; } }
在完成 HelloController 类的定义之后,我们需要重新启动一下应用。当应用成功启动之后,我们再来使用浏览器来访问一下 http://localhost:8080/ 地址,如果不出意外的话,我们将在页面中看到预期的结果:
Hello Spring boot 2.x
四、常见问题
4.1 端口被占用怎么办
通过前面的介绍,我们可知 Spring Boot 默认使用的端口是 8080,所以如果你们本地的 8080 端口已经被占用了,那么你将不能正常启动 Spring Boot 项目。对于这个问题,我们可以通过一个简单的方式来解决,即通过配置文件 application.properties 来修改默认的端口。
server.port=8088
当修改完配置文件,重启应用的时候,在控制台可以看到以下的输出信息:
embedded.tomcat.TomcatWebServer : Tomcat initialized with port(s): 8088 (http)
这就表明我们已经成功修改了 Tomcat 默认的端口。
4.2 如何进行单元测试
细心的小伙伴可能会注意到在 chapter1 项目的根目录下的 pom.xml 文件中还配置了一个依赖 —— spring-boot-starter-test:
<dependency> <groupId>org.springframework.boot</groupId> <artifactId>spring-boot-starter-test</artifactId> <scope>test</scope> </dependency>
顾名思义,这个依赖就是为我们项目提供单元测试支持。
package com.semlinker.chapter1; import org.junit.Test; import org.junit.runner.RunWith; import org.springframework.beans.factory.annotation.Autowired; import org.springframework.boot.test.context.SpringBootTest; import org.springframework.boot.test.web.client.TestRestTemplate; import org.springframework.boot.web.server.LocalServerPort; import org.springframework.http.ResponseEntity; import org.springframework.test.context.junit4.SpringRunner; import java.net.URL; import static org.junit.Assert.assertEquals; @RunWith(SpringRunner.class) @SpringBootTest(webEnvironment = SpringBootTest.WebEnvironment.RANDOM_PORT) public class Chapter1ApplicationTests { @LocalServerPort private int port; @Autowired private TestRestTemplate template; @Test public void testGreet() { ResponseEntity<String> response = template.getForEntity("http://localhost:" + port, String.class); assertEquals(response.getBody(), "Hello Spring boot 2.x"); } }
在 Chapter1ApplicationTests 测试类中,我们通过注入 TestRestTemplate 对象,来发送 Http 请求。需要注意的是在使用 @SpringBootTest 注解时,需要设置 webEnvironment 属性,否则运行单元测试时,会抛出异常,
详细信息可以参考 spring boot test unable to inject TestRestTemplate and MockMvc 这篇文章。
为了让项目更加直观,已对项目做了以下调整: Chapter1Application -> HelloSpringBoot2Application com.semlinker.chapter1 -> com.semlinker 项目地址:https://github.com/semlinker/springstack/tree/master/hello-springboot2


