Kubernetes实战总结 – 阿里云ECS自建K8S集群
- 2020 年 9 月 2 日
- 筆記
- Kubernetes
一、概述
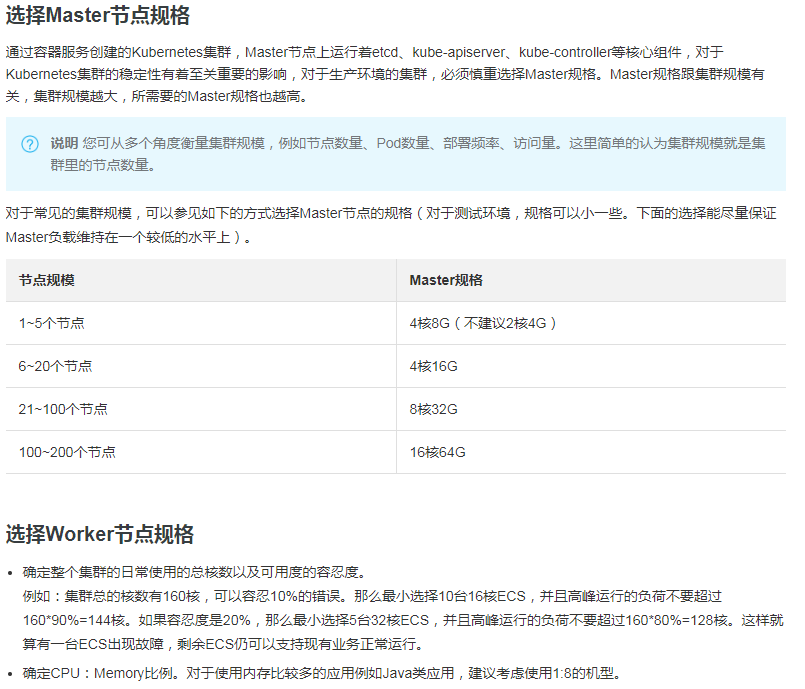
详情参考阿里云说明://help.aliyun.com/document_detail/98886.html?spm=a2c4g.11186623.6.1078.323b1c9bpVKOry
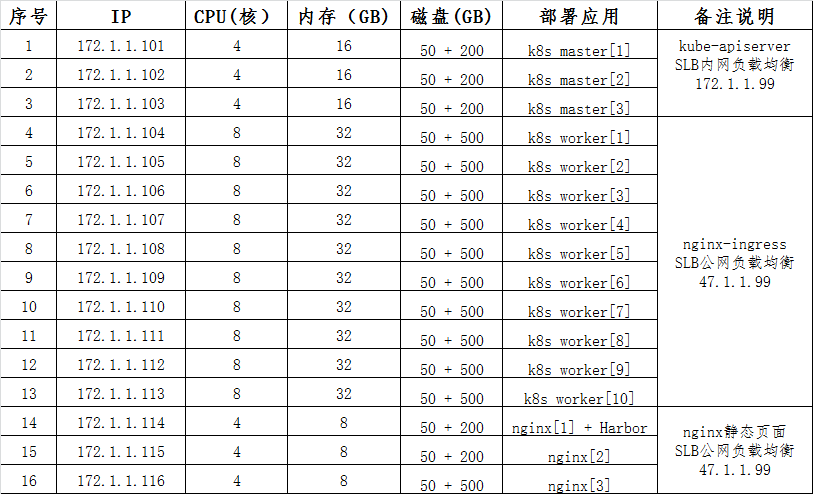
我的项目资源分配(数据库、中间件除外):
二、部署镜像仓库
1) 部署docker-compose,然后参考下文部署docker。
$ sudo curl -L "//github.com/docker/compose/releases/download/1.26.2/docker-compose-$(uname -s)-$(uname -m)" -o /usr/local/bin/docker-compose
$ sudo chmod +x /usr/local/bin/docker-compose
$ sudo ln -s /usr/local/bin/docker-compose /usr/bin/docker-compose
$ docker-compose --version
docker-compose version 1.26.2, build 1110ad01
2) 创建镜像仓库域名证书。
mkdir -p /data/cert && chmod -R 777 /data/cert && cd /data/cert
openssl req -x509 -sha256 -nodes -days 3650 -newkey rsa:2048-keyout harbor.key -out harbor.crt -subj "/CN=hub.jhmy.com"
3) 下载harbor离线包,编辑harbor.yml,修改主机地址、证书路径、仓库密码。
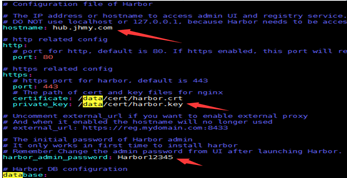
4) 执行install.sh部署,完成之后访问 //hostip 即可。
部署流程:检查环境 -> 导入镜像 -> 准备环境 -> 准备配置 -> 开始启动

三、 系统初始化
1) 设置主机名以及域名解析
hostnamectl set-hostname k8s101
cat >> /etc/hosts <<EOF
172.1.1.114 hub.jhmy.com
172.1.1.101 k8s101
172.1.1.102 k8s102
172.1.1.103 k8s103
172.1.1.104 k8s104
……
172.1.1.99 k8sapi
EOF
2) 节点之前建立无密登录
ssh-keygen
ssh-copy-id -i .ssh/id_rsa.pub  root@k8s-node1
3) 安装依赖包、常用软件,以及同步时间时区
yum -y install vim curl wget unzip ntpdate net-tools ipvsadm ipset sysstat conntrack libseccomp
ntpdate ntp1.aliyun.com && ln -sf /usr/share/zoneinfo/Asia/Shanghai /etc/localtime
4) 关闭swap、selinux、firewalld
swapoff -a && sed -i '/ swap / s/^\(.*\)$/#\1/g' /etc/fstab
setenforce 0 && sed -i 's/^SELINUX=.*/SELINUX=disabled/' /etc/selinux/config
systemctl stop firewalld && systemctl disable firewalld
5) 调整系统内核参数
cat > /etc/sysctl.d/kubernetes.conf <<EOF
net.bridge.bridge-nf-call-iptables=1
net.bridge.bridge-nf-call-ip6tables=1
net.ipv6.conf.all.disable_ipv6=1
net.ipv4.ip_forward=1
net.ipv4.tcp_tw_recycle=0
vm.swappiness=0
fs.file-max=2000000
fs.nr_open=2000000
fs.inotify.max_user_instances=512
fs.inotify.max_user_watches=1280000
net.netfilter.nf_conntrack_max=524288
EOF

modprobe br_netfilter && sysctl -p /etc/sysctl.d/kubernetes.conf
6) 加载系统ipvs相关模块
cat > /etc/sysconfig/modules/ipvs.modules <<EOF
#!/bin/bash
modprobe -- ip_vs
modprobe -- ip_vs_rr
modprobe -- ip_vs_wrr
modprobe -- ip_vs_sh
modprobe -- nf_conntrack_ipv4
EOF

chmod 755 /etc/sysconfig/modules/ipvs.modules
sh /etc/sysconfig/modules/ipvs.modules && lsmod | grep -e ip_
7) 安装nfs文件共享服务
yum -y install nfs-common nfs-utils rpcbind
systemctl start nfs && systemctl enable nfs
systemctl start rpcbind && systemctl enable rpcbind
四、 部署高可用集群
1) 安装部署docker
# 设置镜像源,安装docker及组件
yum install -y yum-utils device-mapper-persistent-data lvm2
yum-config-manager --add-repo //mirrors.aliyun.com/docker-ce/linux/centos/docker-ce.repo
yum install -y docker-ce-19.03.5 docker-ce-cli-19.03.5

# 设置镜像加速,仓库地址,日志模式
mkdir /etc/docker
cat > /etc/docker/daemon.json <<EOF
{
"registry-mirrors": ["//jc3y13r3.mirror.aliyuncs.com"],
"insecure-registries":["hub.jhmy.com"],
"data-root": "/data/docker",
"exec-opts": ["native.cgroupdriver=systemd"],
"log-driver": "json-file",
"log-opts": { "max-size": "100m" }
}
EOF

# 重启docker,设置启动
mkdir -p /etc/systemd/system/docker.service.d
systemctl daemon-reload && systemctl restart docker && systemctl enable docker
2) 安装部署kubernetes
# 设置kubernetes镜像源
cat <<EOF > /etc/yum.repos.d/kubernetes.repo
[kubernetes]
name=Kubernetes
baseurl=//mirrors.aliyun.com/kubernetes/yum/repos/kubernetes-el7-x86_64
enabled=1
gpgcheck=0
repo_gpgcheck=0
gpgkey=//mirrors.aliyun.com/kubernetes/yum/doc/yum-key.gpg
http://mirrors.aliyun.com/kubernetes/yum/doc/rpm-package-key.gpg
EOF

# 安装kubeadm、kebelet、kubectl
yum -y install kubeadm-1.17.5 kubelet-1.17.5 kubectl-1.17.5 --setopt=obsoletes=0
systemctl enable kubelet.service
3) 初始化管理节点
任选一台master节点,修改当前master节点 /etc/hosts,把 k8sapi 对应解析地址修改为当前节点地址(系统初始化时我们统一配置成slb负载地址了)。
虽然我们打算利用阿里云的SLB进行kube-apiserver负载,但是此时集群未启动,无法监听k8sapi端口,也就是还无法访问到SLB负载的端口,
那么集群初始化将会失败,所以我们暂时先用当前节点地址作为负载地址,也就是自己负载自己,来先实现集群初始化。
注意:因为是正式环境,我们尽量修改一些默认值,比如:token、apiserver端口、etcd数据路径、podip网段等。
# kubeadm config print init-defaults > kubeadm-config.yaml
# vim kubeadm-config.yaml
apiVersion: kubeadm.k8s.io/v1beta2
bootstrapTokens:
- groups:
  - system:bootstrappers:kubeadm:default-node-token
  token: token0.123456789kubeadm
  ttl: 24h0m0s
  usages:
  - signing
  - authentication
kind: InitConfiguration
localAPIEndpoint:
  advertiseAddress: 172.1.1.101
  bindPort: 6333
nodeRegistration:
  criSocket: /var/run/dockershim.sock
  name: k8s101
  taints:
  - effect: NoSchedule
    key: node-role.kubernetes.io/master
---
apiServer:
  timeoutForControlPlane: 4m0s
apiVersion: kubeadm.k8s.io/v1beta2
certificatesDir: /etc/kubernetes/pki
clusterName: kubernetes
controlPlaneEndpoint: "k8sapi:6333"
controllerManager: {}
dns:
  type: CoreDNS
etcd:
  local:
    dataDir: /data/etcd
imageRepository: registry.aliyuncs.com/google_containers
kind: ClusterConfiguration
kubernetesVersion: v1.17.5
networking:
  dnsDomain: cluster.local
  serviceSubnet: 10.96.0.0/12
  podSubnet: 10.233.0.0/16
scheduler: {}
---
apiVersion: kubeproxy.config.k8s.io/v1alpha1
kind: KubeProxyConfiguration
featureGates:
  SupportIPVSProxyMode: true
mode: ipvs
# kubeadm init --config=kubeadm-config.yaml --upload-certs | tee kubeadm-init.log
k8s主节点初始化完成后,打开阿里云负载均衡配置,增加SLB内网对kube-apiserver负载配置(这里只能用四层TCP)。
暂且只配置当前master地址,等待其他master节点加入成功后再添加,因为其他两台master还未加入,此时如果配置其他master地址,SLB负载均衡状态将会异常,那其他节点尝试加入集群将会失败。

4) 加入其余管理节点和工作节点
# 根据初始化日志提示,执行kubeadm join命令加入其他管理节点。
kubeadm join 192.168.17.100:6444 --token abcdef.0123456789abcdef \
   --discovery-token-ca-cert-hash sha256:56d53268517... \
   --experimental-control-plane --certificate-key c4d1525b6cce4....

# 根据日志提示,所有管理节点执行以下命令,赋予用户命令权限。
mkdir -p $HOME/.kube
sudo cp -i /etc/kubernetes/admin.conf $HOME/.kube/config
sudo chown $(id -u):$(id -g) $HOME/.kube/config


# 根据初始化日志提示,执行kubeadm join命令加入其他工作节点。
kubeadm join 192.168.17.100:6444 --token abcdef.0123456789abcdef \
          --discovery-token-ca-cert-hash sha256:260796226d…………
注意:token有效期为24小时,失效后请在主节点使用以下命令重新生成
kubeadm token create --print-join-command
修改新加入master节点apiserver端口,以及补全阿里云SLB apiserver负载地址。
# 修改kube-apiserver监听端口
sed -i 's/6443/6333/g' /etc/kubernetes/manifests/kube-apiserver.yaml
# 重启kube-apiserver容器
docker restart `docker ps | grep k8s_kube-apiserver | awk '{print $1}'`
# 查看kube-apiserver监听端口
ss -anp | grep "apiserver" | grep 'LISTEN'
注意:如果忘记修改,后面部署可能会出现错误,比如kube-prometheus
[root@ymt-130 manifests]# kubectl -n monitoring logs pod/prometheus-operator-5bd99d6457-8dv29
ts=2020-08-27T07:00:51.38650537Z caller=main.go:199 msg="Starting Prometheus Operator version '0.34.0'."
ts=2020-08-27T07:00:51.38962086Z caller=main.go:96 msg="Staring insecure server on :8080"
ts=2020-08-27T07:00:51.39038717Z caller=main.go:315 msg="Unhandled error received. Exiting..." err="communicating with server failed: Get //10.96.0.1:443/version?timeout=32s: dial tcp 10.96.0.1:443: connect: connection refused"
5) 部署网络,检查集群健康状况
# 执行准备好的yaml部署文件
kubectl apply -f kube-flannel.yaml

# 检查集群部署情况
kubectl get cs && kubectl get nodes && kubectl get pod --all-namespaces

# 检查etcd集群健康状态(需要上传etcdctl二进制文件)
[root@k8s101 ~]# etcdctl --cert /etc/kubernetes/pki/etcd/peer.crt --key /etc/kubernetes/pki/etcd/peer.key --endpoints //172.1.1.101:2379,//172.1.1.102:2379,//172.1.1.103:2379 --insecure-skip-tls-verify endpoint health
//172.1.1.101:2379 is healthy: successfully committed proposal: took = 12.396169ms
https://172.1.1.102:2379 is healthy: successfully committed proposal: took = 12.718211ms
https://172.1.1.103:2379 is healthy: successfully committed proposal: took = 13.174164ms
6) Kubelet驱逐策略优化
# 修改工作节点kubelet启动参数,更改Pod驱逐策略
vim /usr/lib/systemd/system/kubelet.service.d/10-kubeadm.conf
Environment="EVICTION_HARD=--eviction-hard=memory.available<2Gi,nodefs.available<5Gi,imagefs.available<100Gi"
Environment="EVICTION_RECLAIM=--eviction-minimum-reclaim=memory.available=0Mi,nodefs.available=1Gi,imagefs.available=2Gi"

# 重启kubelet容器,并查看kubelet进程启动参数
[root@k8s104 ~]# systemctl daemon-reload && systemctl restart kubelet
[root@k8s104 ~]# ps -ef | grep kubelet | grep -v grep
[root@k8s104 ~]# ps -ef | grep "/usr/bin/kubelet" | grep -v grep
root 24941 1 2 Aug27 ? 03:00:12 /usr/bin/kubelet --bootstrap-kubeconfig=/etc/kubernetes/bootstrap-kubelet.conf --kubeconfig=/etc/kubernetes/kubelet.conf
--config=/var/lib/kubelet/config.yaml --cgroup-driver=systemd --network-plugin=cni --pod-infra-container-image=registry.aliyuncs.com/google_containers/pause:3.1
--eviction-hard=memory.available<2Gi,nodefs.available<5Gi,imagefs.available<100Gi --eviction-minimum-reclaim=memory.available=0Mi,nodefs.available=1Gi,imagefs.available=2Gi
更多信息:Kubelet 对资源紧缺状况的应对
五、 部署功能组件
1) 部署七层路由Ingress
# 部署Ingress路由和基础组件转发规则
kubectl apply -f nginx-ingress


# 通过修改nginx-config来配置负载地址和最大连接数
kubectl edit cm nginx-config -n nginx-ingress

# 可以适当调整Ingress对外开放端口,然后进行阿里云SLB外网工作负载配置(所有工作节点)

更多详情:Nginx全局配置
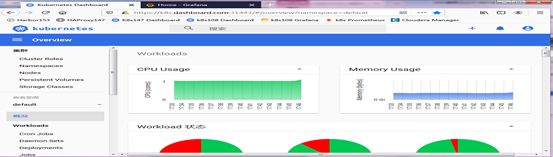
2) 部署页面工具Dashboard
# 执行准备好的yaml部署文件
kubectl apply -f kube-dashboard.yml
# 等待部署完成
kubectl get pod -n kubernetes-dashboard

# 通过域名登录控制页面, Token需要使用命令查看(本地需要配置域名解析)
kubectl -n kube-system describe secret $(kubectl -n kube-system get secret | grep dashboard-admin | awk '{print $1}')
//k8s.dashboard.com:IngressPort
3) 部署日志收集Filebeat
# 修改匹配日志、logstash地址、宿主机目录

# 然后执行部署即可
kubectl apply -f others/kube-filebeat.yml


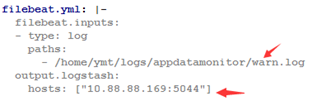
---
apiVersion: v1
kind: ConfigMap
metadata:
  name: filebeat-config
  namespace: kube-system
  labels:
    k8s-app: filebeat
data:
  filebeat.yml: |-
    filebeat.inputs:
    - type: log
      paths:
        - /home/ymt/logs/appdatamonitor/warn.log
    output.logstash:
      hosts: ["10.88.88.169:5044"]
---
    # filebeat.config:
      # inputs:
        # # Mounted `filebeat-inputs` configmap:
        # path: ${path.config}/inputs.d/*.yml
        # # Reload inputs configs as they change:
        # reload.enabled: false
      # modules:
        # path: ${path.config}/modules.d/*.yml
        # # Reload module configs as they change:
        # reload.enabled: false

    # To enable hints based autodiscover, remove `filebeat.config.inputs` configuration and uncomment this:
    #filebeat.autodiscover:
    #  providers:
    #    - type: kubernetes
    #      hints.enabled: true

    # processors:
      # - add_cloud_metadata:

    # cloud.id: ${ELASTIC_CLOUD_ID}
    # cloud.auth: ${ELASTIC_CLOUD_AUTH}

    # output.elasticsearch:
      # hosts: ['${ELASTICSEARCH_HOST:elasticsearch}:${ELASTICSEARCH_PORT:9200}']
      # username: ${ELASTICSEARCH_USERNAME}
      # password: ${ELASTICSEARCH_PASSWORD}
---
# apiVersion: v1
# kind: ConfigMap
# metadata:
  # name: filebeat-inputs
  # namespace: kube-system
  # labels:
    # k8s-app: filebeat
# data:
  # kubernetes.yml: |-
    # - type: docker
      # containers.ids:
      # - "*"
      # processors:
        # - add_kubernetes_metadata:
            # in_cluster: true
---
apiVersion: apps/v1
kind: DaemonSet
metadata:
  name: filebeat
  namespace: kube-system
  labels:
    k8s-app: filebeat
spec:
  selector:
    matchLabels:
      k8s-app: filebeat
  template:
    metadata:
      labels:
        k8s-app: filebeat
    spec:
      serviceAccountName: filebeat
      terminationGracePeriodSeconds: 30
      containers:
      - name: filebeat
        # image: docker.elastic.co/beats/filebeat:6.7.2
        image: registry.cn-shanghai.aliyuncs.com/leozhanggg/elastic/filebeat:6.7.1
        args: [
          "-c", "/etc/filebeat.yml",
          "-e",
        ]
        # env:
        # - name: ELASTICSEARCH_HOST
          # value: elasticsearch
        # - name: ELASTICSEARCH_PORT
          # value: "9200"
        # - name: ELASTICSEARCH_USERNAME
          # value: elastic
        # - name: ELASTICSEARCH_PASSWORD
          # value: changeme
        # - name: ELASTIC_CLOUD_ID
          # value:
        # - name: ELASTIC_CLOUD_AUTH
          # value:
        securityContext:
          runAsUser: 0
          # If using Red Hat OpenShift uncomment this:
          #privileged: true
        resources:
          limits:
            memory: 200Mi
          requests:
            cpu: 100m
            memory: 100Mi
        volumeMounts:
        - name: config
          mountPath: /etc/filebeat.yml
          readOnly: true
          subPath: filebeat.yml
        # - name: inputs
          # mountPath: /usr/share/filebeat/inputs.d
          # readOnly: true
        - name: data
          mountPath: /usr/share/filebeat/data
        - name: ymtlogs
          mountPath: /home/ymt/logs
          readOnly: true
        # - name: varlibdockercontainers
          # mountPath: /var/lib/docker/containers
          # readOnly: true
      volumes:
      - name: config
        configMap:
          defaultMode: 0600
          name: filebeat-config
      - name: ymtlogs
        hostPath:
          path: /home/ymt/logs
      # - name: varlibdockercontainers
        # hostPath:
          # path: /var/lib/docker/containers
      # - name: inputs
        # configMap:
          # defaultMode: 0600
          # name: filebeat-inputs
      # data folder stores a registry of read status for all files, so we don't send everything again on a Filebeat pod restart
      - name: data
        hostPath:
          path: /var/lib/filebeat-data
          type: DirectoryOrCreate
---
apiVersion: rbac.authorization.k8s.io/v1
kind: ClusterRoleBinding
metadata:
  name: filebeat
subjects:
- kind: ServiceAccount
  name: filebeat
  namespace: kube-system
roleRef:
  kind: ClusterRole
  name: filebeat
  apiGroup: rbac.authorization.k8s.io
---
apiVersion: rbac.authorization.k8s.io/v1
kind: ClusterRole
metadata:
  name: filebeat
  labels:
    k8s-app: filebeat
rules:
- apiGroups: [""] # "" indicates the core API group
  resources:
  - namespaces
  - pods
  verbs:
  - get
  - watch
  - list
---
apiVersion: v1
kind: ServiceAccount
metadata:
  name: filebeat
  namespace: kube-system
  labels:
    k8s-app: filebeat
---
kube-filebeat.yaml
注意:因为我们logstash和ES均部署在外部,所以这里k8s集群仅部署了filebeat,用于收集日志传输到集群外部logstash。
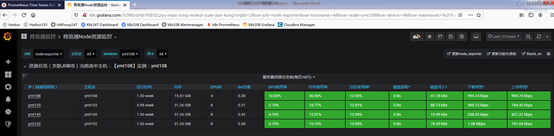
4) 部署监控平台Prometheus
# 先部署默认组件
cd kube-prometheus-0.3.0/manifests
kubectl create -f setup && sleep 5 && kubectl create -f .
# 等待部署完成
kubectl get pod -n monitoring

# 然后修改自定义监控配置,执行升级脚本
cd custom && sh upgrade.sh
* 告警配置:alertmanager.yaml* 默认告警规则:prometheus-rules.yaml* 新增告警规则:prometheus-additional-rules.yaml* 新增监控项配置:prometheus-additional.yaml #调整监控项及地址* 监控配置:prometheus-prometheus.yaml #调整副本数和资源限制
# 通过域名登录监控页面(本地需要配置域名解析)
//k8s.grafana.com:IngressPort # 默认用户和密码都是admin
//k8s.prometheus.com:IngressPort
//k8s.alertmanager.com:IngressPort
# 点击添加按钮 ->Import ->Upload .json file,导入监控仪表板。
* k8s-model.json* node-model.json
详情参考:Kubernetes实战总结 – 自定义Prometheus
五、 其他问题说明
1) Kubectl命令使用
# 命令自动部署设置
yum install -y bash-completion
source /usr/share/bash-completion/bash_completion
source <(kubectl completion bash)
echo "source <(kubectl completion bash)" >> ~/.bashrc
网络博文:kubernetes常用命令整理
2) 延长证书有效期
# 查看证书有效期
kubeadm alpha certs check-expiration
# 重新生成所有证书
kubeadm alpha certs renew all
# 分别重启所有主节点组件容器
docker ps | \
grep -E 'k8s_kube-apiserver|k8s_kube-controller-manager|k8s_kube-scheduler|k8s_etcd_etcd' | \
awk -F ' ' '{print $1}' |xargs docker restart
3) 卸载k8s集群节点
# 将要卸载的节点标记为不能再调度
kubectl cordon k8s-node1
# 将该节点上运行的容器平滑迁移到其他节点上
kubectl drain nodeA --delete-local-data --force
# 从集群上删除该节点
kubectl delete node k8s-node1

# 在删除的节点上重置配置
kubeadm reset
# 根据提示手动删除相应文件
rm -rf /etc/cni/net.d
ipvsadm --clear
rm -rf /root/.kube/
# 停止 kubelet服务
systemctl stop kubelet

# 查看安装过的k8s的软件包
yum list installed | grep 'kube'
# 卸载k8s相关安装包
yum remove kubeadm.x86_64 kubectl.x86_64 cri-tools.x86_64 kubernetes-cni.x86_64 kubelet.x86_64
4) 彻底清除节点网络
# 重置节点
kubeadm reset -f
# 清除配置
rm -rf $HOME/.kube/config /etc/cni/net.d && ipvsadm --clear
# 停止docker
systemctl stop kubelet && systemctl stop docker
# 删除网络配置和路由记录
rm -rf /var/lib/cni/
ip link delete cni0
ip link delete flannel.1
ip link delete dummy0
ip link delete kube-ipvs0
# 重启docker和network
systemctl restart docker && systemctl restart kubelet && systemctl restart network
# 有时候更换网路插件可能会出现podcidr错误,可以进行手动更改
kubectl describe node k8s112 | grep PodCIDR
kubectl patch node k8s112 -p '{"spec":{"podCIDR":"10.233.0.0/16"}}'
5) 部署应用到master节点
#增加不可调度容忍和主节点节点亲和性
      tolerations:
        - key: node-role.kubernetes.io/master
          effect: NoSchedule
      affinity:
       nodeAffinity:
         requiredDuringSchedulingIgnoredDuringExecution:
           nodeSelectorTerms:
           - matchExpressions:
             - key: node-role.kubernetes.io/master
               operator: Exists
注意:我们部署k8s dashboard时有时发现使用主节点地址打开特别的卡,但是我们使用部署的节点打开就非常的流畅,
   那么我们只需要给dashboard增加此配置,即让dashboard部署在主节点,这样使用主节点打开就会非常的流畅了。
6) 修改k8s节点名称
# 阿里云自建K8S集群可能会出现连接apiserver失败情况,一般是由于K8S在做DNS名称解析的时候出现了较长的解析请求,可以通过修改node名称的方式解决。
hostname ymt-140
vim /usr/lib/systemd/system/kubelet.service.d/10-kubeadm.conf
Environment="KUBELET_HOSTNAME=--hostname-override=ymt-140"
$KUBELET_HOSTNAME

systemctl daemon-reload && systemctl restart kubelet && ps -ef | grep /usr/bin/kubelet | grep -v grep
journalctl -xe -u kubelet
7) 部署日志记录
[root@k8s101 ~]# kubeadm init --config=kubeadm-config.yaml --upload-certs | tee kubeadm-init.log
W0819 09:24:09.326568   28880 validation.go:28] Cannot validate kube-proxy config - no validator is available
W0819 09:24:09.326626   28880 validation.go:28] Cannot validate kubelet config - no validator is available
[init] Using Kubernetes version: v1.17.5
[preflight] Running pre-flight checks
[preflight] Pulling images required for setting up a Kubernetes cluster
[preflight] This might take a minute or two, depending on the speed of your internet connection
[preflight] You can also perform this action in beforehand using 'kubeadm config images pull'
[kubelet-start] Writing kubelet environment file with flags to file "/var/lib/kubelet/kubeadm-flags.env"
[kubelet-start] Writing kubelet configuration to file "/var/lib/kubelet/config.yaml"
[kubelet-start] Starting the kubelet
[certs] Using certificateDir folder "/etc/kubernetes/pki"
[certs] Generating "ca" certificate and key
[certs] Generating "apiserver" certificate and key
[certs] apiserver serving cert is signed for DNS names [k8s101 kubernetes kubernetes.default kubernetes.default.svc kubernetes.default.svc.cluster.local k8sapi] and IPs [10.96.0.1 172.1.1.101]
[certs] Generating "apiserver-kubelet-client" certificate and key
[certs] Generating "front-proxy-ca" certificate and key
[certs] Generating "front-proxy-client" certificate and key
[certs] Generating "etcd/ca" certificate and key
[certs] Generating "etcd/server" certificate and key
[certs] etcd/server serving cert is signed for DNS names [k8s101 localhost] and IPs [172.1.1.101 127.0.0.1 ::1]
[certs] Generating "etcd/peer" certificate and key
[certs] etcd/peer serving cert is signed for DNS names [k8s101 localhost] and IPs [172.1.1.101 127.0.0.1 ::1]
[certs] Generating "etcd/healthcheck-client" certificate and key
[certs] Generating "apiserver-etcd-client" certificate and key
[certs] Generating "sa" key and public key
[kubeconfig] Using kubeconfig folder "/etc/kubernetes"
[kubeconfig] Writing "admin.conf" kubeconfig file
[kubeconfig] Writing "kubelet.conf" kubeconfig file
[kubeconfig] Writing "controller-manager.conf" kubeconfig file
[kubeconfig] Writing "scheduler.conf" kubeconfig file
[control-plane] Using manifest folder "/etc/kubernetes/manifests"
[control-plane] Creating static Pod manifest for "kube-apiserver"
[control-plane] Creating static Pod manifest for "kube-controller-manager"
W0819 09:24:14.028737   28880 manifests.go:214] the default kube-apiserver authorization-mode is "Node,RBAC"; using "Node,RBAC"
[control-plane] Creating static Pod manifest for "kube-scheduler"
W0819 09:24:14.029728   28880 manifests.go:214] the default kube-apiserver authorization-mode is "Node,RBAC"; using "Node,RBAC"
[etcd] Creating static Pod manifest for local etcd in "/etc/kubernetes/manifests"
[wait-control-plane] Waiting for the kubelet to boot up the control plane as static Pods from directory "/etc/kubernetes/manifests". This can take up to 4m0s
[apiclient] All control plane components are healthy after 16.502551 seconds
[upload-config] Storing the configuration used in ConfigMap "kubeadm-config" in the "kube-system" Namespace
[kubelet] Creating a ConfigMap "kubelet-config-1.17" in namespace kube-system with the configuration for the kubelets in the cluster
[upload-certs] Storing the certificates in Secret "kubeadm-certs" in the "kube-system" Namespace
[upload-certs] Using certificate key:
8782750a5ffd83f0fdbe635eced5e6b1fc4acd73a2a13721664494170a154a01
[mark-control-plane] Marking the node k8s101 as control-plane by adding the label "node-role.kubernetes.io/master=''"
[mark-control-plane] Marking the node k8s101 as control-plane by adding the taints [node-role.kubernetes.io/master:NoSchedule]
[bootstrap-token] Using token: zwx051.085210868chiscdc
[bootstrap-token] Configuring bootstrap tokens, cluster-info ConfigMap, RBAC Roles
[bootstrap-token] configured RBAC rules to allow Node Bootstrap tokens to post CSRs in order for nodes to get long term certificate credentials
[bootstrap-token] configured RBAC rules to allow the csrapprover controller automatically approve CSRs from a Node Bootstrap Token
[bootstrap-token] configured RBAC rules to allow certificate rotation for all node client certificates in the cluster
[bootstrap-token] Creating the "cluster-info" ConfigMap in the "kube-public" namespace
[kubelet-finalize] Updating "/etc/kubernetes/kubelet.conf" to point to a rotatable kubelet client certificate and key
[addons] Applied essential addon: CoreDNS
[addons] Applied essential addon: kube-proxy

Your Kubernetes control-plane has initialized successfully!

To start using your cluster, you need to run the following as a regular user:

  mkdir -p $HOME/.kube
  sudo cp -i /etc/kubernetes/admin.conf $HOME/.kube/config
  sudo chown $(id -u):$(id -g) $HOME/.kube/config

You should now deploy a pod network to the cluster.
Run "kubectl apply -f [podnetwork].yaml" with one of the options listed at:
  https://kubernetes.io/docs/concepts/cluster-administration/addons/

You can now join any number of the control-plane node running the following command on each as root:

  kubeadm join k8sapi:6333 --token zwx051.085210868chiscdc \
    --discovery-token-ca-cert-hash sha256:de4d9a37423fecd5313a76d99ad60324cdb0ca6a38254de549394afa658c98b2 \
    --control-plane --certificate-key 8782750a5ffd83f0fdbe635eced5e6b1fc4acd73a2a13721664494170a154a01

Please note that the certificate-key gives access to cluster sensitive data, keep it secret!
As a safeguard, uploaded-certs will be deleted in two hours; If necessary, you can use
"kubeadm init phase upload-certs --upload-certs" to reload certs afterward.

Then you can join any number of worker nodes by running the following on each as root:

kubeadm join k8sapi:6333 --token zwx051.085210868chiscdc \
    --discovery-token-ca-cert-hash sha256:de4d9a37423fecd5313a76d99ad60324cdb0ca6a38254de549394afa658c98b2


[root@k8s102 ~]#  kubeadm join k8sapi:6333 --token zwx051.085210868chiscdc \
>     --discovery-token-ca-cert-hash sha256:de4d9a37423fecd5313a76d99ad60324cdb0ca6a38254de549394afa658c98b2 \
>     --control-plane --certificate-key 8782750a5ffd83f0fdbe635eced5e6b1fc4acd73a2a13721664494170a154a01
[preflight] Running pre-flight checks
[preflight] Reading configuration from the cluster...
[preflight] FYI: You can look at this config file with 'kubectl -n kube-system get cm kubeadm-config -oyaml'
[preflight] Running pre-flight checks before initializing the new control plane instance
[preflight] Pulling images required for setting up a Kubernetes cluster
[preflight] This might take a minute or two, depending on the speed of your internet connection
[preflight] You can also perform this action in beforehand using 'kubeadm config images pull'
[download-certs] Downloading the certificates in Secret "kubeadm-certs" in the "kube-system" Namespace
[certs] Using certificateDir folder "/etc/kubernetes/pki"
[certs] Generating "apiserver" certificate and key
[certs] apiserver serving cert is signed for DNS names [k8s101 kubernetes kubernetes.default kubernetes.default.svc kubernetes.default.svc.cluster.local k8sapi] and IPs [10.96.0.1 172.1.1.102]
[certs] Generating "apiserver-kubelet-client" certificate and key
[certs] Generating "etcd/server" certificate and key
[certs] etcd/server serving cert is signed for DNS names [k8s101 localhost] and IPs [172.1.1.102 127.0.0.1 ::1]
[certs] Generating "etcd/healthcheck-client" certificate and key
[certs] Generating "etcd/peer" certificate and key
[certs] etcd/peer serving cert is signed for DNS names [k8s101 localhost] and IPs [172.1.1.102 127.0.0.1 ::1]
[certs] Generating "apiserver-etcd-client" certificate and key
[certs] Generating "front-proxy-client" certificate and key
[certs] Valid certificates and keys now exist in "/etc/kubernetes/pki"
[certs] Using the existing "sa" key
[kubeconfig] Generating kubeconfig files
[kubeconfig] Using kubeconfig folder "/etc/kubernetes"
[endpoint] WARNING: port specified in controlPlaneEndpoint overrides bindPort in the controlplane address
[kubeconfig] Writing "admin.conf" kubeconfig file
[kubeconfig] Writing "controller-manager.conf" kubeconfig file
[kubeconfig] Writing "scheduler.conf" kubeconfig file
[control-plane] Using manifest folder "/etc/kubernetes/manifests"
[control-plane] Creating static Pod manifest for "kube-apiserver"
W0819 10:31:17.604671    4058 manifests.go:214] the default kube-apiserver authorization-mode is "Node,RBAC"; using "Node,RBAC"
[control-plane] Creating static Pod manifest for "kube-controller-manager"
W0819 10:31:17.612645    4058 manifests.go:214] the default kube-apiserver authorization-mode is "Node,RBAC"; using "Node,RBAC"
[control-plane] Creating static Pod manifest for "kube-scheduler"
W0819 10:31:17.613524    4058 manifests.go:214] the default kube-apiserver authorization-mode is "Node,RBAC"; using "Node,RBAC"
[check-etcd] Checking that the etcd cluster is healthy
[kubelet-start] Downloading configuration for the kubelet from the "kubelet-config-1.17" ConfigMap in the kube-system namespace
[kubelet-start] Writing kubelet configuration to file "/var/lib/kubelet/config.yaml"
[kubelet-start] Writing kubelet environment file with flags to file "/var/lib/kubelet/kubeadm-flags.env"
[kubelet-start] Starting the kubelet
[kubelet-start] Waiting for the kubelet to perform the TLS Bootstrap...
[etcd] Announced new etcd member joining to the existing etcd cluster
[etcd] Creating static Pod manifest for "etcd"
[etcd] Waiting for the new etcd member to join the cluster. This can take up to 40s
{"level":"warn","ts":"2020-08-19T10:31:31.039+0800","caller":"clientv3/retry_interceptor.go:61","msg":"retrying of unary invoker failed","target":"passthrough://///172.1.1.102:2379","attempt":0,"error":"rpc error: code = DeadlineExceeded desc = context deadline exceeded"}
[upload-config] Storing the configuration used in ConfigMap "kubeadm-config" in the "kube-system" Namespace
[mark-control-plane] Marking the node k8s101 as control-plane by adding the label "node-role.kubernetes.io/master=''"
[mark-control-plane] Marking the node k8s101 as control-plane by adding the taints [node-role.kubernetes.io/master:NoSchedule]

This node has joined the cluster and a new control plane instance was created:

* Certificate signing request was sent to apiserver and approval was received.
* The Kubelet was informed of the new secure connection details.
* Control plane (master) label and taint were applied to the new node.
* The Kubernetes control plane instances scaled up.
* A new etcd member was added to the local/stacked etcd cluster.

To start administering your cluster from this node, you need to run the following as a regular user:

        mkdir -p $HOME/.kube
        sudo cp -i /etc/kubernetes/admin.conf $HOME/.kube/config
        sudo chown $(id -u):$(id -g) $HOME/.kube/config

Run 'kubectl get nodes' to see this node join the cluster.
kubeadm-init.log
作者:Leozhanggg
出处://www.cnblogs.com/leozhanggg/p/13522155.html
本文版权归作者和博客园共有,欢迎转载,但未经作者同意必须保留此段声明,且在文章页面明显位置给出原文连接,否则保留追究法律责任的权利。

