springboot集成redis
- 2019 年 10 月 3 日
- 筆記
2019-08-13
一直想在springboot上集成带缓存的redis,终于成功了。网上有1000种写法,想找到一篇合适的还真不容易?。走下流程,加深下印象。
环境:
springboot版本:2.1.7
orm框架:mybatis
实现?:
在serviceImpl层方法上加注解@Cacheable和@CachEvict。
@Cacheable把数据放进redis,下一次需要数据直接在缓存中取;@CacheEvict使redis中的缓存失效。
关于注解的更多详细可以参考https://www.cnblogs.com/fashflying/p/6908028.html写得很详细。
准备工作?:
pom.xml?:


1 <parent> 2 <groupId>org.springframework.boot</groupId> 3 <artifactId>spring-boot-starter-parent</artifactId> 4 <version>2.1.7.RELEASE</version> 5 <relativePath/> 6 </parent> 7 8 <dependencies> 9 <dependency> 10 <groupId>org.springframework.boot</groupId> 11 <artifactId>spring-boot-starter-web</artifactId> 12 </dependency> 13 <dependency> 14 <groupId>org.springframework.boot</groupId> 15 <artifactId>spring-boot-starter-test</artifactId> 16 <scope>test</scope> 17 </dependency> 18 <!-- servlet依赖. --> 19 <dependency> 20 <groupId>javax.servlet</groupId> 21 <artifactId>javax.servlet-api</artifactId> 22 </dependency> 23 <dependency> 24 <groupId>javax.servlet</groupId> 25 <artifactId>jstl</artifactId> 26 </dependency> 27 28 <!--tomcat--> 29 <dependency> 30 <groupId>org.apache.tomcat.embed</groupId> 31 <artifactId>tomcat-embed-jasper</artifactId> 32 </dependency> 33 34 <!--热部署--> 35 <dependency> 36 <groupId>org.springframework.boot</groupId> 37 <artifactId>spring-boot-devtools</artifactId> 38 <optional>true</optional> 39 </dependency> 40 41 <!-- mysql --> 42 <dependency> 43 <groupId>mysql</groupId> 44 <artifactId>mysql-connector-java</artifactId> 45 <version>5.1.21</version> 46 </dependency> 47 <!--mybatis--> 48 <dependency> 49 <groupId>org.mybatis.spring.boot</groupId> 50 <artifactId>mybatis-spring-boot-starter</artifactId> 51 <version>1.1.1</version> 52 </dependency> 53 <!--mybatis逆向工程--> 54 <dependency> 55 <groupId>org.mybatis.generator</groupId> 56 <artifactId>mybatis-generator-core</artifactId> 57 <version>1.3.7</version> 58 </dependency> 59 60 <!--json格式--> 61 <dependency> 62 <groupId>com.fasterxml.jackson.datatype</groupId> 63 <artifactId>jackson-datatype-jsr310</artifactId> 64 </dependency> 65 66 <!-- redis --> 67 <dependency> 68 <groupId>org.springframework.boot</groupId> 69 <artifactId>spring-boot-starter-data-redis</artifactId> 70 </dependency> 71 72 <!--thymeleaf--> 73 <!--<dependency>--> 74 <!--<groupId>org.springframework.boot</groupId>--> 75 <!--<artifactId>spring-boot-starter-thymeleaf</artifactId>--> 76 <!--</dependency>--> 77 </dependencies>
View Code
application.properties文件?:
#mvc spring.mvc.view.prefix=/WEB-INF/jsp/ spring.mvc.view.suffix=.jsp #mysql spring.datasource.url=jdbc:mysql://localhost:3306/common?characterEncoding=utf-8 spring.datasource.username=xfk spring.datasource.password=123456 spring.datasource.driver-class-name=com.mysql.jdbc.Driver #mybatis mybatis.mapper-locations=classpath:/mapper/*.xml mybatis.type-aliases-package=com.xfk.sb.pojo #redis spring.redis.database=0 spring.redis.host=127.0.0.1 spring.redis.port=6379 spring.redis.password= spring.redis.timeout=5000
View Code
书写?:
一,允许使用缓存:
?在springboot的主启动类上添加注解@EnableCaching
SbApplication.java
1 package com.xfk.sb; 2 3 import org.springframework.boot.SpringApplication; 4 import org.springframework.boot.autoconfigure.SpringBootApplication; 5 import org.springframework.cache.annotation.EnableCaching; 6 7 @SpringBootApplication 8 @EnableCaching 9 public class SbApplication { 10 public static void main(String[] args) { 11 SpringApplication.run(SbApplication.class, args); 12 } 13 }
二,redis配置类:
?这里一个重要的点就是Serializer。RedisCache默认使用的是JdkSerializationRedisSerializer,我们要实现json格式的数据在redis上的存储。利用Jackson2JsonRedisSerializer或GenericJackson2JsonRedisSerializer,其优点是存储的长度小。在这里我们用GenericJackson2JsonRedisSerializerJackson2JsonRedisSerializer
?cacheManager方法是用作注解@Cacheable和@CacheEvict执行service实现层方法缓存数据的,另外就是定义一个redisTemplate,哪个controller需要就在哪个controller中注入,灵活使用。
RedisConfig.java
1 package com.xfk.sb.config; 2 3 import org.springframework.cache.annotation.CachingConfigurerSupport; 4 import org.springframework.cache.annotation.EnableCaching; 5 import org.springframework.context.annotation.Bean; 6 import org.springframework.context.annotation.Configuration; 7 import org.springframework.data.redis.cache.RedisCacheConfiguration; 8 import org.springframework.data.redis.cache.RedisCacheManager; 9 import org.springframework.data.redis.connection.RedisConnectionFactory; 10 import org.springframework.data.redis.core.RedisTemplate; 11 import org.springframework.data.redis.serializer.*; 12 import java.time.Duration; 13 14 @Configuration 15 @EnableCaching 16 public class RedisConfig extends CachingConfigurerSupport { 17 // 过期时间 18 private Duration timeToLive = Duration.ofHours(12); 19 20 @Bean 21 public RedisCacheManager cacheManager(RedisConnectionFactory connectionFactory) { 22 RedisCacheConfiguration config = RedisCacheConfiguration.defaultCacheConfig() 23 .entryTtl(this.timeToLive) 24 .serializeKeysWith(RedisSerializationContext.SerializationPair.fromSerializer(keySerializer())) 25 .serializeValuesWith(RedisSerializationContext.SerializationPair.fromSerializer(valueSerializer())) 26 .disableCachingNullValues(); 27 28 return RedisCacheManager.builder(connectionFactory) 29 .cacheDefaults(config) 30 .transactionAware() 31 .build(); 32 } 33 34 @Bean(name = "redisTemplate") 35 public RedisTemplate<String, Object> redisTemplate(RedisConnectionFactory redisConnectionFactory) { 36 RedisTemplate<String, Object> redisTemplate = new RedisTemplate<>(); 37 redisTemplate.setConnectionFactory(redisConnectionFactory); 38 redisTemplate.setKeySerializer(keySerializer()); 39 redisTemplate.setHashKeySerializer(keySerializer()); 40 redisTemplate.setValueSerializer(valueSerializer()); 41 redisTemplate.setHashValueSerializer(valueSerializer()); 42 return redisTemplate; 43 } 44 45 private RedisSerializer<String> keySerializer() { 46 return new StringRedisSerializer(); 47 } 48 49 private RedisSerializer<Object> valueSerializer() { 50 return new GenericJackson2JsonRedisSerializer(); 51 } 52 }
三,增删改查Demo:
简单的pojo类,Student.java
1 package com.xfk.sb.pojo; 2 3 public class Student { 4 private int id; 5 private String name; 6 private int age; 7 8 public Student() { 9 } 10 11 public int getId() { 12 return id; 13 } 14 15 public void setId(int id) { 16 this.id = id; 17 } 18 19 public String getName() { 20 return name; 21 } 22 23 public void setName(String name) { 24 this.name = name; 25 } 26 27 public int getAge() { 28 return age; 29 } 30 31 public void setAge(int age) { 32 this.age = age; 33 } 34 35 @Override 36 public String toString() { 37 return "Student{" + 38 "id=" + id + 39 ", name='" + name + ''' + 40 ", age=" + age + 41 '}'; 42 } 43 }
View Code
?我使用的是mybatis的注解方式,简单的几个增删改查方法。
xml文件,studentMapper.xml
1 <?xml version="1.0" encoding="UTF-8"?> 2 <!DOCTYPE mapper 3 PUBLIC "-//mybatis.org//DTD Mapper 3.0//EN" 4 "http://mybatis.org/dtd/mybatis-3-mapper.dtd"> 5 6 <mapper namespace="com.xfk.sb.mapper.StudentMapper"> 7 <select id="selectStudent" resultType="com.xfk.sb.pojo.Student"> 8 select * from student 9 </select> 10 <delete id="deleteStudent" parameterType="Integer"> 11 delete from student where id = #{id} 12 </delete> 13 <insert id="createStudent" parameterType="com.xfk.sb.pojo.Student" keyColumn="id" keyProperty="student.id" useGeneratedKeys="true"> 14 insert into student(id, name, age) values(null, #{student.name}, #{student.age}) 15 </insert> 16 <update id="updateStudent" parameterType="com.xfk.sb.pojo.Student"> 17 update student set name=#{student.name}, age=#{student.age} where id = #{student.id} 18 </update> 19 <select id="selectStudentByPrimaryKey" parameterType="Integer" resultType="com.xfk.sb.pojo.Student"> 20 select * from student where id = #{id} limit 1 21 </select> 22 </mapper>
View Code
mapper接口,StudentMapper.java
1 package com.xfk.sb.mapper; 2 3 import com.xfk.sb.pojo.Student; 4 import org.apache.ibatis.annotations.Mapper; 5 import org.apache.ibatis.annotations.Param; 6 import org.springframework.stereotype.Component; 7 import java.util.List; 8 9 @Mapper 10 @Component 11 public interface StudentMapper { 12 List<Student> selectStudent(); 13 int deleteStudent(@Param("id")int id); 14 int createStudent(@Param("student")Student student); 15 int updateStudent(@Param("student")Student student); 16 Student selectStudentByPrimaryKey(@Param("id")int id); 17 }
View Code
service层接口,StudentService.java
1 package com.xfk.sb.service; 2 3 import com.xfk.sb.pojo.Student; 4 import java.util.List; 5 6 public interface StudentService { 7 List<Student> selectStudent(); 8 int deleteStudent(int id); 9 int createStudent(Student student); 10 int updateStudent(Student student); 11 Student selectStudentByPrimaryKey(int id); 12 }
View Code
service实现层,StudentServiceImpl.java
1 package com.xfk.sb.service.implement; 2 3 import com.xfk.sb.mapper.StudentMapper; 4 import com.xfk.sb.pojo.Student; 5 import com.xfk.sb.service.StudentService; 6 import org.springframework.beans.factory.annotation.Autowired; 7 import org.springframework.cache.annotation.CacheConfig; 8 import org.springframework.cache.annotation.CacheEvict; 9 import org.springframework.cache.annotation.Cacheable; 10 import org.springframework.cache.annotation.Caching; 11 import org.springframework.stereotype.Service; 12 import java.util.List; 13 14 @Service 15 @CacheConfig(cacheNames="students") 16 public class StudentServiceImpl implements StudentService { 17 private final StudentMapper studentMapper; 18 19 @Autowired 20 public StudentServiceImpl(StudentMapper studentMapper) { 21 this.studentMapper = studentMapper; 22 } 23 24 @Cacheable(key="'students'") 25 @Override 26 public List<Student> selectStudent() { 27 System.out.println("从数据库中取selectStudent"); 28 return studentMapper.selectStudent(); 29 } 30 31 @Override 32 @Caching(evict={ 33 @CacheEvict(key="'singleStudent'+#id"), 34 @CacheEvict(key="'students'"), 35 }) 36 public int deleteStudent(int id) { 37 System.out.println("从数据库中删除deleteStudent"); 38 return studentMapper.deleteStudent(id); 39 } 40 41 @Override 42 @Caching(evict={ 43 @CacheEvict(key="'singleStudent'+#student.id"), 44 @CacheEvict(key="'students'"), 45 }) 46 public int createStudent(Student student) { 47 System.out.println("从数据库中创建createStudent"); 48 return studentMapper.createStudent(student); 49 } 50 51 @Caching(evict={ 52 @CacheEvict(key="'singleStudent'+#student.id"), 53 @CacheEvict(key="'students'"), 54 }) 55 @Override 56 public int updateStudent(Student student) { 57 System.out.println("从数据库中更新updateStudent"); 58 return studentMapper.updateStudent(student); 59 } 60 61 @Cacheable(key="'singleStudent'+#p0") 62 @Override 63 public Student selectStudentByPrimaryKey(int id) { 64 System.out.println("从数据库中取一个selectStudentByPrimaryKey"); 65 return studentMapper.selectStudentByPrimaryKey(id); 66 } 67 }
?使用@CacheConfig注解,相当于在redis数据库下建一个文件夹,以cacheNames作为文件夹的名字,统一管理这个实现层缓存的数据。正如在Redis Desktop Manager下看到的目录结构,db0下有一个students文件夹。
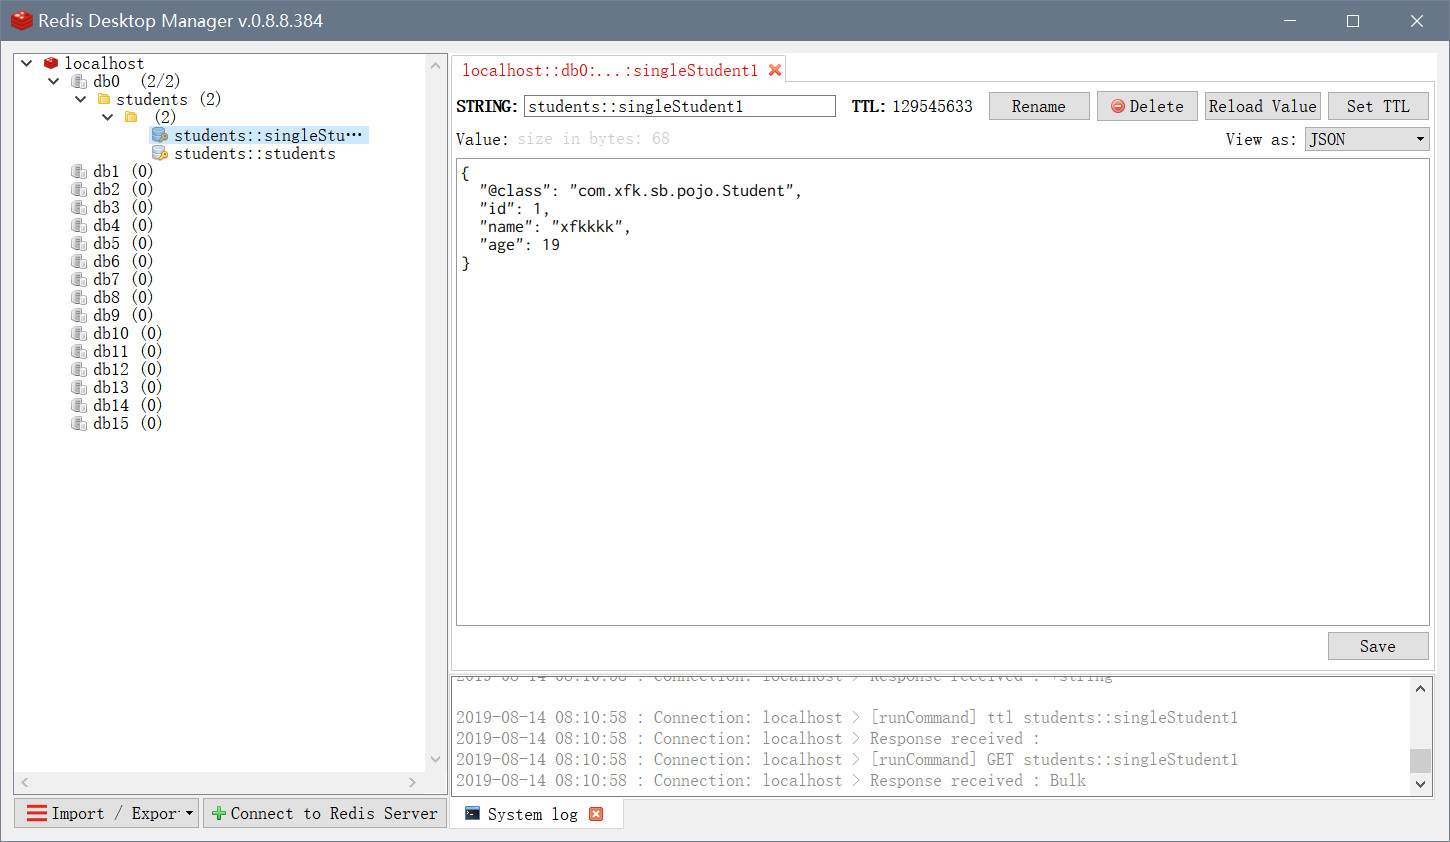
?使用@Cacheable注解使缓存生效,以实现层的selectStudentByPrimaryKey()方法为例,从数据库中根据id查询一个Student对象。
使用@Cacheable(key=”‘singleStudent’+#p0″),#p0就是形参parameter0,多个参数就是#p1,#p2,,,也可以写成#id,注意singleStudent字符串一定要用单引号扩上,然后使用字符串的拼接模式,这个变量的规则是spring的EL表达式,一定要用加上#符号,如果是一个对象则可以直接用”.”引用属性,参考createStudent()方法中的#student.id 。
属性key相当于在students文件夹下的文件夹创建一条以singleStudent+#p0为名字的一条缓存数据,在Redis Desktop Manager可以看到,由于students文件夹下的文件夹没有名字,所以成功缓存数据的命名是students::singleStudent1,两个引号之间为空。这就相当以这个命名空间下的唯一key,可以根据唯一key准确的失效缓存数据。
?@CacheEvict注解使缓存失效,根据需求要保证数据库与缓存的一致性,所以操作数据库之后要同步缓存。
在更新,删除和增加后要使缓存失效,不能返回过时的信息。在这里使用@Caching的目的是使多条缓存失效,它集合了@Cacheable,@CacheEvict,@CachePut,可以很直观的管理生效与失效。还可以直接使用@CacheEvict(allEntries=true)使这个命名空间下的所有缓存失效。
到这里核心工作完成得差不多了,就还差controller返回视图层了。
controller层,StudentController.java
 1 package com.xfk.sb.web;   2   3 import com.xfk.sb.pojo.Student;   4 import com.xfk.sb.service.StudentService;   5 import org.springframework.beans.factory.annotation.Autowired;   6 import org.springframework.data.redis.core.StringRedisTemplate;   7 import org.springframework.stereotype.Controller;   8 import org.springframework.ui.Model;   9 import org.springframework.web.bind.annotation.*;  10 import java.util.List;  11  12 @Controller  13 public class StudentController {  14     private final StudentService studentService;  15     private final StringRedisTemplate redis;  16  17     @Autowired  18     public StudentController(StudentService studentService, StringRedisTemplate redis) {  19         this.studentService = studentService;  20         this.redis = redis;  21     }  22  23     @GetMapping("/students")  24     public String listStudent(Model model){  25         List<Student> students = studentService.selectStudent();  26         model.addAttribute("students", students);  27         return "listStudent";  28     }  29  30     @DeleteMapping("/students/{id}")  31     public String deleteStudent(@PathVariable("id")int id) throws Exception{  32         studentService.deleteStudent(id);  33         return "redirect:/students";  34     }  35  36     @PutMapping("/students")  37     public String updateStudent(Student student){  38         studentService.updateStudent(student);  39         return "redirect:/students";  40     }  41     @PostMapping("/students")  42     public String createStudent(Student student){  43         studentService.createStudent(student);  44         return "redirect:/students";  45     }  46  47     @GetMapping("/students/{id}")  48     public String editStudent(@PathVariable("id")int id, Model model){  49         Student s = studentService.selectStudentByPrimaryKey(id);  50         model.addAttribute("student", s);  51         return "editStudent";  52     }  53  54     @RequestMapping("/test")  55     public String test(Model model){  56         List<Student> students = studentService.selectStudent();  57         model.addAttribute("students", students);  58         return "test";  59     }  60  61     @RequestMapping("/getOne")  62     public String getOne(Model model){
       // 获取id为1的Student对象到test.jsp  63         Student student = studentService.selectStudentByPrimaryKey(1);  64         model.addAttribute("student", student);  65         return "test";  66     }  67 }
?使用的restful风格,返回的jsp页面,/test和/getOne用来验证缓存是否生效。
小贴一下jsp:
listStudent.jsp
1 <%@ taglib prefix="c" uri="http://java.sun.com/jsp/jstl/core" %> 2 <%@ page contentType="text/html;charset=UTF-8" language="java" %> 3 <html> 4 <head> 5 <title>students</title> 6 </head> 7 <body> 8 <form action="${pageContext.request.contextPath}/students" method="post"> 9 增加:<br/> 10 name:<input type="text" name="name"/> <input type="number" name="age" /><br/> 11 <input type="submit" value="提交"/> 12 </form> 13 <table> 14 <tr> 15 <th>id</th> 16 <th>name</th> 17 <th>age</th> 18 <th>编辑</th> 19 <th>删除</th> 20 </tr> 21 <c:forEach items="${students}" var="each"> 22 <tr> 23 <td>${each.id}</td> 24 <td>${each.name}</td> 25 <td>${each.age}</td> 26 <td><a href="${pageContext.request.contextPath}/students/${each.id}">修改</a></td> 27 <td> 28 <button class="deleteStudent" value="${pageContext.request.contextPath}/students/${each.id}">删除</button> 29 </td> 30 </tr> 31 </c:forEach> 32 <form id="deleteType" action="" method="POST"> 33 <input type="hidden" name="_method" value="DELETE"/> 34 </form> 35 </table> 36 <button class="hhh">验证你的jquer是否生效</button> 37 <script src="https://cdn.bootcss.com/jquery/3.4.1/jquery.min.js"></script> 38 <script> 39 $(function(){ 40 $(".deleteStudent").click(function(){ 41 var href = $(this).attr("value"); 42 alert(href); 43 $("#deleteType").attr("action", href).submit(); 44 }) 45 $(".hhh").click(function(){ 46 alert("你的jquer已生效"); 47 }) 48 }) 49 </script> 50 </body> 51 </html>
View Code
editStudent.jsp
1 <%@ page contentType="text/html;charset=UTF-8" language="java" %> 2 <html> 3 <head> 4 <title>editStudent</title> 5 </head> 6 <body> 7 <form action="${pageContext.request.contextPath}/students" method="post"> 8 <input type="hidden" name="_method" value="PUT"/> 9 <input type="hidden" name="id" value="${student.id}"/> 10 name:<input type="text" name="name" value="${student.name}"/><br/> 11 age :<input type="text" name="age" value="${student.age}"/><br/> 12 <input type="submit" value="更新"/><a href="${pageContext.request.contextPath}/">返回主页</a> 13 </form> 14 </body> 15 </html>
View Code
test.jsp
1 <%@ taglib prefix="c" uri="http://java.sun.com/jsp/jstl/core" %> 2 <%@ page contentType="text/html;charset=UTF-8" language="java" %> 3 <html> 4 <head> 5 <title>test</title> 6 </head> 7 <body> 8 <c:forEach items="${students}" var="each"> 9 <div>${each.id}, ${each.name}, ${each.age}</div> 10 </c:forEach> 11 <br/> 12 得到一个Student<br/> 13 ${student.id}, ${student.name}, ${student.age} 14 </body> 15 </html>
四,验证测试:
?步骤:
1,/getOne
由于StudentServiceImpl.java中的System.out.println(“从数据库中取一个selectStudentByPrimaryKey”); 查看后台控制台,可以知道这条数据是从数据库中获取的。
/getOne获取的Student的id为1,所以会在Redis Desktop Manager中看到一条singleStudent1的缓存记录。
http://localhost:8080/getOne

2,更改Redis Desktop Manager中的记录
?比如redis库中原来的数据是

?更改数据,因为这里改的数据是redis的,mysql里的数据还是没变,这样就知道了是从缓存中读取的数据
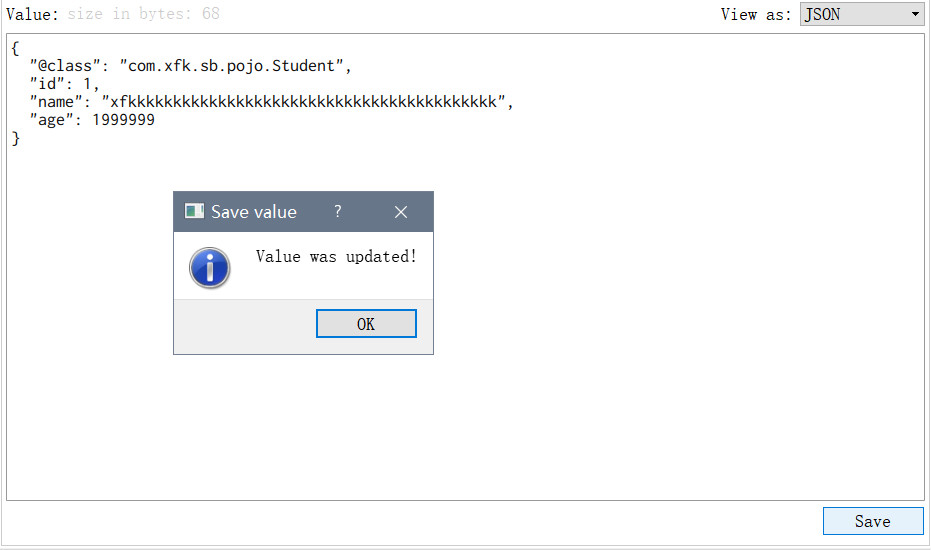
?点击save之后,刷新http://localhost:8080/getOne
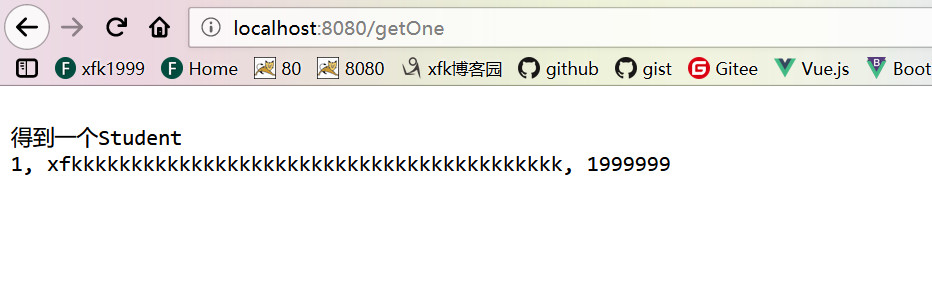
成功!????? 然后@CacheEvict是一样的逻辑,指定失效的key就好了
github:https://github.com/CaseyFu/sb
参考博文:https://liuyanzhao.com/9207.html
