Spring Boot (十二): Spring Boot 邮件服务
- 2019 年 10 月 14 日
- 筆記

最早我们发邮件的时候是使用 JavaMail 来发送邮件,而在 Spring Boot 中, Spring Boot 帮我们将 JavaMail 封装好了,是可以直接拿来使用的。
1. 依赖文件 pom.xml
代码清单:spring-boot-mail/pom.xml
***
<dependencies> <dependency> <groupId>org.springframework.boot</groupId> <artifactId>spring-boot-starter-mail</artifactId> </dependency> <dependency> <groupId>org.springframework.boot</groupId> <artifactId>spring-boot-starter-thymeleaf</artifactId> </dependency> <dependency> <groupId>org.springframework.boot</groupId> <artifactId>spring-boot-starter-test</artifactId> <scope>test</scope> </dependency> </dependencies>- spring-boot-starter-thymeleaf 引入这个模版引擎是因为我们在发送邮件的时候,各种格式使用 HTML 的方式更容易实现,同样我们也可以使用 freeMark , Spring Boot 同样为我们提供了依赖包。
2. 配置文件 application.yml
代码清单:
***
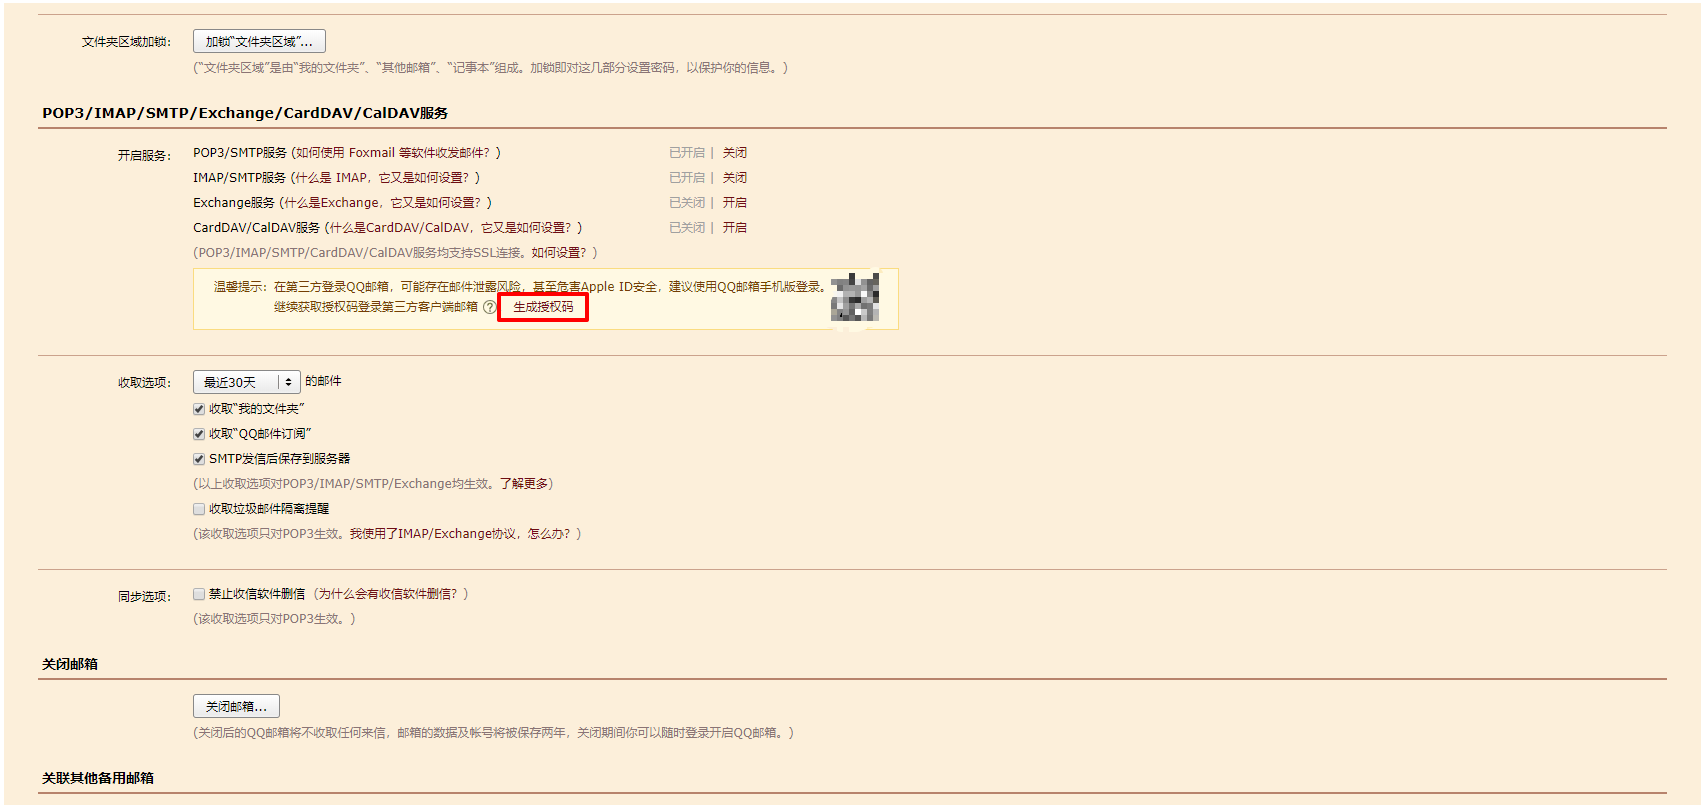
server: port: 8080 spring: application: name: spring-boot-mail mail: host: smtp.qq.com username: 136736247 password: xxxxxx default-encoding: UTF-8 fromAddr: [email protected] nickName: inwsy这里我使用 QQ 邮箱作为邮件的发送方,其中的 password 并不是我们的 QQ 密码,这个密码需要我们在 QQ 邮箱的设置里面自己申请的。如下图:

其中的 spring.mail.fromAddr 和 spring.mail.nickName 这两个配置是我自己配置的,并不是官方的配置,后续我会在代码中读这两个配置项。
3. 简易邮件发送
3.1 实现类
代码清单:spring-boot-mail/src/main/java/com/springboot/springbootmail/service/impl/MailServiceImpl.java
***
@Service public class MailServiceImpl implements MailService { private final Logger logger = LoggerFactory.getLogger(this.getClass()); @Autowired private JavaMailSender javaMailSender; @Value("${spring.mail.fromAddr}") private String from; @Value("${spring.mail.nickName}") private String nickName; @Override public void sendSimpleEmail(String to, String subject, String content) { SimpleMailMessage simpleMailMessage = new SimpleMailMessage(); simpleMailMessage.setFrom(nickName + "<" + from + ">"); simpleMailMessage.setTo(to); simpleMailMessage.setSubject(subject); simpleMailMessage.setText(content); try{ javaMailSender.send(simpleMailMessage); logger.info("简易邮件发送成功"); } catch(Exception e) { logger.error("简易邮件发送异常", e); } } }3.2 测试类
代码清单:spring-boot-mail/src/test/java/com/springboot/springbootmail/SpringBootMailApplicationTests.java
***
@Autowired MailService mailService; @Test public void sendSimpleEmail() { mailService.sendSimpleEmail("[email protected]", "测试邮件题目", "测试邮件内容"); }这里邮件发送至本人的 Hotmail 邮箱。
4. 发送 HTML 格式的邮件
4.1 实现类
代码清单:spring-boot-mail/src/main/java/com/springboot/springbootmail/service/impl/MailServiceImpl.java
***
@Override public void sendHTMLEmail(String to, String subject, String content) { MimeMessage message = javaMailSender.createMimeMessage(); try { MimeMessageHelper messageHelper = new MimeMessageHelper(message, true); messageHelper.setFrom(new InternetAddress(from, nickName, "UTF-8")); messageHelper.setTo(to); messageHelper.setSubject(subject); messageHelper.setText(content, true); javaMailSender.send(message); logger.info("HTML 模版邮件发送成功"); } catch (MessagingException e) { logger.error("HTML 模版邮件发送失败", e); } catch (UnsupportedEncodingException e) { logger.error("收件地址编码异常", e); } }4.2 页面模版
代码清单:spring-boot-mail/src/main/resources/templates/email.html
***
<!DOCTYPE html> <html lang="zh" xmlns:th="http://www.thymeleaf.org"> <head> <meta charset="UTF-8"/> <title>邮件模版</title> </head> <body> 这是邮件模版生成的邮件,可以点击链接查看详情。 <a href="#" th:href="@{ http://www.geekdigging.com/ }">查看详情。</a> 当前的Code为:<span th:text="${code}"></span> </body> </html>这里添加了动态内容 code ,在日常的开发中,我们使用发送验证码,动态生成内容是很有必要的。
4.3 测试类
代码清单:spring-boot-mail/src/test/java/com/springboot/springbootmail/SpringBootMailApplicationTests.java
***
@Test public void sendHTMLTemplateMail() { Context context = new Context(); context.setVariable("code", "123456"); String emailHTMLContent = templateEngine.process("email", context); mailService.sendHTMLEmail("[email protected]", "测试 HTML 模版邮件", emailHTMLContent); }5. 发送带附件的邮件
5.1 实现类
代码清单:spring-boot-mail/src/main/java/com/springboot/springbootmail/service/impl/MailServiceImpl.java
***
@Override public void sendAttachmentsMail(String to, String subject, String content, String fileName, String filePath) { MimeMessage message = javaMailSender.createMimeMessage(); try { MimeMessageHelper messageHelper = new MimeMessageHelper(message, true); messageHelper.setFrom(new InternetAddress(from, nickName, "UTF-8")); messageHelper.setTo(to); messageHelper.setSubject(subject); messageHelper.setText(content, true); FileSystemResource file = new FileSystemResource(new File(filePath)); messageHelper.addAttachment(fileName, file); javaMailSender.send(message); logger.info("带附件邮件发送成功"); } catch (MessagingException e) { logger.error("带附件邮件发送失败", e); } catch (UnsupportedEncodingException e) { logger.error("收件地址编码异常", e); } }注意: 如果需要发送多个附件,写多个 messageHelper.addAttachment(fileName, file); 即可。
5.2 测试类
代码清单:spring-boot-mail/src/test/java/com/springboot/springbootmail/SpringBootMailApplicationTests.java
***
@Test public void sendAttachmentsMail() { String fileName = "图片.jpg"; String filePath = "C:\Users\inwsy\Downloads\0370279582fe3e2a8012060c896a5dd.jpg"; mailService.sendAttachmentsMail("[email protected]", "测试带附件的邮件", "详细请查阅附件", fileName, filePath); }6. 小结
在实际的开发过程中,邮件发送失败是一件比较经常出现的事情,比如:网络堵塞、对方拒收等情况,一般在邮件系统的设计中,可以先将要发送的数据写入数据中,等发送完成后再修改标记位,再增加一个保障机制,例如增加一个定时任务,将一段时间内,发送失败并重试次数小于一定阀值的内容再次进行发送,如果邮件系统的压力过大,可以选择使用异步的方式来进行发送,比如使用消息队列进行承压。
7. 示例代码
7. 参考
http://www.ityouknow.com/springboot/2017/05/06/spring-boot-mail.html

