Apollo学习笔记(一):canbus模块与车辆底盘之间的CAN数据传输过程
- 2019 年 11 月 2 日
- 筆記
Apollo学习笔记(一):canbus模块与车辆底盘之间的CAN数据传输过程
博主现在从车载自组网信道分配和多跳路由转向了自动驾驶,没啥经验,想快些做出来个Demo还是得站在巨人的肩膀上才行,我选择了Apollo,主要还是支持国产而且它的开发者套件有现成的底盘可以直接跑起来,但是apollo系统结构比较复杂,各种花哨的设计模式(消息适配器、工厂模式等)绕得人头晕。日本那里有个autoware是基于原生ROS的,也用Apollo开发者套件跑了下,就是普通的机器人开发那套,难度适合学生用来做项目,还是得师夷长技以制夷,后面继续深入研究一下。
这次的学习是基于Apollo3.0的,因为3.0还是基于ROS的,后期研究autoware开发自己的系统能用得上,而且那个开发者套件也要用3.0。
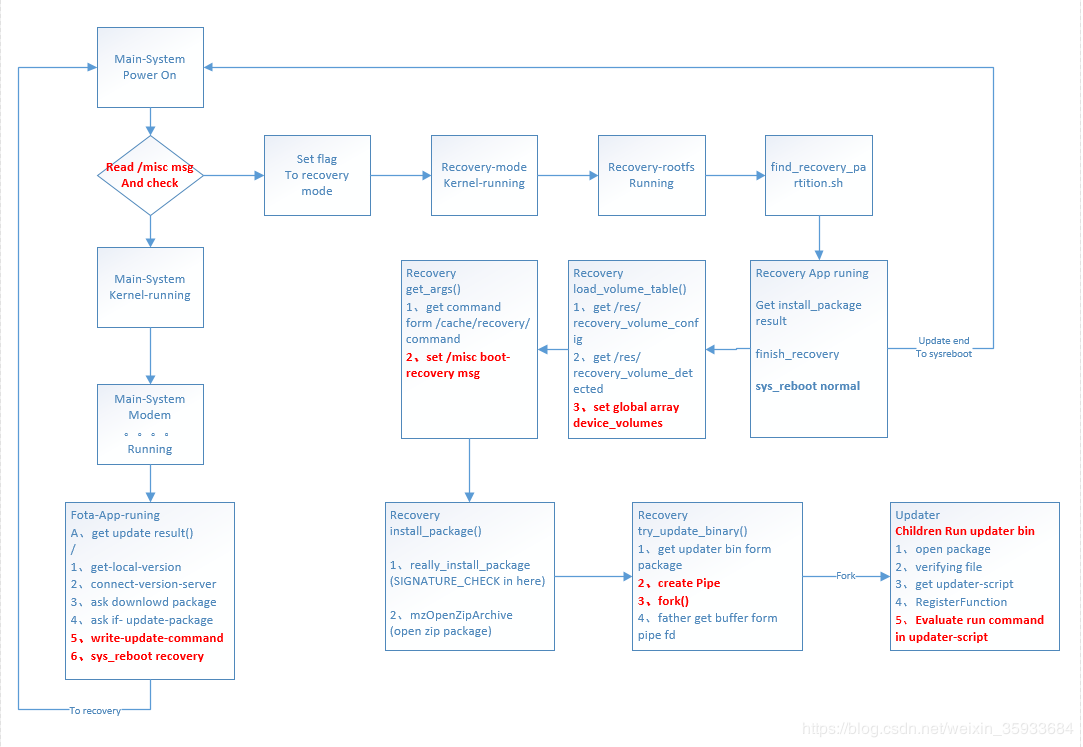
canbus模块启动过程
参考知行合一2018大佬的Apollo Planning模块源代码分析可以知道canbus模块的主入口为modules/canbus/main.cc:
APOLLO_MAIN(apollo::canbus::Canbus); 该宏展开后为:
1 #define APOLLO_MAIN(APP) 2 int main(int argc, char **argv) { 3 google::InitGoogleLogging(argv[0]); 4 google::ParseCommandLineFlags(&argc, &argv, true); 5 signal(SIGINT, apollo::common::apollo_app_sigint_handler); 6 APP apollo_app_; 7 ros::init(argc, argv, apollo_app_.Name()); 8 apollo_app_.Spin(); 9 return 0; 10 }
这里直接引用知行合一2018大神对于Apollo Planning模块的分析:
Main函数完成以下工作:始化Google日志工具,使用Google命令行解析工具解析相关参数,注册接收中止信号“SIGINT”的处理函数:apollo::common::apollo_app_sigint_handler(该函数的功能十分简单,就是收到中止信号“SIGINT”后,调用ros::shutdown()关闭ROS),创建apollo::planning::Planning对象:apollo_app_,初始化ROS环境,调用apollo_app_.Spin()函数开始消息处理循环。
————————————————
版权声明:本文为CSDN博主「知行合一2018」的原创文章,遵循 CC 4.0 BY-SA 版权协议,转载请附上原文出处链接及本声明。
原文链接:https://blog.csdn.net/davidhopper/article/details/79176505
更详细的不再赘述,大家可以去上面链接学习。
在apollo_app_.Spin();函数内会依次调用modules/canbus/canbus.cc的Init()和Start()。
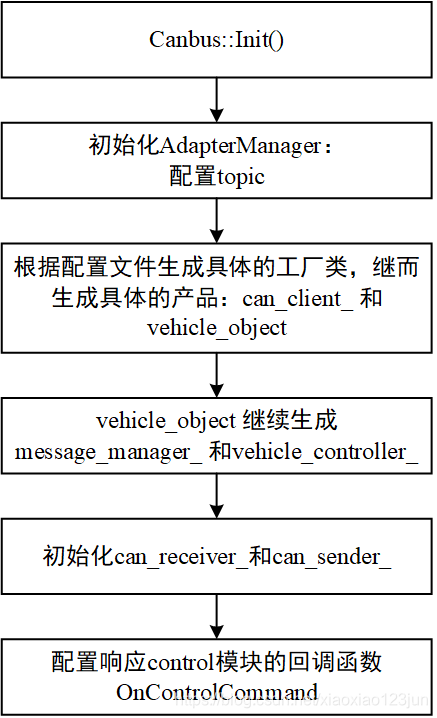
Init()主要过程源码分析
1 Status Canbus::Init() { 2 AdapterManager::Init(FLAGS_canbus_adapter_config_filename);/*完成AdapterManager的初始化, 3 FLAGS_canbus_adapter_config_filename对应于modules/canbus/common/canbus_gflags.cc中的 4 DEFINE_string(canbus_adapter_config_filename, "modules/canbus/conf/adapter.conf", 5 "The adapter config file"); 6 adapter.conf中配置了canbus模块订阅和发布的topic 7 如果改成原生ROS的话,这里的AdapterManager配置删掉,改成ROS的topic订阅和发布*/ 8 AINFO << "The adapter manager is successfully initialized."; 9 10 // load conf 11 //导入配置文件modules/canbus/conf/canbus_conf.pb.txt 12 /* 13 vehicle_parameter { 14 brand: LINCOLN_MKZ//指定车辆,后面生成对应的vehicle_factory,进而生成对应的message_manager_ 15 max_enable_fail_attempt: 5 16 driving_mode: COMPLETE_AUTO_DRIVE 17 } 18 19 can_card_parameter { 20 brand: ESD_CAN//指定车辆,后面生成对应的can_client_ 21 type: PCI_CARD 22 channel_id: CHANNEL_ID_ZERO 23 } 24 25 enable_debug_mode: false 26 enable_receiver_log: false 27 enable_sender_log: false 28 */ 29 //如果改成原生ROS的话此处也可以删除,工厂模式也可以放一边,上面导入的配置文件就是用来生成具体的产品工厂 30 //对象和产品对象,我们直接用ROS跑自己的工程一般车辆和CAN卡是固定的,可以改动后直接生成对应的产品对象 31 if (!common::util::GetProtoFromFile(FLAGS_canbus_conf_file, &canbus_conf_)) { 32 return OnError("Unable to load canbus conf file: " + 33 FLAGS_canbus_conf_file); 34 } 35 36 AINFO << "The canbus conf file is loaded: " << FLAGS_canbus_conf_file; 37 ADEBUG << "Canbus_conf:" << canbus_conf_.ShortDebugString(); 38 39 // Init can client 40 auto *can_factory = CanClientFactory::instance(); 41 can_factory->RegisterCanClients(); 42 can_client_ = can_factory->CreateCANClient(canbus_conf_.can_card_parameter()); 43 /* 44 std::unique_ptr<CanClient> CanClientFactory::CreateCANClient( 45 const CANCardParameter& parameter) { 46 auto factory = CreateObject(parameter.brand());//这里确定了新建的can client对象, 47 //此处新建的是ESD CAN卡对应的can client对象(ESD CAN卡是开发者套件用的CAN卡),具体为 48 //modules/drivers/canbus/can_client/esd/esd_can_client.cc的对象。 49 //由此也可以看出modules/canbus/与modules/drivers/canbus/之间的联系是很紧密的, 50 //modules/canbus/偏向上层的针对不同车辆的针对性数据解析 51 //modules/drivers/canbus/偏向底层的一些共性功能的实现,比如 52 //modules/drivers/canbus/can_comm/message_manager就是 53 //modules/canbus/vehicle/lincoln/lincoln_message_manager的父类 54 //改成原生ROS时这两个文件夹可以合到一起 55 if (!factory) { 56 AERROR << "Failed to create CAN client with parameter: " 57 << parameter.DebugString(); 58 } else if (!factory->Init(parameter)) { 59 AERROR << "Failed to initialize CAN card with parameter: " 60 << parameter.DebugString(); 61 } 62 return factory; 63 } 64 */ 65 if (!can_client_) { 66 return OnError("Failed to create can client."); 67 } 68 AINFO << "Can client is successfully created."; 69 70 VehicleFactory vehicle_factory; 71 vehicle_factory.RegisterVehicleFactory(); 72 auto vehicle_object = 73 vehicle_factory.CreateVehicle(canbus_conf_.vehicle_parameter());//类似地生成具体的车辆对象 74 if (!vehicle_object) { 75 return OnError("Failed to create vehicle:"); 76 } 77 78 message_manager_ = vehicle_object->CreateMessageManager();//生成对应车辆的message_manager_ 79 if (message_manager_ == nullptr) { 80 return OnError("Failed to create message manager."); 81 } 82 AINFO << "Message manager is successfully created."; 83 //初始化can_receiver_,就是将can_client_、message_manager_赋给can_receiver_的成员变量 84 if (can_receiver_.Init(can_client_.get(), message_manager_.get(), 85 canbus_conf_.enable_receiver_log()) != ErrorCode::OK) { 86 return OnError("Failed to init can receiver."); 87 } 88 AINFO << "The can receiver is successfully initialized."; 89 //初始化can_sender_,就是将can_client_赋给can_sender_的成员变量 90 if (can_sender_.Init(can_client_.get(), canbus_conf_.enable_sender_log()) != 91 ErrorCode::OK) { 92 return OnError("Failed to init can sender."); 93 } 94 AINFO << "The can sender is successfully initialized."; 95 96 //生成对应车辆的vehicle_controller_ 97 //至此vehicle_object生成了message_manager_和vehicle_controller_ 98 //message_manager_ 用来解析canbus从CAN接收到的消息 99 //vehicle_controller_ 用来更新canbus发往CAN的数据对象,也叫作协议类型数据 100 //(如刹车这个命令(协议)对应的对象,apollo将每种命令建了个类,比如林肯的刹车对应的类是 101 //modules/canbus/vehicle/lincoln/protocol/brake_60.h), 102 //也就是canbus接收到上层control的commond后通过vehicle_controller_ 103 //更新协议类型数据内的具体成员变量(如刹车这个命令对应的对象内的“刹车量pedal_cmd_”这一成员变量) 104 vehicle_controller_ = vehicle_object->CreateVehicleController(); 105 if (vehicle_controller_ == nullptr) { 106 return OnError("Failed to create vehicle controller."); 107 } 108 AINFO << "The vehicle controller is successfully created."; 109 110 /*vehicle_controller_->Init(...) (实际上是 111 modules/canbus/vehicle/lincoln/lincoln_controller.cc中的LincolnController::Init)里面 112 先生成brake_60_等协议类型数据,接着通过 113 can_sender_->AddMessage(Brake60::ID, brake_60_, false);等将brake_60_等协议类型数据 114 加入can_sender_的成员变量send_messages_(向量),后面can_sender_发送数据时就会将send_messages_ 115 中的各个协议类型数据包含的CAN帧can_frame_to_send_发送到底盘 116 */ 117 if (vehicle_controller_->Init(canbus_conf_.vehicle_parameter(), &can_sender_, 118 message_manager_.get()) != ErrorCode::OK) { 119 return OnError("Failed to init vehicle controller."); 120 } 121 AINFO << "The vehicle controller is successfully initialized."; 122 123 CHECK(AdapterManager::GetControlCommand()) << "Control is not initialized."; 124 CHECK(AdapterManager::GetGuardian()) << "Guardian is not initialized."; 125 // TODO(QiL) : depreacte this 126 //类似原生ROS的添加回调函数,Apollo将topic的发布和订阅都集成到了AdapterManager进行统一管理 127 //Canbus::OnControlCommand就是canbus模块对上层cotrol_command的回调函数 128 if (!FLAGS_receive_guardian) { 129 AdapterManager::AddControlCommandCallback(&Canbus::OnControlCommand, this); 130 } else { 131 AdapterManager::AddGuardianCallback(&Canbus::OnGuardianCommand, this); 132 } 133 134 return Status::OK(); 135 }
Init()主要过程流程图(为方便整合不严格按照代码里的顺序)
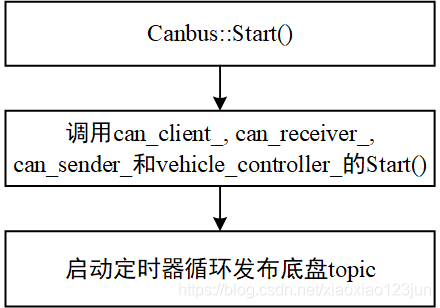
Start()主要过程源码分析
1 /*Init()生成的对象有can_client_ , vehicle_object , message_manager_, 2 vehicle_controller_ , can_receiver_ 和 can_sender_, 3 Start()里面就是调用can_client_, can_receiver_, can_sender_和vehicle_controller_的Start()将 4 它们的功能各自启动起来,比如can_client_ 的Start() (实际上是 5 modules/drivers/canbus/can_client/esd/esd_can_client.cc的Start()) 6 就是调用third_party/can_card_library/esd_can/include/ntcan.h的内置函数canOpen()等设置端口等 7 以启动CAN卡,ntcan.h是买CAN卡的时候附带光盘里的文件,买了开发者套件装好CAN卡以后要把这个文件拷到 8 third_party/can_card_library/esd_can/include/下使用。因为ntcan.h是花钱买的所以就不把ntcan.h 9 的代码放上来了。 10 11 最后启动定时器循环运行Canbus::OnTimer,OnTimer这个函数就是发布底盘信息用的,发布以后 12 订阅底盘topic的上层模块就能接收到底盘信息。 13 */ 14 Status Canbus::Start() { 15 // 1. init and start the can card hardware 16 if (can_client_->Start() != ErrorCode::OK) { 17 return OnError("Failed to start can client"); 18 } 19 AINFO << "Can client is started."; 20 21 // 2. start receive first then send 22 if (can_receiver_.Start() != ErrorCode::OK) { 23 return OnError("Failed to start can receiver."); 24 } 25 AINFO << "Can receiver is started."; 26 27 // 3. start send 28 if (can_sender_.Start() != ErrorCode::OK) { 29 return OnError("Failed to start can sender."); 30 } 31 32 // 4. start controller 33 if (vehicle_controller_->Start() == false) { 34 return OnError("Failed to start vehicle controller."); 35 } 36 37 // 5. set timer to triger publish info periodly 38 const double duration = 1.0 / FLAGS_chassis_freq; 39 timer_ = AdapterManager::CreateTimer(ros::Duration(duration), 40 &Canbus::OnTimer, this); 41 42 // last step: publish monitor messages 43 apollo::common::monitor::MonitorLogBuffer buffer(&monitor_logger_); 44 buffer.INFO("Canbus is started."); 45 46 return Status::OK(); 47 }
Start()主要过程流程图
下面分canbus模块向底盘发送数据和canbus模块从底盘接收数据两部分进行深入分析。
canbus模块向底盘发送数据
主要过程
canbus模块向底盘发送数据的开端在canbus模块接收到上层control_command,因此Canbus::OnControlCommand是发送的开端。
1 void Canbus::OnControlCommand(const ControlCommand &control_command) { 2 int64_t current_timestamp = 3 apollo::common::time::AsInt64<common::time::micros>(Clock::Now()); 4 // if command coming too soon, just ignore it. 5 if (current_timestamp - last_timestamp_ < FLAGS_min_cmd_interval * 1000) { 6 ADEBUG << "Control command comes too soon. Ignore.n Required " 7 "FLAGS_min_cmd_interval[" 8 << FLAGS_min_cmd_interval << "], actual time interval[" 9 << current_timestamp - last_timestamp_ << "]."; 10 return; 11 } 12 13 last_timestamp_ = current_timestamp; 14 ADEBUG << "Control_sequence_number:" 15 << control_command.header().sequence_num() << ", Time_of_delay:" 16 << current_timestamp - control_command.header().timestamp_sec(); 17 18 /*从此处开始的vehicle_controller_->Update(control_command)和can_sender_.Update()是关键 19 正如之前所提到的,vehicle_controller_->Update(control_command)用来更新协议类型数据的 20 成员变量,接着can_sender_.Update()把更新之后的数据通过can_frame_to_update_ 21 赋值给can_frame_to_send_,can_sender_在Start()是开启的发送线程将can_frame_to_send_ 22 通过CAN卡附带驱动内的canWrite()函数注入底盘CAN网络 23 24 这两个Update()涉及的函数比较多,中间挺多跳转,就不放源码了,跳转的过程在后面流程图中给出,具体代码的 25 实现大家还是需要自己去看代码 26 */ 27 if (vehicle_controller_->Update(control_command) != ErrorCode::OK) { 28 AERROR << "Failed to process callback function OnControlCommand because " 29 "vehicle_controller_->Update error."; 30 return; 31 } 32 can_sender_.Update(); 33 }
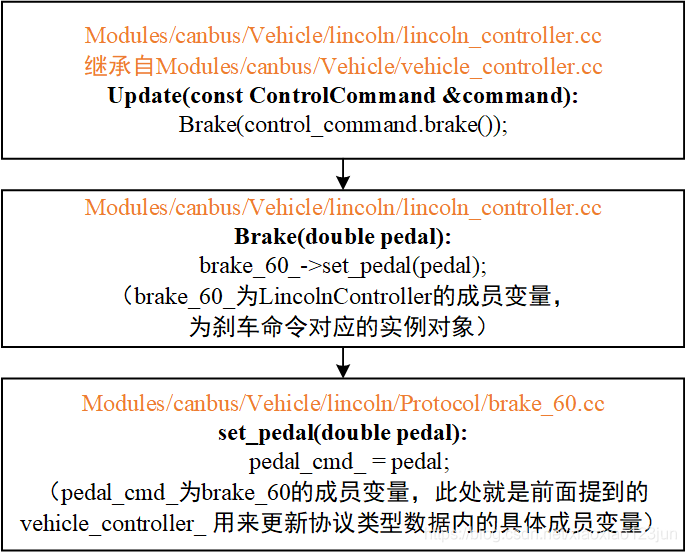
vehicle_controller_->Update流程图(以刹车对应的协议类型数据为例)
can_sender_.Update()流程图(以刹车对应的协议类型数据为例)

canbus模块从底盘接收数据
主要过程
在canbus Start()的时候,can_receiver_.Start()启动了从底盘接收数据的线程,线程内运行CanReceiver::RecvThreadFunc()
1 // 2. start receive first then send 2 if (can_receiver_.Start() != ErrorCode::OK) { 3 return OnError("Failed to start can receiver."); 4 } 5 AINFO << "Can receiver is started."; 6 7 template <typename SensorType> 8 ::apollo::common::ErrorCode CanReceiver<SensorType>::Start() { 9 if (is_init_ == false) { 10 return ::apollo::common::ErrorCode::CANBUS_ERROR; 11 } 12 is_running_ = true; 13 14 thread_.reset(new std::thread([this] { RecvThreadFunc(); })); 15 if (thread_ == nullptr) { 16 AERROR << "Unable to create can client receiver thread."; 17 return ::apollo::common::ErrorCode::CANBUS_ERROR; 18 } 19 return ::apollo::common::ErrorCode::OK; 20 }
RecvThreadFunc()内循环运行can_client_->Receive(&buf, &frame_num)
1 template <typename SensorType> 2 void CanReceiver<SensorType>::RecvThreadFunc() { 3 AINFO << "Can client receiver thread starts."; 4 CHECK_NOTNULL(can_client_); 5 CHECK_NOTNULL(pt_manager_); 6 7 int32_t receive_error_count = 0; 8 int32_t receive_none_count = 0; 9 const int32_t ERROR_COUNT_MAX = 10; 10 std::chrono::duration<double, std::micro> default_period{10 * 1000}; 11 12 while (IsRunning()) { 13 std::vector<CanFrame> buf; 14 int32_t frame_num = MAX_CAN_RECV_FRAME_LEN; 15 if (can_client_->Receive(&buf, &frame_num) != 16 ::apollo::common::ErrorCode::OK) { 17 /* 18 can_client_为modules/drivers/canbus/can_client/esd/esd_can_client.cc的实例化对象, 19 其Receive()函数调用了third_party/can_card_library/esd_can/include/ntcan.h的canRead函数从 20 CAN网络中读取数据并存入buf, 21 const int32_t ret = canRead(dev_handler_, recv_frames_, frame_num, nullptr); 22 buf的定义是std::vector<CanFrame> buf; 23 CanFrame在之前can_sender_.Update()流程图内有分析。 24 */ 25 LOG_IF_EVERY_N(ERROR, receive_error_count++ > ERROR_COUNT_MAX, 26 ERROR_COUNT_MAX) 27 << "Received " << receive_error_count << " error messages."; 28 std::this_thread::sleep_for(default_period); 29 continue; 30 } 31 receive_error_count = 0; 32 33 if (buf.size() != static_cast<size_t>(frame_num)) { 34 AERROR_EVERY(100) << "Receiver buf size [" << buf.size() 35 << "] does not match can_client returned length[" 36 << frame_num << "]."; 37 } 38 39 if (frame_num == 0) { 40 LOG_IF_EVERY_N(ERROR, receive_none_count++ > ERROR_COUNT_MAX, 41 ERROR_COUNT_MAX) 42 << "Received " << receive_none_count << " empty messages."; 43 std::this_thread::sleep_for(default_period); 44 continue; 45 } 46 receive_none_count = 0; 47 48 for (const auto &frame : buf) { 49 uint8_t len = frame.len; 50 uint32_t uid = frame.id; 51 const uint8_t *data = frame.data; 52 pt_manager_->Parse(uid, data, len); 53 /* 54 pt_manager_在Init时被赋值为message_manager_(modules/canbus/vehicle/lincoln 55 /lincoln_message_manager.cc的实例化对象),message_manager_用来解析从CAN网络获取的CanFrame 56 */ 57 if (enable_log_) { 58 ADEBUG << "recv_can_frame#" << frame.CanFrameString(); 59 } 60 } 61 std::this_thread::yield(); 62 } 63 AINFO << "Can client receiver thread stopped."; 64 }
接收CAN数据流程图

至于chassis_datail找不到的问题大家可以从https://blog.csdn.net/M_Alan_walker/article/details/88823610的最后面获得解答。
后记
博主主要是从https://blog.csdn.net/M_Alan_walker/article/details/88823610学习的,加入一些自己的理解,有些分析得不完善的地方大家在上面的网址可以得到更详细的补充。