自己实现spring核心功能 二
- 2019 年 10 月 3 日
- 筆記
前言
上一篇我们讲了spring的一些特点并且分析了需要实现哪些功能,已经把准备工作都做完了,这一篇我们开始实现具体功能。
容器加载过程
我们知道,在spring中refesh()方法做了很多初始化的工作,它几乎涵盖了spring的核心流程
public void refresh() throws BeansException, IllegalStateException { synchronized (this.startupShutdownMonitor) { //刷新之前的准备工作,包括设置启动时间,是否激活标识位,初始化属性源(property source)配置 prepareRefresh(); //由子类去刷新BeanFactory(如果还没创建则创建),并将BeanFactory返回 ConfigurableListableBeanFactory beanFactory = obtainFreshBeanFactory(); //准备BeanFactory以供ApplicationContext使用 prepareBeanFactory(beanFactory); try { //子类可通过格式此方法来对BeanFactory进行修改 postProcessBeanFactory(beanFactory); //实例化并调用所有注册的BeanFactoryPostProcessor对象 invokeBeanFactoryPostProcessors(beanFactory); //实例化并调用所有注册的BeanPostProcessor对象 registerBeanPostProcessors(beanFactory); //初始化MessageSource initMessageSource(); //初始化事件广播器 initApplicationEventMulticaster(); //子类覆盖此方法在刷新过程做额外工作 onRefresh(); //注册应用监听器ApplicationListener registerListeners(); //实例化所有non-lazy-init bean finishBeanFactoryInitialization(beanFactory); //刷新完成工作,包括初始化LifecycleProcessor,发布刷新完成事件等 finishRefresh(); } catch (BeansException ex) { // Destroy already created singletons to avoid dangling resources. destroyBeans(); // Reset 'active' flag. cancelRefresh(ex); // Propagate exception to caller. throw ex; } } }
做的东西比较复杂,而我们实现做些基本的就好了。
我们在CJDispatcherServlet 类的init方法中,实现如下业务逻辑,就能将spring功能给初始化了,就可以使用依赖注入了
@Override public void init(ServletConfig config) { //加载配置 //获取要扫描的包地址 //扫描要加载的类 //实例化要加载的类 //加载依赖注入,给属性赋值 //加载映射地址 }
加载配置
String contextConfigLocation = config.getInitParameter("contextConfigLocation"); loadConfig(contextConfigLocation);
这里会获取到web.xml中init-param节点中的值

具体指向的是spring文件下的application.properties配置文件,里面只有一行配置

通过配置的key名字可以知道,这是指定了需要扫描的包路径
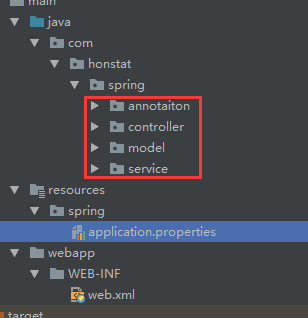
代表的是扫描红框中定义的所有类

第二行代码是创建了一个loadConfig方法,将包路径传进去
void loadConfig(String contextConfigLocation) { InputStream is = this.getClass().getClassLoader().getResourceAsStream(contextConfigLocation); try { properties.load(is); } catch (IOException e) { e.printStackTrace(); } finally { if (null != is) { try { is.close(); } catch (IOException e) { e.printStackTrace(); } } } }
黃色部分的代码需要注意,这里使用了一个成员变量
private Properties properties = new Properties();
在类的上半部分定义就好了,这里的作用是获取application.properties文件中的配置内容加载到properties变量中,供后面使用。
获取要扫描的包地址
//获取要扫描的包地址 String dirpath = properties.getProperty("scanner.package");
这里使用配置中的key读取出目录地址
扫描要加载的类
//扫描要加载的类 doScanner(dirpath);
扫描类我们定义一个doScanner方法,把包目录地址传进去
1 void doScanner(String dirpath) { 2 URL url = this.getClass().getClassLoader().getResource("/" + dirpath.replaceAll("\.", "/")); 3 File dir = new File(url.getFile()); 4 File[] files = dir.listFiles(); 5 for (File file : files) { 6 if (file.isDirectory()) { 7 doScanner(dirpath + "." + file.getName()); 8 continue; 9 } 10 11 //取文件名 12 String beanName = dirpath + "." + file.getName().replaceAll(".class", ""); 13 beanNames.add(beanName); 14 } 15 }
第二行代码进行了转义替换
本方法内的代码作业是读取指定路径下的文件,如果是文件夹,则递归调用,如果是文件,把文件名称和路径存进集合容器内
需要注意黄色部分的变量,是在外部定义了一个成员变量
private List<String> beanNames = new ArrayList<>();
我们在类的上半部分加上它。
得到的beanName如下

从这里看出,它已经把我们定义的注解给找出来了。

实例化要加载的类
//实例化要加载的类 doInstance();
刚才我们已经得到了这些定义好的类的名称列表,现在我们需要一个个实例化,并且保存在ioc容器当中。
先定义个装载类的容器,使用HashMap就能做到,将它设为成员变量,在类的上半部分定义
private Map<String, Object> ioc = new HashMap<>();
接着创建一个方法doInstance
1 void doInstance() { 2 if (beanNames.isEmpty()) { 3 return; 4 } 5 for (String beanName : beanNames) { 6 try { 7 Class cls = Class.forName(beanName); 8 if (cls.isAnnotationPresent(JCController.class)) { 9 //使用反射实例化对象 10 Object instance = cls.newInstance(); 11 //默认类名首字母小写 12 beanName = firstLowerCase(cls.getSimpleName()); 13 //写入ioc容器 14 ioc.put(beanName, instance); 15 16 17 } else if (cls.isAnnotationPresent(JCService.class)) { 18 Object instance = cls.newInstance(); 19 JCService jcService = (JCService) cls.getAnnotation(JCService.class); 20 21 String alisName = jcService.value(); 22 if (null == alisName || alisName.trim().length() == 0) { 23 beanName = cls.getSimpleName(); 24 } else { 25 beanName = alisName; 26 } 27 beanName = firstLowerCase(beanName); 28 ioc.put(beanName, instance); 29 //如果是接口,自动注入它的实现类 30 Class<?>[] interfaces = cls.getInterfaces(); 31 for (Class<?> c : 32 interfaces) { 33 ioc.put(firstLowerCase(c.getSimpleName()), instance); 34 } 35 } else { 36 continue; 37 } 38 } catch (ClassNotFoundException e) { 39 e.printStackTrace(); 40 } catch (IllegalAccessException e) { 41 e.printStackTrace(); 42 } catch (InstantiationException e) { 43 e.printStackTrace(); 44 } 45 } 46 }
只要提供类的完全限定名,通过Class.forName静态方法,我们就能将类信息加载到内存中并且返回Class 对象,通过反射来实例化,见第10行代码,
我们通过循环beanNames集合,来实例化每个类,并将实例化后的对象装入HashMap中
注意:第12行将类名的首字母小写后存入map,该方法定义如下
1 String firstLowerCase(String str) { 2 char[] chars = str.toCharArray(); 3 chars[0] += 32; 4 return String.valueOf(chars); 5 }
这行代码会将字符串转成char数组,然后将数组中第一个字符转为大写,这里采用了一种比较巧妙的方式实现,tom老师采用了一种比较骚的操作
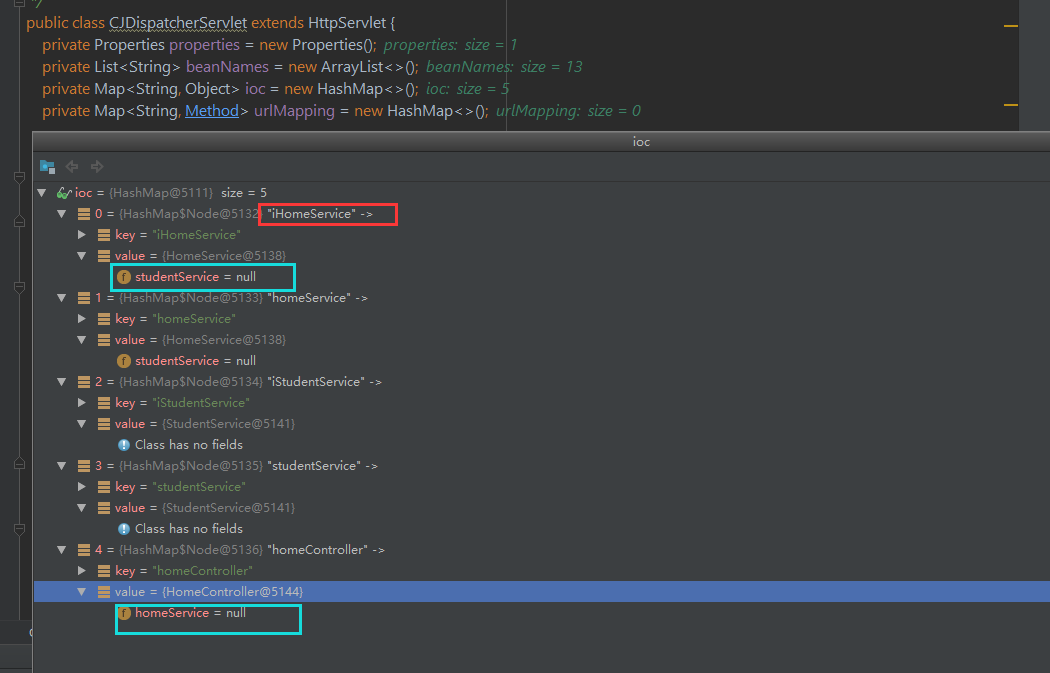
实例化完成后,ioc容器中的数据如下:

说明:
图片中可以看出,hashMap的key 都是小写,value已经是对象了 ,见红框。
这里为什么要把蓝框标记出来,是因为这是类中的字段属性,此时可以看到,虽然类已经被实例化了,可是属性还是null呢
我这里为了测试依赖注入,所以加了2个接口和2个实现类
接口定义如下:

public interface IHomeService { String sayHi(); String getName(Integer id,String no); String getRequestBody(Integer id, String no, GetUserInfo userInfo); } public interface IStudentService { String sayHi(); }
View Code
实现类:

@JCService public class StudentService implements IStudentService{ @Override public String sayHi(){ return "Hello world!"; } }
View Code

@JCService public class HomeService implements IHomeService{ @JCAutoWrited StudentService studentService; @Override public String sayHi() { return studentService.sayHi(); } @Override public String getName(Integer id,String no) { return "SB0000"+id; } @Override public String getRequestBody(Integer id, String no, GetUserInfo userInfo) { return "userName="+userInfo.getName()+" no="+no; } }
View Code
依赖实体:

public class GetUserInfo { public String getName() { return name; } public void setName(String name) { this.name = name; } public Integer getAge() { return age; } public void setAge(Integer age) { this.age = age; } public BigDecimal getGrowthValue() { return growthValue; } public void setGrowthValue(BigDecimal growthValue) { this.growthValue = growthValue; } private String name; private Integer age; private BigDecimal growthValue; }
View Code
加载依赖注入,给属性赋值
//加载依赖注入,给属性赋值 doAutoWrited();
现在我们实现依赖注入,需要定义一个无参的方法doAutoWrite
1 void doAutoWrited() { 2 for (Map.Entry<String, Object> obj : ioc.entrySet()) { 3 try { 4 for (Field field : obj.getValue().getClass().getDeclaredFields()) { 5 if (!field.isAnnotationPresent(JCAutoWrited.class)) { 6 continue; 7 } 8 JCAutoWrited autoWrited = field.getAnnotation(JCAutoWrited.class); 9 String beanName = autoWrited.value(); 10 if ("".equals(beanName)) { 11 beanName = field.getType().getSimpleName(); 12 } 13 14 field.setAccessible(true); 15 16 field.set(obj.getValue(), ioc.get(firstLowerCase(beanName))); 17 } 18 } catch (IllegalAccessException e) { 19 e.printStackTrace(); 20 } 21 22 } 23 24 25 }
这个方法是通过循环ioc里面的实体,反射找出字段,看看是否有需要注入的标记JCAutoWrited,如果加了标记,就反射给字段赋值,类型从ioc容器中获取
加载映射地址
//加载映射地址 doRequestMapping();
映射地址的作用是根据请求的url匹配method方法
1 void doRequestMapping() { 2 if (ioc.isEmpty()) { 3 return; 4 } 5 for (Map.Entry<String, Object> obj : ioc.entrySet()) { 6 if (!obj.getValue().getClass().isAnnotationPresent(JCController.class)) { 7 continue; 8 } 9 Method[] methods = obj.getValue().getClass().getMethods(); 10 for (Method method : methods) { 11 if (!method.isAnnotationPresent(JCRequestMapping.class)) { 12 continue; 13 } 14 String baseUrl = ""; 15 if (obj.getValue().getClass().isAnnotationPresent(JCRequestMapping.class)) { 16 baseUrl = obj.getValue().getClass().getAnnotation(JCRequestMapping.class).value(); 17 } 18 JCRequestMapping jcRequestMapping = method.getAnnotation(JCRequestMapping.class); 19 if ("".equals(jcRequestMapping.value())) { 20 continue; 21 } 22 String url = (baseUrl + "/" + jcRequestMapping.value()).replaceAll("/+", "/"); 23 urlMapping.put(url, method); 24 System.out.println(url); 25 } 26 } 27 }
这里其实就是根据对象反射获取到JCRequestMapping上面的value值
@JCRequestMapping(“/sayHi”)
取到的就是/sayHi
另外注意的是:黄色部分使用的变量是一个hashMap,在类上半部分定义的
private Map<String, Method> urlMapping = new HashMap<>();

这里面存的是 url 和对应的method对象。后面处理请求的时候要使用到的。
结尾
容器的初始化到这里就结束了,一共使用了4个容器来存放相关对象,后续servlet处理请求的时候会用到它们。
下一篇,将会继续完善它,通过请求来验证是否可以达到预期效果。另外会实现参数绑定,能处理各类请求并响应。

